> ## Documentation Index
> Fetch the complete documentation index at: https://docs.chainstack.com/llms.txt
> Use this file to discover all available pages before exploring further.
# Deep dive into Merkle proofs and eth_getProof
> Understand Merkle proofs and use eth_getProof to verify Ethereum account state and storage slots without trusting a full node for data authenticity.
This tutorial uses **web3.js**, which is [no longer maintained](https://github.com/web3/web3.js) (ChainSafe sunset it in 2025). For new projects, use [ethers.js or viem](/docs/ethereum-tooling) — the concepts here still apply; only the library calls differ.
**TLDR**
* Introduces the eth\_getProof method, which returns a Merkle proof of an account’s state and storage at a specific block.
* Explains Ethereum’s Merkle trie structure and how merkle proofs allow verifying account/storage data without downloading the entire state.
* Demonstrates retrieving a proof for an ERC-20 contract (e.g. USDT) and shows a sample Python script to verify that proof off-chain.
* Reminds that archive nodes are required and that eth\_getProof is supported on both Geth (no block limit) and Erigon (100,000-block limit).
## Main article
`eth_getProof` is an Ethereum JSON-RPC method. It returns the Merkle proof of a specific account and its storage at a given block. If you're not familiar with these terms, don't worry. Most people don't understand them. By the end of this article, you should have a better understanding of what `eth_getProof` is and how to use it.
eth\_getProof requires an archive node.
## The Merkle trie
`eth_getProof` was proposed in [EIP-1186](https://eips.ethereum.org/EIPS/eip-1186). The proposal summary states the following:
> In order to allow verification of accounts outside the client, we need an additional function delivering us the required proof. These proofs are important to secure Layer2-Technologies.
But how does the proof work?
In the Chainstack blog **[Deep dive into eth\_call](https://chainstack.com/deep-dive-into-eth_call/)**, we discuss how Ethereum uses Merkle tries for data storage. There are four types of tries used by Ethereum:
* State trie
* Storage trie
* Receipt trie
* Transaction trie
The state trie of Ethereum is like a real tree in some ways. All the account information is stored at the end of the branches, which are represented by the leaves.
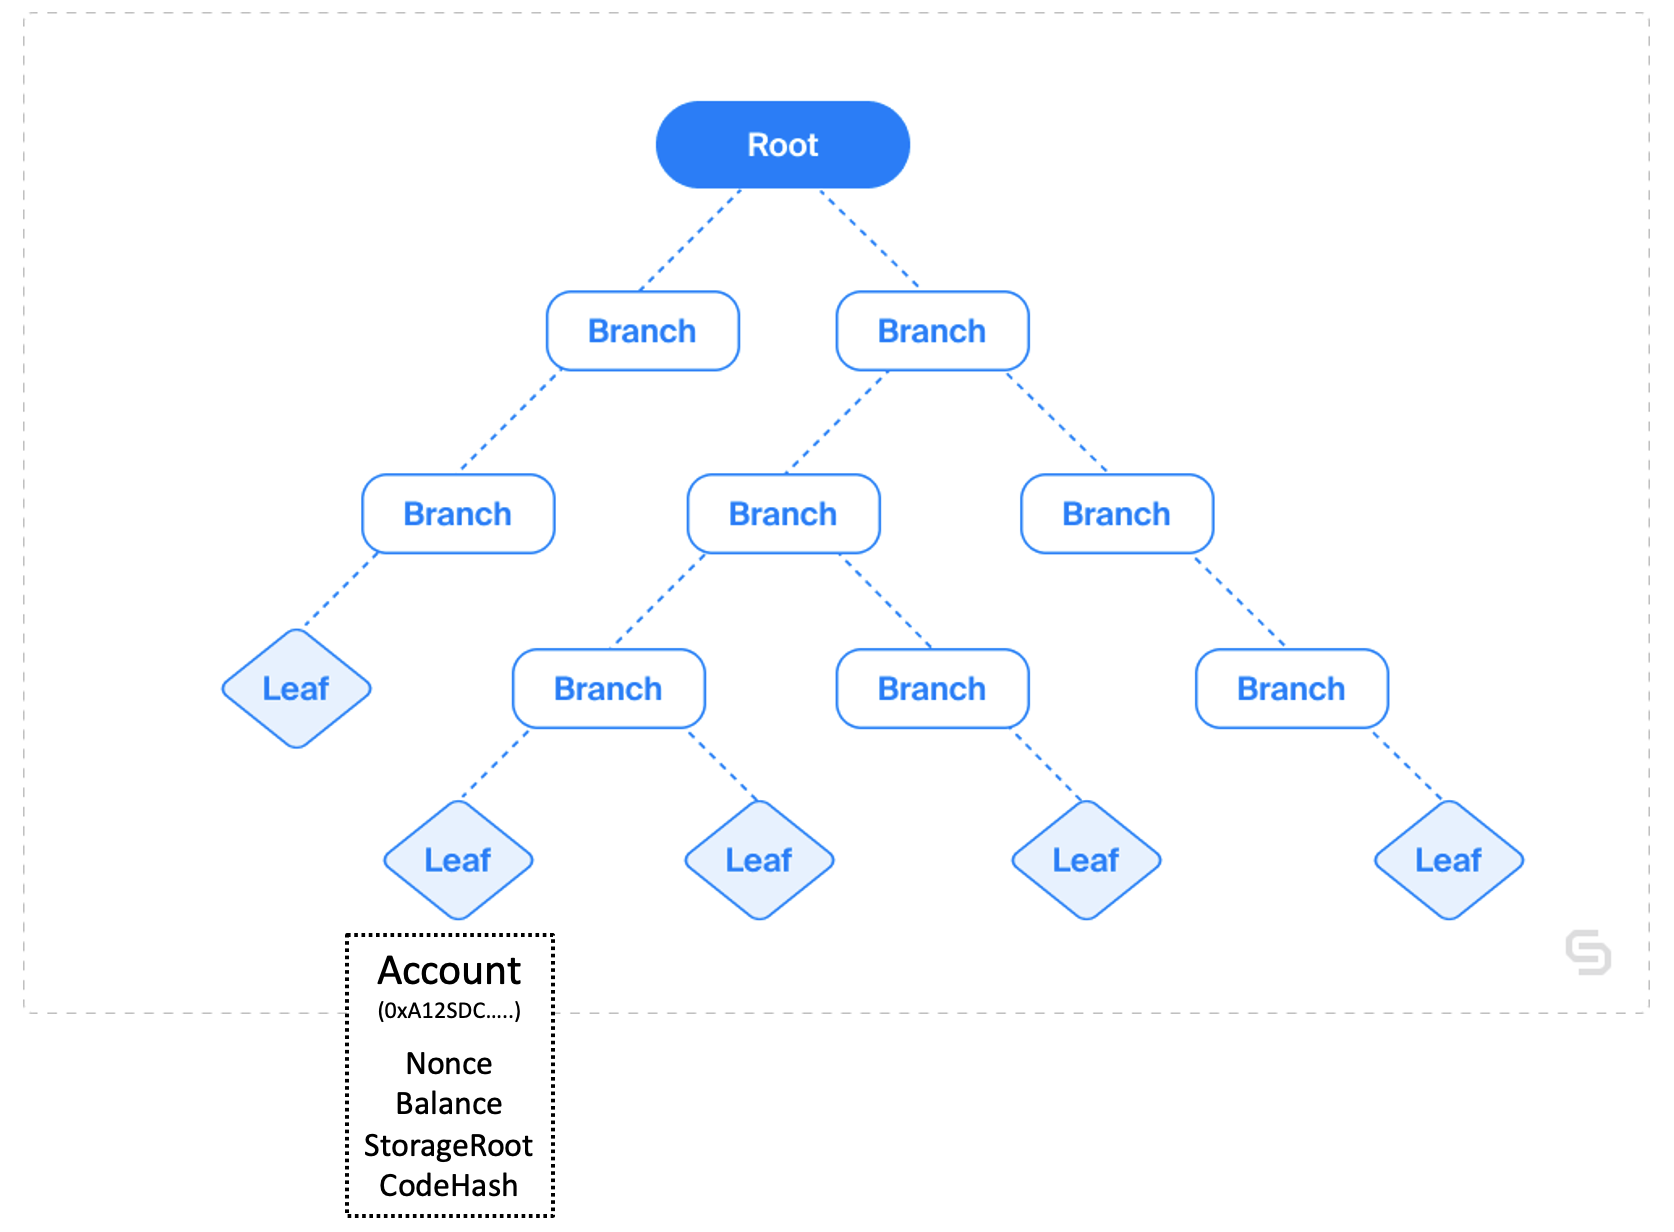 Each block has a unique hash value that references the storage root. In a full mode, which has access to the most recent 128 blocks, there are 128 isolated state tries (in reality, it is slightly more complicated than this). When the EVM needs to access the account state, it uses the block number to find the proper root hash, then uses the root hash to determine which trie to query, and finally traverses down the branches to identify the correct leaf containing the account information.
## Merkle proof
Now, here's the question: we have account information (`storageRoot`, `codeHash`, balance, and `nonce`); how do we verify this information’s authenticity and correctness? The answer is by using the storage root hash.
For Ethereum, the final root hash is derived by hashing every layer of the trie.
Each block has a unique hash value that references the storage root. In a full mode, which has access to the most recent 128 blocks, there are 128 isolated state tries (in reality, it is slightly more complicated than this). When the EVM needs to access the account state, it uses the block number to find the proper root hash, then uses the root hash to determine which trie to query, and finally traverses down the branches to identify the correct leaf containing the account information.
## Merkle proof
Now, here's the question: we have account information (`storageRoot`, `codeHash`, balance, and `nonce`); how do we verify this information’s authenticity and correctness? The answer is by using the storage root hash.
For Ethereum, the final root hash is derived by hashing every layer of the trie.
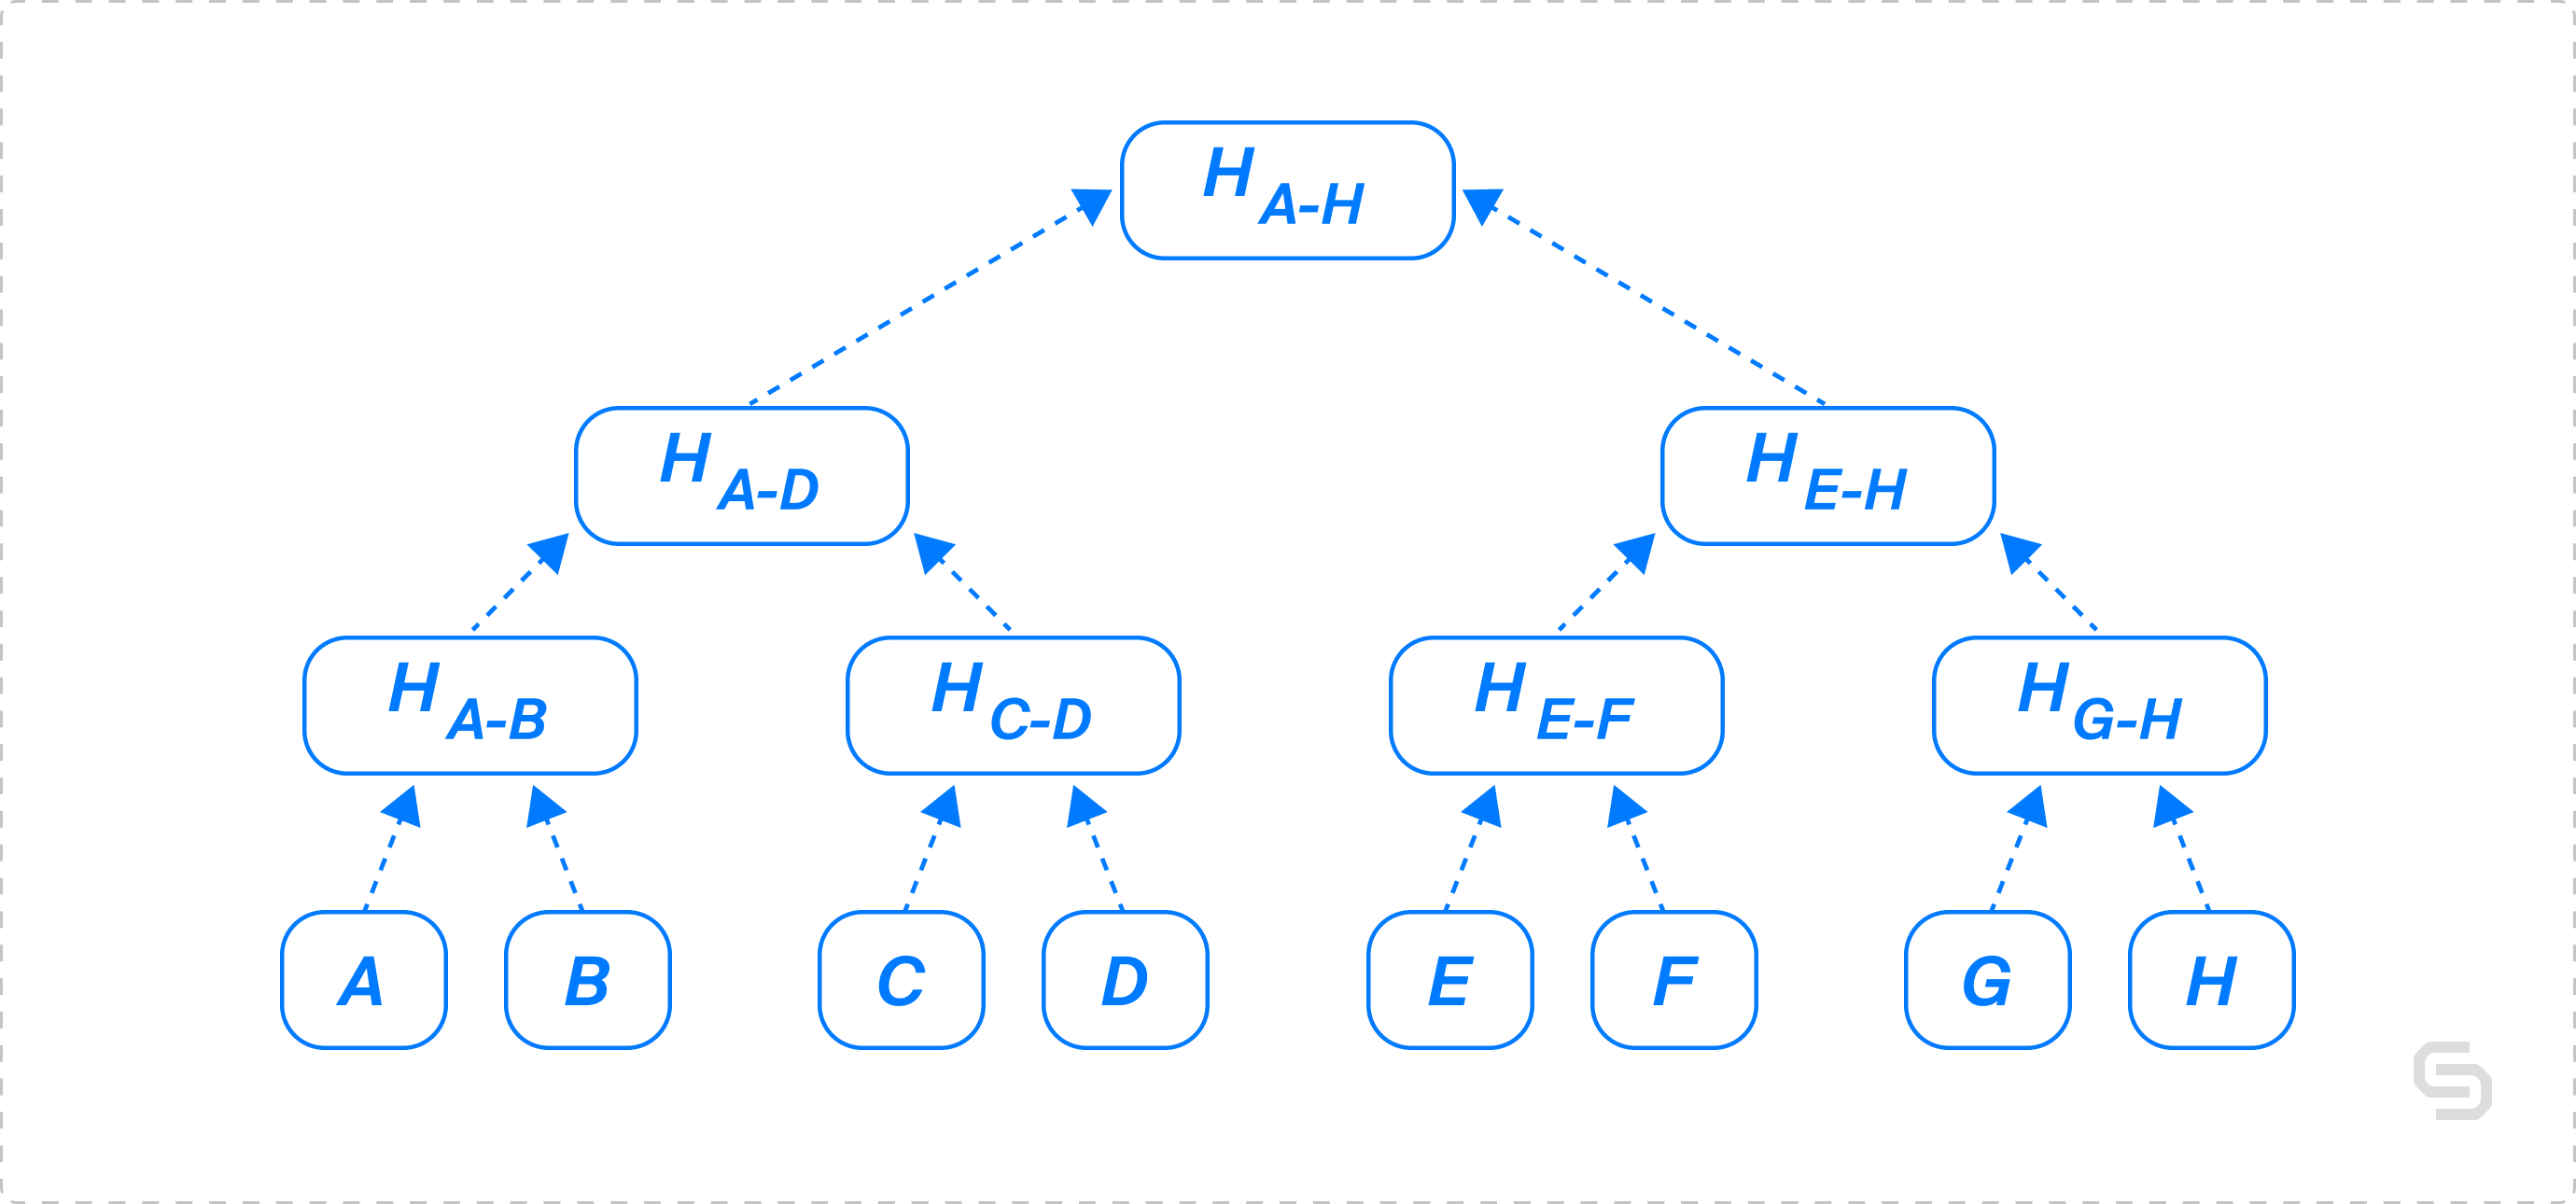 [Merkle proofs for offline data integrity](https://ethereum.org/en/developers/tutorials/merkle-proofs-for-offline-data-integrity/)
```javascript stateRootHash theme={"system"}
//In a very simplified fashion
stateRootHash = hash(
hash(
hash(hash(A)+hash(B))+hash(hash(C)+hash(D))
)+
hash(
hash(hash(E)+hash(F))+hash(hash(G)+hash(H))
)
)
```
The final root hash is computed by hashing all the sub-nodes in the state trie. If any of the account information differs from the original, the resulting root hash will also be different. Therefore, any account information can be verified using an authenticated root hash.
For example, consider the following Ethereum account: `0xdac17f958d2ee523a2206206994597c13d831ec7`.
At block `16947990`, its account information is as follows:
```javascript Account states theme={"system"}
0xdac17f958d2ee523a2206206994597c13d831ec7{
balance : '1',
codeHash : '0xb44fb4e949d0f78f87f79ee46428f23a2a5713ce6fc6e0beb3dda78c2ac1ea55',
nonce : '1',
storageHash : '0x171b13e236ba0fd523b341866fdd3db37aeb8eb9bb578e819cbd983971309e3c'
}
```
The state root hash at block `16947990` is: `0x98612efbedabf19646d53f903810e156143d3174a4e985b00cbf01dc257431d1`
If any of the account information does not match the original value, the final root hash will not match `0x98612efbedabf19646d53f903810e156143d3174a4e985b00cbf01dc257431d1`. Therefore, we can prove that this information is incorrect.
Here comes another question: do we need every account's information to produce a proof? The answer is obviously no. With millions of accounts on the blockchain, it is not feasible to retrieve all these data just to verify one single account, especially for off-chain verification.
In fact, to verify account C, we don’t really need the information from leaf nodes A, B, D, E, F, G, H; we just need the hash of the intermediate branch nodes.
[Merkle proofs for offline data integrity](https://ethereum.org/en/developers/tutorials/merkle-proofs-for-offline-data-integrity/)
```javascript stateRootHash theme={"system"}
//In a very simplified fashion
stateRootHash = hash(
hash(
hash(hash(A)+hash(B))+hash(hash(C)+hash(D))
)+
hash(
hash(hash(E)+hash(F))+hash(hash(G)+hash(H))
)
)
```
The final root hash is computed by hashing all the sub-nodes in the state trie. If any of the account information differs from the original, the resulting root hash will also be different. Therefore, any account information can be verified using an authenticated root hash.
For example, consider the following Ethereum account: `0xdac17f958d2ee523a2206206994597c13d831ec7`.
At block `16947990`, its account information is as follows:
```javascript Account states theme={"system"}
0xdac17f958d2ee523a2206206994597c13d831ec7{
balance : '1',
codeHash : '0xb44fb4e949d0f78f87f79ee46428f23a2a5713ce6fc6e0beb3dda78c2ac1ea55',
nonce : '1',
storageHash : '0x171b13e236ba0fd523b341866fdd3db37aeb8eb9bb578e819cbd983971309e3c'
}
```
The state root hash at block `16947990` is: `0x98612efbedabf19646d53f903810e156143d3174a4e985b00cbf01dc257431d1`
If any of the account information does not match the original value, the final root hash will not match `0x98612efbedabf19646d53f903810e156143d3174a4e985b00cbf01dc257431d1`. Therefore, we can prove that this information is incorrect.
Here comes another question: do we need every account's information to produce a proof? The answer is obviously no. With millions of accounts on the blockchain, it is not feasible to retrieve all these data just to verify one single account, especially for off-chain verification.
In fact, to verify account C, we don’t really need the information from leaf nodes A, B, D, E, F, G, H; we just need the hash of the intermediate branch nodes.
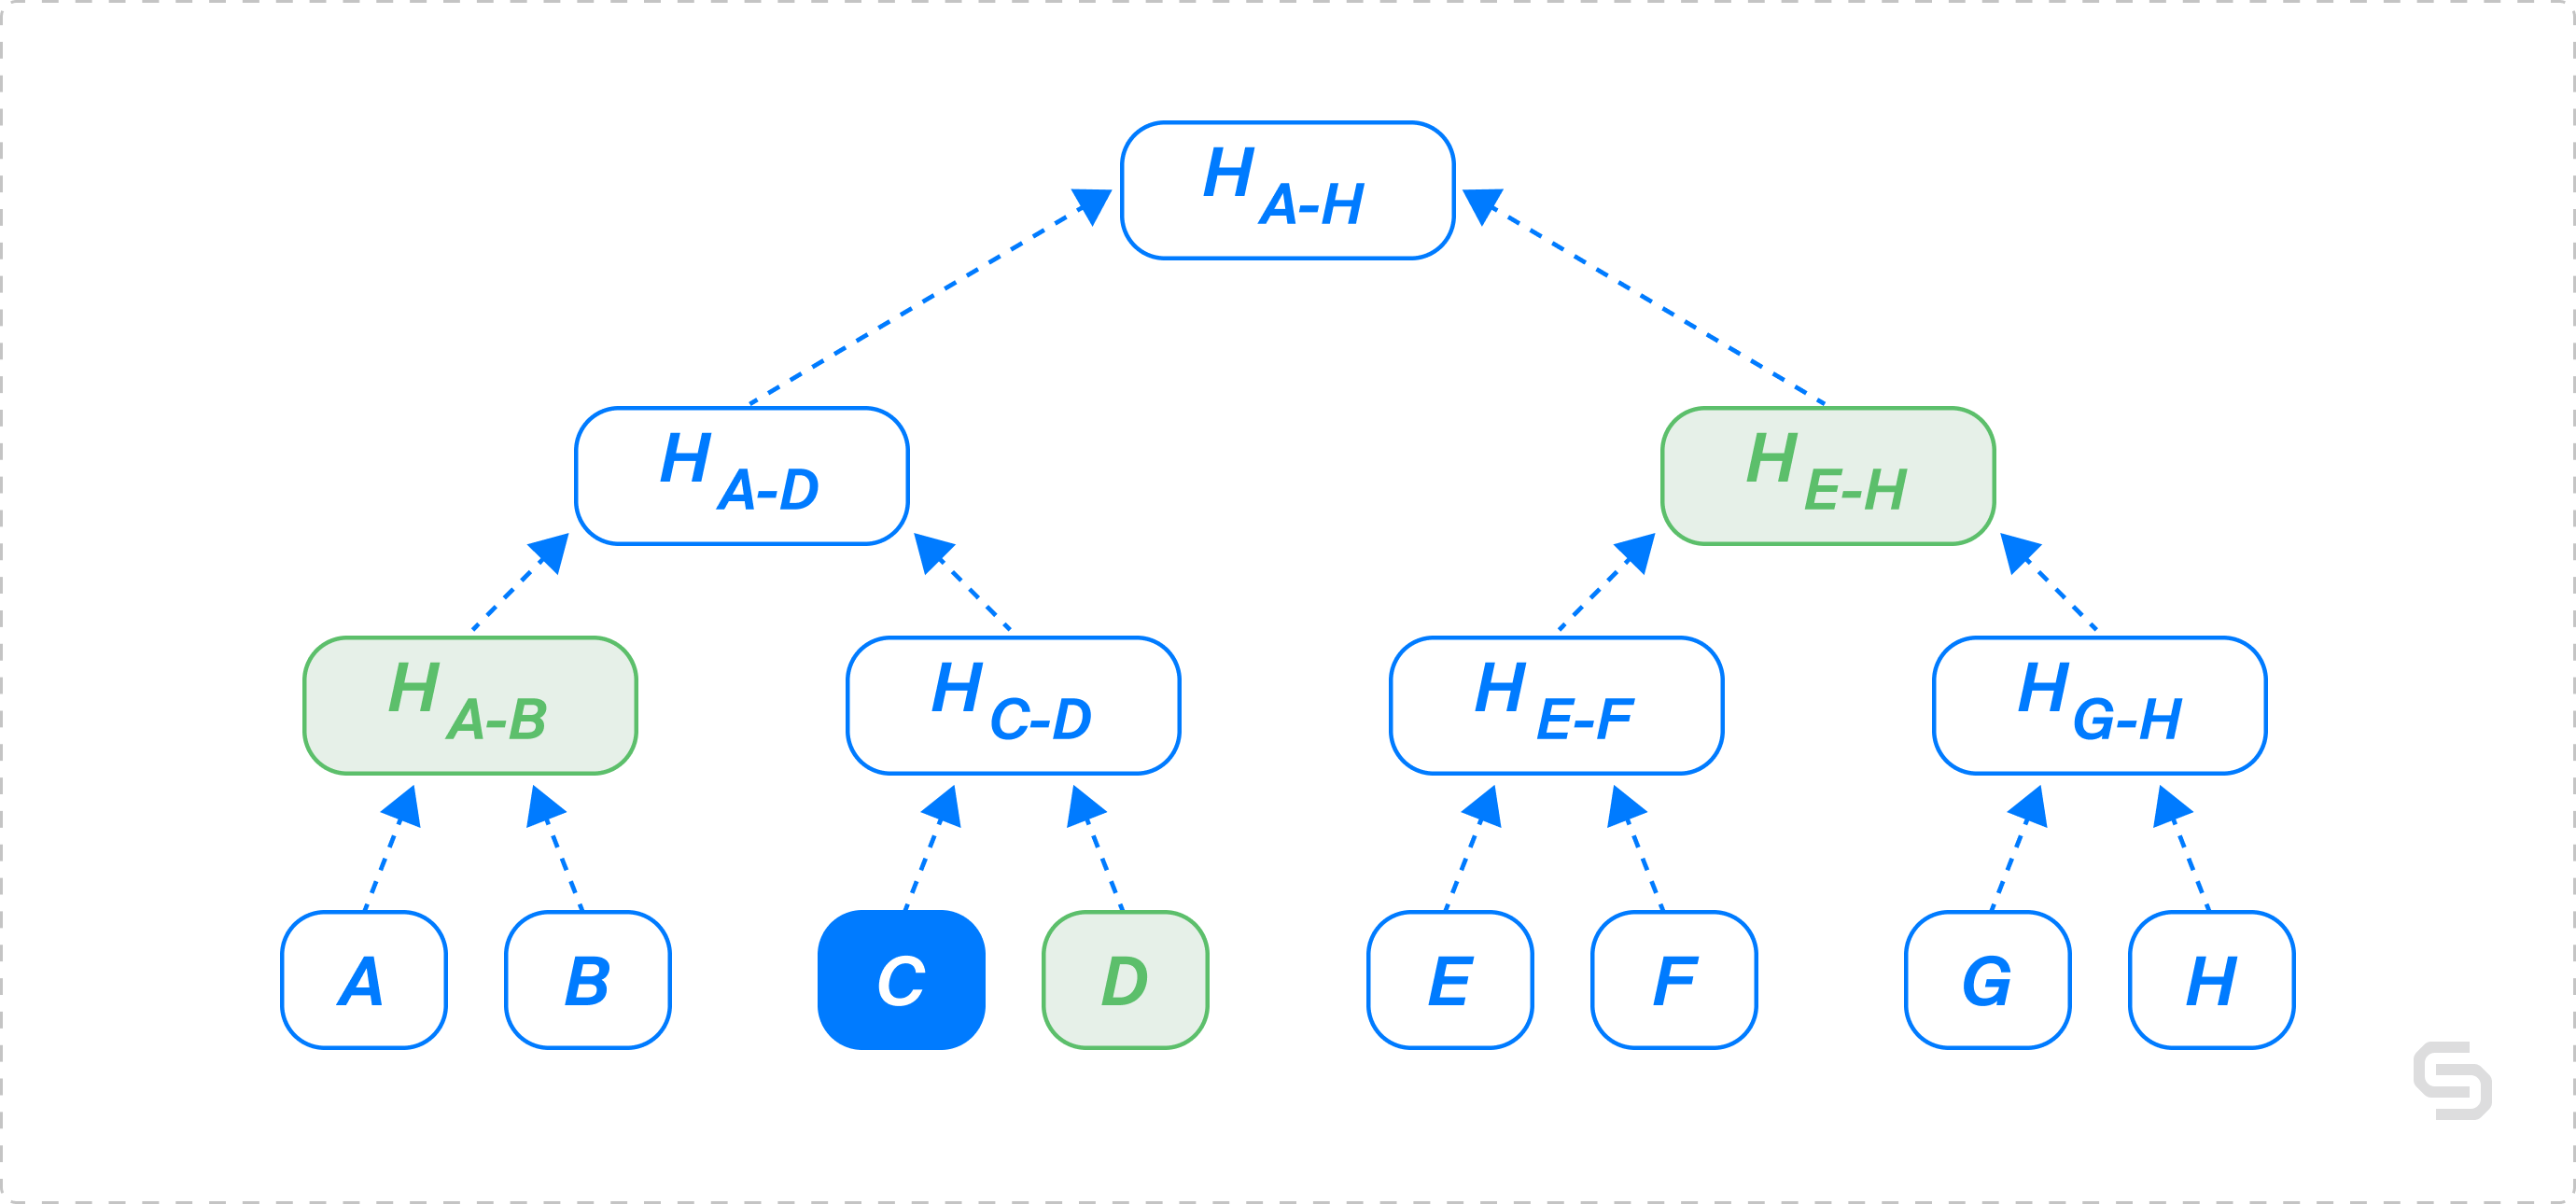 [Merkle proofs for offline data integrity](https://ethereum.org/en/developers/tutorials/merkle-proofs-for-offline-data-integrity/)
If the value of `hashEFGH`, `hashAB`, and `hashD` are known:
```javascript Nodes hashes theme={"system"}
const hashEFGH = hash(hash(hash(E)+hash(F))+hash(hash(G)+hash(H)))
const hashAB = hash(hash(A)+hash(B))
const hashD = hash(D)
```
The original equation becomes:
```javascript stateRootHash theme={"system"}
//In a very simplified fashion
stateRootHash = hash(hash(hashAB + hash(hash(C)+hashD)+ hashEFGH)
```
This is much easier, isn't it?
Essentially, `eth_getProof` returns the values of `hashEFGH`, `hashAB`, and `hashD`. It is also known as Merkle proof.
Merkle proof doesn't only work for account information but also for storage information. Storage refers to the data that lives within an account, such as the owner and balance mapping from an ERC-20 token smart contract.
## eth\_getProof
`eth_getProof` returns the Merkle proof for a specific account and its associated storage values. Merkle proofs are used to verify the inclusion of a certain piece of data within a Merkle trie.
### Parameters
* `DATA` — Ethereum address of the account for which the proof is requested
* `ARRAY` — the array of 32-byte storage keys that need to be proven and included. See [eth\_getStorageAt](/reference/ethereum-getstorageat) in the API reference.
* `QUANTITY|TAG` — the integer block number identifying the block for which the proof is requested or a string tag such as `"latest"` or `"earliest"`.
### Response
`Object` — an account object with:
* `balance`: `QUANTITY` — the balance of the account. See [eth\_getBalance](/reference/ethereum-getbalance) in the API reference.
* `codeHash`: `DATA`— the code hash of the account. For a simple account without code, it will return `"0xc5d2460186f7233c927e7db2dcc703c0e500b653ca82273b7bfad8045d85a470"`.
* `nonce`: `QUANTITY` — the nonce of the account. See [eth\_getTransactionCount](/reference/ethereum-gettransactioncount).
* `storageHash`: `DATA` — SHA3 of the `StorageRoot`. All storage will deliver a Merkle proof starting with this root hash. This hash is used as the starting point to retrieve a Merkle proof for all storage entries associated with the account.
* `accountProof`: `ARRAY` — the array of RLP-serialized Merkle trie nodes, starting with the stateRoot-Node, following the path of the SHA3 (address) as key, and can be used to prove the existence and validity of a piece of data in the trie.
* `storageProof`: `ARRAY` — the requested array of storage entries, where each entry is represented as an object that includes the following properties:
* `key`: `QUANTITY` — the requested storage key
* `value`: `QUANTITY` — the storage value
* `proof`: `ARRAY` — the array of RLP-serialized Merkle trie nodes, starting with the `storageHash-Node`, following the path of the SHA3 (key) as the path.
Source: [EIP-1186 specification](https://eips.ethereum.org/EIPS/eip-1186)
See the following code samples:
```bash cURL theme={"system"}
curl "YOUR_CHAINSTACK_ENDPOINT" \
-X POST \
-H "Content-Type: application/json" \
-d '{"id": 1,"jsonrpc": "2.0","method": "eth_getProof","params": ["0xdac17f958d2ee523a2206206994597c13d831ec7",["0x9c7fca54b386399991ce2d6f6fbfc3879e4204c469d179ec0bba12523ed3d44c"],"latest"]}'
```
```js web3.js theme={"system"}
const Web3 = require('web3');
const web3 = new Web3(new Web3.providers.HttpProvider('YOUR_CHAINSTACK_ENDPOINT'));
async function main() {
// Gets the Merkle proof of USDT's smart contract
var proof = await web3.eth.getProof(
"0xdac17f958d2ee523a2206206994597c13d831ec7", [
//Storage slot hash, value = keccak256(storage address + slot index)
"0x9c7fca54b386399991ce2d6f6fbfc3879e4204c469d179ec0bba12523ed3d44c"
],
"latest"
)
var block = await web3.eth.getBlock("latest")
//state root is very important for Merkle verification
var stateRoot = block.stateRoot
console.log("state root:" + stateRoot)
console.log(proof)
}
main();
```
```py web3.py theme={"system"}
from web3 import Web3
httpUrl = "YOUR_CHAINSTACK_ENDPOINT"
w3 = Web3(Web3.HTTPProvider(httpUrl))
proof = w3.eth.get_proof('0xdAC17F958D2ee523a2206206994597C13D831ec7', ["0x9c7fca54b386399991ce2d6f6fbfc3879e4204c469d179ec0bba12523ed3d44c"], "latest")
print(proof)
```
Sample result:
```shell Shell theme={"system"}
{
address: '0xdAC17F958D2ee523a2206206994597C13D831ec7',
accountProof: [
'0xf90211a06a718c2c9da77c253b12d7b2569657901e37bb691718f5dda1b86157ab1dd5eda0e7f19ed5e21bccc8d3260236b24f80ad88b3634f5d005f37b838881f0e12f1bda0abb301291704e4d92686c0f5f8ebb1734185321559b8d717ffdca95c99591976a0d0c2026bfab65c3b95276bfa82af9dec860b485f8857f293c148d63a2182128fa0c98044ec9a1273a218bed58b478277dd39173ad7b8edb95c200423a6bc8fc25fa056e5a55d9ddccdbf49362857200bbb1f042d61187c9f5f9ddcff5d2f1fc984a2a02a5b7200af424114f99a4b5f0a21c19aac82209e431ed80bfde177adb1004bdfa0026e4374f0518ff44a80fa374838ecb86cc64ac93bb710fea6dff4198f947b27a03fea341d87984673ad523177ed52f278bf4d8f97e6531c8ece932aeede4802f4a0bfe2f4a7fcb78f7e9f080dea7b6977fb1d88c441696e4456dad92b9d34ff0f43a02a3eb5c0edb14626c9c629601027bd60178bb2b688a67cea4d179fc432436615a0747355b8e02f3b884b4ffe5cea1619e32515fea064cca98208591af8c744e894a0874253737bae37f020ad3bb7e3292c7c4a63cdc158af6b33aaa4deaef016dccba03d8192bc1fc6aa1548912e763a0b5013a94399cefad7b47cf388873b2b794068a09b67f9737c6028d796bfd1c5da57a6f45824dc891f848ea0e1f8019d1fb5fba8a0aa871f9de8da85960fcd8a22cdf21c27f11e3966c14a6737ffd414b98dda00b280',
'0xf90211a0d360be1e1da1a0c32bc4c105833bd531e59d110684007b7c50fb2709002973eca0cf6dd1e350a7031b4e2ab49c899fd8bd47551c8565d8fd8d1d7796c83820c3b1a0eb0a88c29bb33989a589156f7bf07d9efc74034dd9d3f5b73385c3b45c3249bea02783c25f97a6ddb8dc07adf4b176991836d39184b1f678adeda832fff15e3664a00a4e288060045e587774d8a64993a7add73068b16863145e1e8eeb4602e18e19a0340851f4046ad1298962d6e47d05c66329549c839c158748aaad7ae00b943aefa085b127bc2a3bd17604283de21b2b3c9aa8f1d4b7b85c94d8105a46fe32c77688a00f531d62b3c5435324c01009c284fe31277e8d38302b75ea01be89f09e205969a00011c8351c0e3d639ac54b9d3a59de630b16a67de8270d7d6064d0a67e93f9cca048780d32b7f2db88650b51c46f46fd0a68795edee1fd5ecee6eb3595741d9669a0c91afd74eaf8e08a997061a62b354e2516fdc494e8e26cc50ceeb8f4a175608ba0e2c07f1b48fab80eecb340f5882e8c7b32ee416e4045c61f1df646a133487303a01a1eff78435a7a29a29463bdc3486ae81364b00bea82ba0fdf67a110770f2261a04f2eb440ba71c72da5fd7f0e439018d6671dc809f747213a1ea755848124e994a074ff9f37fce99daa3ed01dd763076450022996fc729be2cc43c61ec5182c2366a0b80b36b7b621112592f52390b89748d422e9b1517c4b0203b8176a53f89d4a6680',
'0xf90211a0b25f283bd01a8c8b2418049f9585bc37ff2c1e2e12eab4b7f64ae1f26647389aa02ad96c150d7c3c9c194d30315456852cf6a0a940e0191ae5d04007454823d4e9a0b220cf7a855e2dbcc0b973134e2e119b982d7d40dbb1b27d99816c41f40e829aa049224431da84cbf1b7ae813abcc9ef4c1dfc1760f6ddc5d57f7354bf3cbf6cc4a015191f879ac115b362f0257fd3eedb789537e836574a5b1abf1c9982ebe3bdfea07913c1b6e7282569d2d421e9fa2257f5d1698e93303bc49b941704287d7aaefea0a526576981ce6fd9f2bd48dd2ca6d5272f2fbdc85f0ee35a295f6ccd97ae8765a0313fad407f0c737c29024c02a890c4ecc12d7771c05ab7b435e5087a7cdef4d9a0d2044603cba9d4afdaf6fd2470e729ef3a65242de71276f20d59accfa6b53a7ca0457caacb9370c09b15f7d904adefd2308be94e23669ba5f43241ffff5f438a0aa09fb2dd45a383a0cc088a72b14117e1e9b7d6889218f3ac7631e8de644c5cb76da0c675dcd4d3fb692b514851c6106e2b09e6f5661d56a0a32ae02e2efc1515c235a074949a59ff1bdba87548510d6e404ec4532f4456dfdec8e753d92fda11a3088ba0a328c6ab1ab8f70db4d23e95bb163c13ba0c508f063a5b1393a4efd7ff375f05a0c722fe3ce796998269373cbb2fc229b2bdf2c43c6c2df003309422e043ce6c03a024e69343286eec44fa4744f6907209116e5383cff3fa98fe81ba06e7e8d4366680',
'0xf90211a00e99ba2198124b8241ea304551fe973215829e2fbc0438d67922707a2a847432a0bb9ce24fd527879c5fe6dbbec1ef5a05ed9d1ca88e921d140bafbec1112f6a6aa099787fd6c7a1989229c4291ef5267335e66152ce417daea46e66d19cb6f81d1ca0e430ff4b8d5621baa5978673344e78b4d8b4df51431b6e63785267c98a24ce18a0bb3e91a825fe3d42ed270a93e9ad1aabd566c40cb28e622f7f1d7ee967c8afd6a0aa364b0056870c6507bc3262a5f851ecb13684088bdb13996d3cb2db401ce3ffa0a3732eba4c7a6e062665ab5be08acb986c3db87556fb138548cc900ff1e56995a026b088e90c9738b8ce16e853107a937a50d52726a24f9f6ce60f587762eb45a2a006c9d5bc3c064b5c1fb565bff91cace9161c64ae653a329610c1dcf34d434429a06c16df2edc70656d322d0c2403bad7d45bc790ffc3e7adeef856d98ea6afc91ba0ae05ed5d6c34b5da29c2e94d7880aeba0906f95f4ec10b132a1d4766a0701c98a01470a86aa350d1ada0c082eac75de828a851f9c8c7c4aa49b1556fe3a5574966a0334eef025100a6da1033710dd98e0475f29d3d7e397caf618ca71c336c5f4f49a0ef0b3abbebcff34d6a8a8f5cdbfbd154ab3452b58dcb09de58ec983644963675a041857e865ec38e200a13bc1a3cb71c7d69aeef7ffdee8be515c9a5b691ce091fa059edd0eb3bbec36bbf38a19802d4646c00ba821ab55fdeea12e15bab62c4e1e580',
'0xf90211a0af0c7fa65ffcb84c31e68c1cf00e1a20bf8bb497c39883e19b66a99975b03431a0c492cab3623eb7926069794c3c718733e16c5fd0d4a13fb7c752ee9809aac7ada05003cea7132aa70d6f36731d60640a90bcd8f4fd493e4540d5ab1b4943679c0ca0fd700683405b1d2306b586dd3b5b2f92f1692fae20d17cd8b8e59d09b9c6670da01db8683910e46e56e8afeb9fe2b7c35382e5a0914d7b0dd8f0e8cb9981ba7435a0fa7f75d73aa73c35824387bec81388315caa4aee3f4f5562f971beb256c62d49a0ee478e420d83f413e8568dacfd5d83f83a5dd7c45f494b504828e5dc962f0e3ea094b95444a917ac94a675681f6bf851172ad0969801a783a63a71edafed45e7a7a0a0c46586e109abe80fe50361dd582e3f143cb416828239faa43bb2b890869501a0ae051d5d43634c68bf9c97823256cc68580f194dfdbd0c301140c7ca5853430ca0660b9365bb77ec9cdc6eb95516c162dca20727c6f828dbbeb1ae110dde4d3134a09feb1b75e84ff6722e4d837bfb6d207b6ee3b21b86844a01140ce293813b49a1a0ed58a70b04efa3bdc0babe2abfa20824a75d61d52291bfdb5cf08597800764d6a020a2d5d3a83f9e35ad9fd1c448626d90af0eb3efefaa4f2f93207b4096ef5507a0fc8efc4484dcf0a54f0574de9aaade0dcff6ec3599edb9f82efb26b6566dcaeaa032f7e79856db3fd984f72bb2c93d4dab328198d355a61c975fab1f08bdb2046580',
'0xf90211a0c87222cccea2bf32759fcee9dbaacbe3ea4165dd6184af6773651c5e00e34a8ba0be90e6e5d1a67ab5587779c60ac136d6a96db62b84c04998a5f03a367346abd6a05344aa1c9ca2e3e56bf98fd718ec43728578d148e1967fbaf8bf17a2a073a0bda011a2f9312c3308640a0d6ceeae218747290f23806067456da1d444c65abae437a0b3097a108bfce79af6699da4ae3003cd4929f0b4576aad655c31cb725bde84c7a0c133d3c637e174f36a73c22b1039eb003da6374bc0929321241badb3efa3c4a9a0f13059f2301ad9862ce02e3f7f3f2c9ab78eb30583764d73654f7f1f8b1e86fda06544e3915748b18204e09df75ff20d2fa6bd8121e2e669699012d54590383d6fa070e3a8e093691581d58fadb560b510262a758037632cd8670d3a36df828976b7a062a88a2900544dc76a32255a6b2b2a2eef8fa68279700c00adc7508286702552a0a474aeebd5603dfce46a6ecd1ecd519068dc034a544fde03ac42d4018e60a334a0b7d528fc41c8fdc8ea18c6e7d0099270c777ec1403cf879d1f5134bdc12a6c6ca04440f1242e42c5bfa7c536591ab89c8e84bea417435871c32eef1e25295b20daa06a5dcfe3cc84cff9d3e3c3ae868cfba8f0dd111a90c3f85869dab5b893f96643a026b2fb9dd7d08b0ed2f1c44fbf875011412a384f86f751c92e1013248d4aa371a0c75597b2b789fc4e939b71937390ce9d7d53159431328ac52180eef08ef200f280',
'0xf90191a0f0c5b800b542001597f2b7a8e106ac0e2849d2cc1df1727ac35c4ea3965f1c9180a08537f2e248702a6ae2a57e9110a5740f5772c876389739ac90debd6a0692713ea00b3a26a05b5494fb3ff6f0b3897688a5581066b20b07ebab9252d169d928717fa0a9a54d84976d134d6dba06a65064c7f3a964a75947d452db6f6bb4b6c47b43aaa01e2a1ed3d1572b872bbf09ee44d2ed737da31f01de3c0f4b4e1f046740066461a076f251d160b9a02eb0b5c1d83b61c9cdd4f37361705e79a45529bf49801fb824a0774a01a624cb14a50d17f2fe4b7ae6af8a67bbb029177ccc3dd729a734484d3ea05921b8a19aebe4fff5a36071e311778f9b93459183fdf7f6d870b401fa25dcbba0c8d71dd13d2806e2865a5c2cfa447f626471bf0b66182a8fd07230434e1cad2680a0e9864fdfaf3693b2602f56cd938ccd494b8634b1f91800ef02203a3609ca4c21a0c69d174ad6b6e58b0bd05914352839ec60915cd066dd2bee2a48016139687f21a0513dd5514fd6bad56871711441d38de2821cc6913cb192416b0385f025650731808080',
'0xf8669d3802a763f7db875346d03fbf86f137de55814b191c069e721f47474733b846f8440101a0146f8675fabbf90b214375a6839a8ddfb33f4c556a26ade8a48c4a82d7055100a0b44fb4e949d0f78f87f79ee46428f23a2a5713ce6fc6e0beb3dda78c2ac1ea55'
],
balance: '1',
codeHash: '0xb44fb4e949d0f78f87f79ee46428f23a2a5713ce6fc6e0beb3dda78c2ac1ea55',
nonce: '1',
storageHash: '0x146f8675fabbf90b214375a6839a8ddfb33f4c556a26ade8a48c4a82d7055100',
storageProof: [
{
key: '0x9c7fca54b386399991ce2d6f6fbfc3879e4204c469d179ec0bba12523ed3d44c',
value: '0x3499e1d1',
proof: [Array]
}
]
}
```
## Verifying the proof
[This script](https://colab.research.google.com/drive/1ksKdHyUquq1Ea4RoDhypoLNg5ipxdE7H?usp=sharing) on Google Colaboratory is a working Python sample from the [web3.py’s official documentation](https://web3py.readthedocs.io/en/stable/web3.eth.html#web3.eth.Eth.get_proof). To run the script, follow the steps below.
First, you need to uncomment and run the following `pip install` commands to install py-trie and [web3.py](https://github.com/ethereum/web3.py).
```bash Shell theme={"system"}
# pip install trie # https://github.com/ethereum/py-trie
# pip install web3 # https://web3py.readthedocs.io/
```
Then you can go to **Runtime > Run all** or press the button beside each cell.
Most importantly, don’t forget to fill in your Chainstack endpoint in the following line:
```bash Shell theme={"system"}
httpUrl = "YOUR_CHAINSTACK_ENDPOINT"
```
You can sign up and get an Ethereum RPC endpoint for free:
Next, you can run the code to see it in action. Scroll all the way down to the last section of the script. This is where the code is executed.
[Merkle proofs for offline data integrity](https://ethereum.org/en/developers/tutorials/merkle-proofs-for-offline-data-integrity/)
If the value of `hashEFGH`, `hashAB`, and `hashD` are known:
```javascript Nodes hashes theme={"system"}
const hashEFGH = hash(hash(hash(E)+hash(F))+hash(hash(G)+hash(H)))
const hashAB = hash(hash(A)+hash(B))
const hashD = hash(D)
```
The original equation becomes:
```javascript stateRootHash theme={"system"}
//In a very simplified fashion
stateRootHash = hash(hash(hashAB + hash(hash(C)+hashD)+ hashEFGH)
```
This is much easier, isn't it?
Essentially, `eth_getProof` returns the values of `hashEFGH`, `hashAB`, and `hashD`. It is also known as Merkle proof.
Merkle proof doesn't only work for account information but also for storage information. Storage refers to the data that lives within an account, such as the owner and balance mapping from an ERC-20 token smart contract.
## eth\_getProof
`eth_getProof` returns the Merkle proof for a specific account and its associated storage values. Merkle proofs are used to verify the inclusion of a certain piece of data within a Merkle trie.
### Parameters
* `DATA` — Ethereum address of the account for which the proof is requested
* `ARRAY` — the array of 32-byte storage keys that need to be proven and included. See [eth\_getStorageAt](/reference/ethereum-getstorageat) in the API reference.
* `QUANTITY|TAG` — the integer block number identifying the block for which the proof is requested or a string tag such as `"latest"` or `"earliest"`.
### Response
`Object` — an account object with:
* `balance`: `QUANTITY` — the balance of the account. See [eth\_getBalance](/reference/ethereum-getbalance) in the API reference.
* `codeHash`: `DATA`— the code hash of the account. For a simple account without code, it will return `"0xc5d2460186f7233c927e7db2dcc703c0e500b653ca82273b7bfad8045d85a470"`.
* `nonce`: `QUANTITY` — the nonce of the account. See [eth\_getTransactionCount](/reference/ethereum-gettransactioncount).
* `storageHash`: `DATA` — SHA3 of the `StorageRoot`. All storage will deliver a Merkle proof starting with this root hash. This hash is used as the starting point to retrieve a Merkle proof for all storage entries associated with the account.
* `accountProof`: `ARRAY` — the array of RLP-serialized Merkle trie nodes, starting with the stateRoot-Node, following the path of the SHA3 (address) as key, and can be used to prove the existence and validity of a piece of data in the trie.
* `storageProof`: `ARRAY` — the requested array of storage entries, where each entry is represented as an object that includes the following properties:
* `key`: `QUANTITY` — the requested storage key
* `value`: `QUANTITY` — the storage value
* `proof`: `ARRAY` — the array of RLP-serialized Merkle trie nodes, starting with the `storageHash-Node`, following the path of the SHA3 (key) as the path.
Source: [EIP-1186 specification](https://eips.ethereum.org/EIPS/eip-1186)
See the following code samples:
```bash cURL theme={"system"}
curl "YOUR_CHAINSTACK_ENDPOINT" \
-X POST \
-H "Content-Type: application/json" \
-d '{"id": 1,"jsonrpc": "2.0","method": "eth_getProof","params": ["0xdac17f958d2ee523a2206206994597c13d831ec7",["0x9c7fca54b386399991ce2d6f6fbfc3879e4204c469d179ec0bba12523ed3d44c"],"latest"]}'
```
```js web3.js theme={"system"}
const Web3 = require('web3');
const web3 = new Web3(new Web3.providers.HttpProvider('YOUR_CHAINSTACK_ENDPOINT'));
async function main() {
// Gets the Merkle proof of USDT's smart contract
var proof = await web3.eth.getProof(
"0xdac17f958d2ee523a2206206994597c13d831ec7", [
//Storage slot hash, value = keccak256(storage address + slot index)
"0x9c7fca54b386399991ce2d6f6fbfc3879e4204c469d179ec0bba12523ed3d44c"
],
"latest"
)
var block = await web3.eth.getBlock("latest")
//state root is very important for Merkle verification
var stateRoot = block.stateRoot
console.log("state root:" + stateRoot)
console.log(proof)
}
main();
```
```py web3.py theme={"system"}
from web3 import Web3
httpUrl = "YOUR_CHAINSTACK_ENDPOINT"
w3 = Web3(Web3.HTTPProvider(httpUrl))
proof = w3.eth.get_proof('0xdAC17F958D2ee523a2206206994597C13D831ec7', ["0x9c7fca54b386399991ce2d6f6fbfc3879e4204c469d179ec0bba12523ed3d44c"], "latest")
print(proof)
```
Sample result:
```shell Shell theme={"system"}
{
address: '0xdAC17F958D2ee523a2206206994597C13D831ec7',
accountProof: [
'0xf90211a06a718c2c9da77c253b12d7b2569657901e37bb691718f5dda1b86157ab1dd5eda0e7f19ed5e21bccc8d3260236b24f80ad88b3634f5d005f37b838881f0e12f1bda0abb301291704e4d92686c0f5f8ebb1734185321559b8d717ffdca95c99591976a0d0c2026bfab65c3b95276bfa82af9dec860b485f8857f293c148d63a2182128fa0c98044ec9a1273a218bed58b478277dd39173ad7b8edb95c200423a6bc8fc25fa056e5a55d9ddccdbf49362857200bbb1f042d61187c9f5f9ddcff5d2f1fc984a2a02a5b7200af424114f99a4b5f0a21c19aac82209e431ed80bfde177adb1004bdfa0026e4374f0518ff44a80fa374838ecb86cc64ac93bb710fea6dff4198f947b27a03fea341d87984673ad523177ed52f278bf4d8f97e6531c8ece932aeede4802f4a0bfe2f4a7fcb78f7e9f080dea7b6977fb1d88c441696e4456dad92b9d34ff0f43a02a3eb5c0edb14626c9c629601027bd60178bb2b688a67cea4d179fc432436615a0747355b8e02f3b884b4ffe5cea1619e32515fea064cca98208591af8c744e894a0874253737bae37f020ad3bb7e3292c7c4a63cdc158af6b33aaa4deaef016dccba03d8192bc1fc6aa1548912e763a0b5013a94399cefad7b47cf388873b2b794068a09b67f9737c6028d796bfd1c5da57a6f45824dc891f848ea0e1f8019d1fb5fba8a0aa871f9de8da85960fcd8a22cdf21c27f11e3966c14a6737ffd414b98dda00b280',
'0xf90211a0d360be1e1da1a0c32bc4c105833bd531e59d110684007b7c50fb2709002973eca0cf6dd1e350a7031b4e2ab49c899fd8bd47551c8565d8fd8d1d7796c83820c3b1a0eb0a88c29bb33989a589156f7bf07d9efc74034dd9d3f5b73385c3b45c3249bea02783c25f97a6ddb8dc07adf4b176991836d39184b1f678adeda832fff15e3664a00a4e288060045e587774d8a64993a7add73068b16863145e1e8eeb4602e18e19a0340851f4046ad1298962d6e47d05c66329549c839c158748aaad7ae00b943aefa085b127bc2a3bd17604283de21b2b3c9aa8f1d4b7b85c94d8105a46fe32c77688a00f531d62b3c5435324c01009c284fe31277e8d38302b75ea01be89f09e205969a00011c8351c0e3d639ac54b9d3a59de630b16a67de8270d7d6064d0a67e93f9cca048780d32b7f2db88650b51c46f46fd0a68795edee1fd5ecee6eb3595741d9669a0c91afd74eaf8e08a997061a62b354e2516fdc494e8e26cc50ceeb8f4a175608ba0e2c07f1b48fab80eecb340f5882e8c7b32ee416e4045c61f1df646a133487303a01a1eff78435a7a29a29463bdc3486ae81364b00bea82ba0fdf67a110770f2261a04f2eb440ba71c72da5fd7f0e439018d6671dc809f747213a1ea755848124e994a074ff9f37fce99daa3ed01dd763076450022996fc729be2cc43c61ec5182c2366a0b80b36b7b621112592f52390b89748d422e9b1517c4b0203b8176a53f89d4a6680',
'0xf90211a0b25f283bd01a8c8b2418049f9585bc37ff2c1e2e12eab4b7f64ae1f26647389aa02ad96c150d7c3c9c194d30315456852cf6a0a940e0191ae5d04007454823d4e9a0b220cf7a855e2dbcc0b973134e2e119b982d7d40dbb1b27d99816c41f40e829aa049224431da84cbf1b7ae813abcc9ef4c1dfc1760f6ddc5d57f7354bf3cbf6cc4a015191f879ac115b362f0257fd3eedb789537e836574a5b1abf1c9982ebe3bdfea07913c1b6e7282569d2d421e9fa2257f5d1698e93303bc49b941704287d7aaefea0a526576981ce6fd9f2bd48dd2ca6d5272f2fbdc85f0ee35a295f6ccd97ae8765a0313fad407f0c737c29024c02a890c4ecc12d7771c05ab7b435e5087a7cdef4d9a0d2044603cba9d4afdaf6fd2470e729ef3a65242de71276f20d59accfa6b53a7ca0457caacb9370c09b15f7d904adefd2308be94e23669ba5f43241ffff5f438a0aa09fb2dd45a383a0cc088a72b14117e1e9b7d6889218f3ac7631e8de644c5cb76da0c675dcd4d3fb692b514851c6106e2b09e6f5661d56a0a32ae02e2efc1515c235a074949a59ff1bdba87548510d6e404ec4532f4456dfdec8e753d92fda11a3088ba0a328c6ab1ab8f70db4d23e95bb163c13ba0c508f063a5b1393a4efd7ff375f05a0c722fe3ce796998269373cbb2fc229b2bdf2c43c6c2df003309422e043ce6c03a024e69343286eec44fa4744f6907209116e5383cff3fa98fe81ba06e7e8d4366680',
'0xf90211a00e99ba2198124b8241ea304551fe973215829e2fbc0438d67922707a2a847432a0bb9ce24fd527879c5fe6dbbec1ef5a05ed9d1ca88e921d140bafbec1112f6a6aa099787fd6c7a1989229c4291ef5267335e66152ce417daea46e66d19cb6f81d1ca0e430ff4b8d5621baa5978673344e78b4d8b4df51431b6e63785267c98a24ce18a0bb3e91a825fe3d42ed270a93e9ad1aabd566c40cb28e622f7f1d7ee967c8afd6a0aa364b0056870c6507bc3262a5f851ecb13684088bdb13996d3cb2db401ce3ffa0a3732eba4c7a6e062665ab5be08acb986c3db87556fb138548cc900ff1e56995a026b088e90c9738b8ce16e853107a937a50d52726a24f9f6ce60f587762eb45a2a006c9d5bc3c064b5c1fb565bff91cace9161c64ae653a329610c1dcf34d434429a06c16df2edc70656d322d0c2403bad7d45bc790ffc3e7adeef856d98ea6afc91ba0ae05ed5d6c34b5da29c2e94d7880aeba0906f95f4ec10b132a1d4766a0701c98a01470a86aa350d1ada0c082eac75de828a851f9c8c7c4aa49b1556fe3a5574966a0334eef025100a6da1033710dd98e0475f29d3d7e397caf618ca71c336c5f4f49a0ef0b3abbebcff34d6a8a8f5cdbfbd154ab3452b58dcb09de58ec983644963675a041857e865ec38e200a13bc1a3cb71c7d69aeef7ffdee8be515c9a5b691ce091fa059edd0eb3bbec36bbf38a19802d4646c00ba821ab55fdeea12e15bab62c4e1e580',
'0xf90211a0af0c7fa65ffcb84c31e68c1cf00e1a20bf8bb497c39883e19b66a99975b03431a0c492cab3623eb7926069794c3c718733e16c5fd0d4a13fb7c752ee9809aac7ada05003cea7132aa70d6f36731d60640a90bcd8f4fd493e4540d5ab1b4943679c0ca0fd700683405b1d2306b586dd3b5b2f92f1692fae20d17cd8b8e59d09b9c6670da01db8683910e46e56e8afeb9fe2b7c35382e5a0914d7b0dd8f0e8cb9981ba7435a0fa7f75d73aa73c35824387bec81388315caa4aee3f4f5562f971beb256c62d49a0ee478e420d83f413e8568dacfd5d83f83a5dd7c45f494b504828e5dc962f0e3ea094b95444a917ac94a675681f6bf851172ad0969801a783a63a71edafed45e7a7a0a0c46586e109abe80fe50361dd582e3f143cb416828239faa43bb2b890869501a0ae051d5d43634c68bf9c97823256cc68580f194dfdbd0c301140c7ca5853430ca0660b9365bb77ec9cdc6eb95516c162dca20727c6f828dbbeb1ae110dde4d3134a09feb1b75e84ff6722e4d837bfb6d207b6ee3b21b86844a01140ce293813b49a1a0ed58a70b04efa3bdc0babe2abfa20824a75d61d52291bfdb5cf08597800764d6a020a2d5d3a83f9e35ad9fd1c448626d90af0eb3efefaa4f2f93207b4096ef5507a0fc8efc4484dcf0a54f0574de9aaade0dcff6ec3599edb9f82efb26b6566dcaeaa032f7e79856db3fd984f72bb2c93d4dab328198d355a61c975fab1f08bdb2046580',
'0xf90211a0c87222cccea2bf32759fcee9dbaacbe3ea4165dd6184af6773651c5e00e34a8ba0be90e6e5d1a67ab5587779c60ac136d6a96db62b84c04998a5f03a367346abd6a05344aa1c9ca2e3e56bf98fd718ec43728578d148e1967fbaf8bf17a2a073a0bda011a2f9312c3308640a0d6ceeae218747290f23806067456da1d444c65abae437a0b3097a108bfce79af6699da4ae3003cd4929f0b4576aad655c31cb725bde84c7a0c133d3c637e174f36a73c22b1039eb003da6374bc0929321241badb3efa3c4a9a0f13059f2301ad9862ce02e3f7f3f2c9ab78eb30583764d73654f7f1f8b1e86fda06544e3915748b18204e09df75ff20d2fa6bd8121e2e669699012d54590383d6fa070e3a8e093691581d58fadb560b510262a758037632cd8670d3a36df828976b7a062a88a2900544dc76a32255a6b2b2a2eef8fa68279700c00adc7508286702552a0a474aeebd5603dfce46a6ecd1ecd519068dc034a544fde03ac42d4018e60a334a0b7d528fc41c8fdc8ea18c6e7d0099270c777ec1403cf879d1f5134bdc12a6c6ca04440f1242e42c5bfa7c536591ab89c8e84bea417435871c32eef1e25295b20daa06a5dcfe3cc84cff9d3e3c3ae868cfba8f0dd111a90c3f85869dab5b893f96643a026b2fb9dd7d08b0ed2f1c44fbf875011412a384f86f751c92e1013248d4aa371a0c75597b2b789fc4e939b71937390ce9d7d53159431328ac52180eef08ef200f280',
'0xf90191a0f0c5b800b542001597f2b7a8e106ac0e2849d2cc1df1727ac35c4ea3965f1c9180a08537f2e248702a6ae2a57e9110a5740f5772c876389739ac90debd6a0692713ea00b3a26a05b5494fb3ff6f0b3897688a5581066b20b07ebab9252d169d928717fa0a9a54d84976d134d6dba06a65064c7f3a964a75947d452db6f6bb4b6c47b43aaa01e2a1ed3d1572b872bbf09ee44d2ed737da31f01de3c0f4b4e1f046740066461a076f251d160b9a02eb0b5c1d83b61c9cdd4f37361705e79a45529bf49801fb824a0774a01a624cb14a50d17f2fe4b7ae6af8a67bbb029177ccc3dd729a734484d3ea05921b8a19aebe4fff5a36071e311778f9b93459183fdf7f6d870b401fa25dcbba0c8d71dd13d2806e2865a5c2cfa447f626471bf0b66182a8fd07230434e1cad2680a0e9864fdfaf3693b2602f56cd938ccd494b8634b1f91800ef02203a3609ca4c21a0c69d174ad6b6e58b0bd05914352839ec60915cd066dd2bee2a48016139687f21a0513dd5514fd6bad56871711441d38de2821cc6913cb192416b0385f025650731808080',
'0xf8669d3802a763f7db875346d03fbf86f137de55814b191c069e721f47474733b846f8440101a0146f8675fabbf90b214375a6839a8ddfb33f4c556a26ade8a48c4a82d7055100a0b44fb4e949d0f78f87f79ee46428f23a2a5713ce6fc6e0beb3dda78c2ac1ea55'
],
balance: '1',
codeHash: '0xb44fb4e949d0f78f87f79ee46428f23a2a5713ce6fc6e0beb3dda78c2ac1ea55',
nonce: '1',
storageHash: '0x146f8675fabbf90b214375a6839a8ddfb33f4c556a26ade8a48c4a82d7055100',
storageProof: [
{
key: '0x9c7fca54b386399991ce2d6f6fbfc3879e4204c469d179ec0bba12523ed3d44c',
value: '0x3499e1d1',
proof: [Array]
}
]
}
```
## Verifying the proof
[This script](https://colab.research.google.com/drive/1ksKdHyUquq1Ea4RoDhypoLNg5ipxdE7H?usp=sharing) on Google Colaboratory is a working Python sample from the [web3.py’s official documentation](https://web3py.readthedocs.io/en/stable/web3.eth.html#web3.eth.Eth.get_proof). To run the script, follow the steps below.
First, you need to uncomment and run the following `pip install` commands to install py-trie and [web3.py](https://github.com/ethereum/web3.py).
```bash Shell theme={"system"}
# pip install trie # https://github.com/ethereum/py-trie
# pip install web3 # https://web3py.readthedocs.io/
```
Then you can go to **Runtime > Run all** or press the button beside each cell.
Most importantly, don’t forget to fill in your Chainstack endpoint in the following line:
```bash Shell theme={"system"}
httpUrl = "YOUR_CHAINSTACK_ENDPOINT"
```
You can sign up and get an Ethereum RPC endpoint for free:
Next, you can run the code to see it in action. Scroll all the way down to the last section of the script. This is where the code is executed.
 To begin, we retrieve the latest block information by calling `w3.eth.get_block("latest")`.
Next, we obtain the Merkle proof of the account `0xdAC17F958D2ee523a2206206994597C13D831ec7` and one of its storage values by calling `w3.eth.get_proof('0xdAC17F958D2ee523a2206206994597C13D831ec7', ["0x9c7fca54b386399991ce2d6f6fbfc3879e4204c469d179ec0bba12523ed3d44c"], "latest")`.
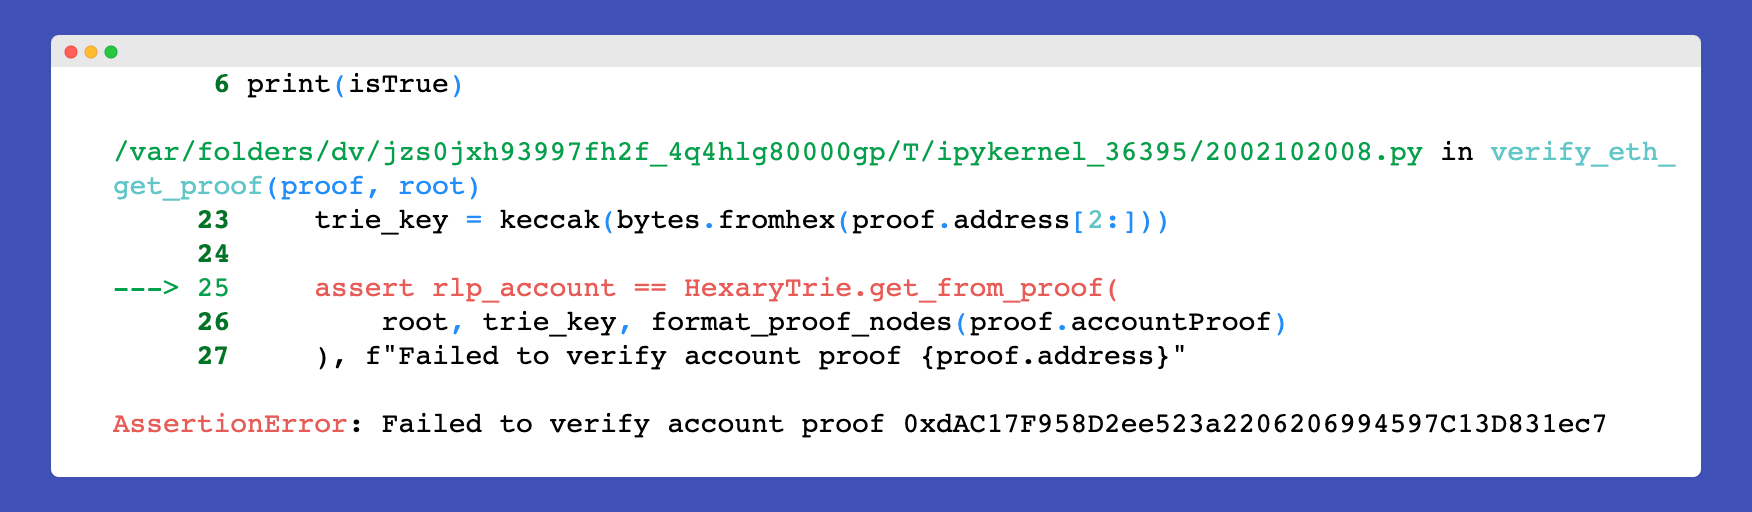
Then, we verify the proof by calling `verify_eth_get_proof(proof, block.stateRoot)`. If the proof is valid, `verify_eth_get_proof` returns `true` to the `isValidProof` variable. Otherwise, it returns a "Failed to verify account proof" error.
To begin, we retrieve the latest block information by calling `w3.eth.get_block("latest")`.
Next, we obtain the Merkle proof of the account `0xdAC17F958D2ee523a2206206994597C13D831ec7` and one of its storage values by calling `w3.eth.get_proof('0xdAC17F958D2ee523a2206206994597C13D831ec7', ["0x9c7fca54b386399991ce2d6f6fbfc3879e4204c469d179ec0bba12523ed3d44c"], "latest")`.
Then, we verify the proof by calling `verify_eth_get_proof(proof, block.stateRoot)`. If the proof is valid, `verify_eth_get_proof` returns `true` to the `isValidProof` variable. Otherwise, it returns a "Failed to verify account proof" error.
 ## Q\&A
This method allows for efficient verification of the network's state without having to download the entire state trie for a block. This can be particularly useful for building lightweight clients or auditing smart contract state changes.
There are many reasons why Ethereum uses a Merkle trie for data storage, but one of the most important is its verifiability. As a famous blockchain quote goes, "Don’t trust, verify.” You can learn more about the Merkle trie in the [Ethereum documentation article](https://ethereum.org/en/developers/docs/data-structures-and-encoding/patricia-merkle-trie/).
The implementation determines this. For Ethereum, the trie is hexary, which means that there are 16 entries for every node.
Yes, Ethereum keeps a separate storage trie for each state.
The storage trie is a part of the state trie that stores the contract state. Each contract on the blockchain has its own storage trie, which is a key-value store that maps 256-bit keys to 256-bit values. This allows smart contracts to persist data across transactions and to maintain their own state.
When a contract is executed, and its state is updated, the new state is stored in a new storage trie, which is then added to the state trie. This creates a new state root, which represents the updated state of the blockchain.
RLP (recursive length prefix) serialization is a technique widely used by Ethereum clients for serialization purposes. In a Merkle trie, RLP is used to convert key-value pairs (the node entries) into a long string, which is then used for hashing. You can read more in [Recursive-length prefix (RLP) serialization](https://ethereum.org/en/developers/docs/data-structures-and-encoding/rlp/).
Yes, `eth_getProof` is available on the Erigon client but only supports 100,000 blocks in the past. On Geth, there's no 100,000 blocks limit. Note that you need an archive node for `eth_getProof`.
## Conclusion
This concludes the article. Congratulations! You now know how to use the eth\_getProof method to retrieve a Merkle proof and verify a user's ERC-20 token balance.
When using `eth_getProof`, remember to provide the correct block number, account address, and key path to retrieve the desired proof.
### See also
### About the author
## Q\&A
This method allows for efficient verification of the network's state without having to download the entire state trie for a block. This can be particularly useful for building lightweight clients or auditing smart contract state changes.
There are many reasons why Ethereum uses a Merkle trie for data storage, but one of the most important is its verifiability. As a famous blockchain quote goes, "Don’t trust, verify.” You can learn more about the Merkle trie in the [Ethereum documentation article](https://ethereum.org/en/developers/docs/data-structures-and-encoding/patricia-merkle-trie/).
The implementation determines this. For Ethereum, the trie is hexary, which means that there are 16 entries for every node.
Yes, Ethereum keeps a separate storage trie for each state.
The storage trie is a part of the state trie that stores the contract state. Each contract on the blockchain has its own storage trie, which is a key-value store that maps 256-bit keys to 256-bit values. This allows smart contracts to persist data across transactions and to maintain their own state.
When a contract is executed, and its state is updated, the new state is stored in a new storage trie, which is then added to the state trie. This creates a new state root, which represents the updated state of the blockchain.
RLP (recursive length prefix) serialization is a technique widely used by Ethereum clients for serialization purposes. In a Merkle trie, RLP is used to convert key-value pairs (the node entries) into a long string, which is then used for hashing. You can read more in [Recursive-length prefix (RLP) serialization](https://ethereum.org/en/developers/docs/data-structures-and-encoding/rlp/).
Yes, `eth_getProof` is available on the Erigon client but only supports 100,000 blocks in the past. On Geth, there's no 100,000 blocks limit. Note that you need an archive node for `eth_getProof`.
## Conclusion
This concludes the article. Congratulations! You now know how to use the eth\_getProof method to retrieve a Merkle proof and verify a user's ERC-20 token balance.
When using `eth_getProof`, remember to provide the correct block number, account address, and key path to retrieve the desired proof.
### See also
### About the author
 Developer Advocate @ Chainstack
BUIDLs on Ethereum, zkEVMs, and The Graph protocol