> ## Documentation Index
> Fetch the complete documentation index at: https://docs.chainstack.com/llms.txt
> Use this file to discover all available pages before exploring further.
# Ethereum tooling
> Set up MetaMask, Hardhat, Foundry, and development tools to build and deploy smart contracts on Ethereum through your Chainstack RPC node endpoints.
### Run nodes on Chainstack
[Start for free](https://console.chainstack.com/) and get your app to production levels immediately. No credit card required. You can sign up with your GitHub, X, Google, or Microsoft account.
Get started with a [reliable Ethereum RPC endpoint](https://chainstack.com/build-better-with-ethereum/) to use the tools below.
## Wallets
Wallets allow the addition of custom RPC endpoints either by directly modifying the settings of an existing network (e.g., Ethereum) or by adding a custom network and specifying a custom RPC endpoint.
To obtain the address of your RPC endpoint, navigate to the node details on the Chainstack console and locate the Execution client HTTPS endpoint in the Access and credentials section. When adding a new network, you need a chain ID which you can on resources like [chainlist.org](http://chainlist.org/) or [chainlist.wtf](http://chainlist.wtf).
### MetaMask
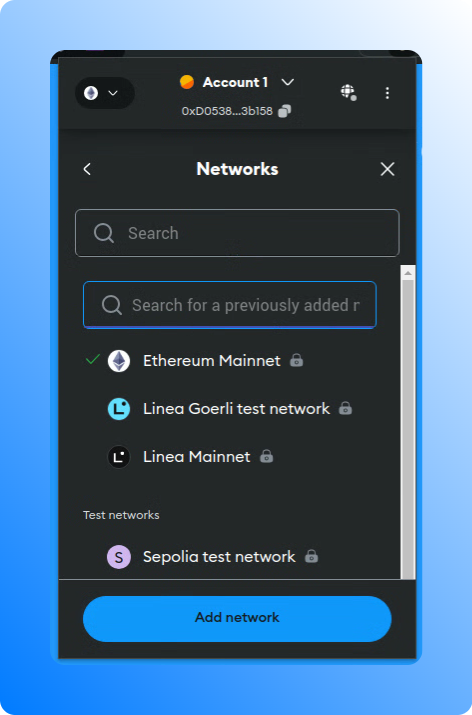 In the section **Access and credentials** of a Chainstack Node, press **Connect wallet**. This will prompt you to confirm a new network details.
To add a network manually, go to **Networks** and add a new network with a required chain ID and your Chainstack RPC endpoint.
### Trust Wallet
In the section **Access and credentials** of a Chainstack Node, press **Connect wallet**. This will prompt you to confirm a new network details.
To add a network manually, go to **Networks** and add a new network with a required chain ID and your Chainstack RPC endpoint.
### Trust Wallet
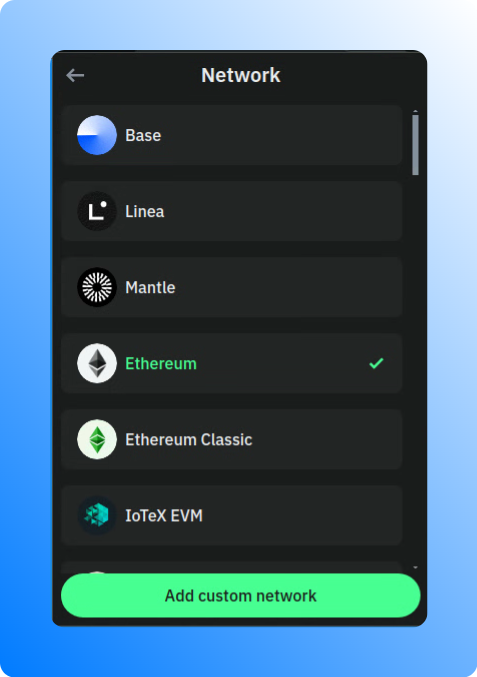 To add a custom RPC to Trust Wallet, open the wallet and navigate to the **Settings** section. Look for the **Network** section to add a custom network with your Chainstack RPC endpoint.
### Rainbow
To add a custom RPC to Trust Wallet, open the wallet and navigate to the **Settings** section. Look for the **Network** section to add a custom network with your Chainstack RPC endpoint.
### Rainbow
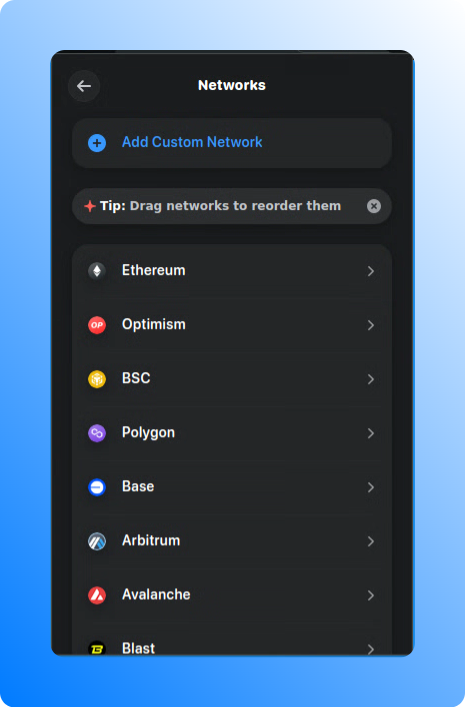 To add a custom RPC to Rainbow Wallet, open the wallet and navigate to the **Settings** section. Look for the **Networks** to add your Chainstack RPC endpoint.
### Rabby
To add a custom RPC to Rainbow Wallet, open the wallet and navigate to the **Settings** section. Look for the **Networks** to add your Chainstack RPC endpoint.
### Rabby
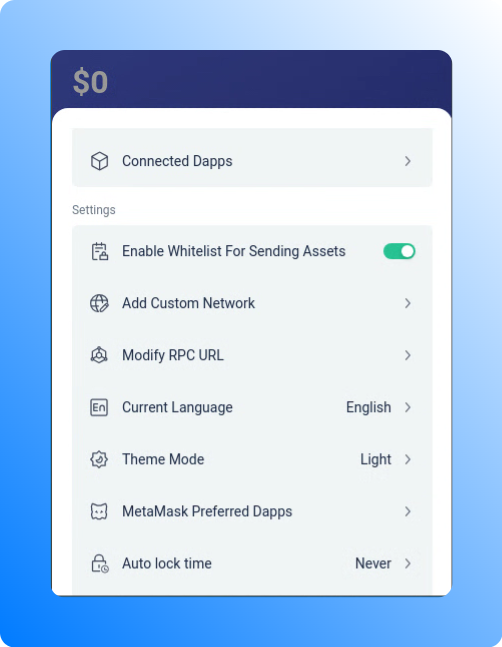 To add a custom RPC to Rabby Wallet, open the wallet and navigate to the **Settings (More)** section. Look for the **Modify RPC URL** to add your Chainstack RPC endpoint.
### Frame Desktop
To add a custom RPC to Rabby Wallet, open the wallet and navigate to the **Settings (More)** section. Look for the **Modify RPC URL** to add your Chainstack RPC endpoint.
### Frame Desktop
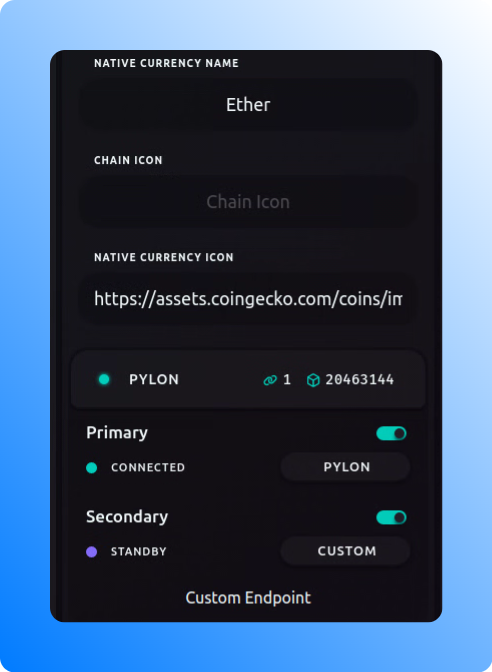 To add a custom RPC to Frame Desktop, open the wallet and navigate to the **Chains** section. Click on the chain details to add your Chainstack RPC endpoint.
## IDEs
Cloud-based IDEs provide the flexibility to use injected providers. MetaMask is the most commonly used one. By adding a Chainstack RPC node in MetaMask and connecting to the wallet in your IDE, you can seamlessly interact with the network through a Chainstack node.
### Remix IDE
To enable Remix IDE to interact with the network through a Chainstack node, you can follow these steps:
1. Install and set up MetaMask to use a Chainstack node for interaction. You can refer to the guide on Interacting through MetaMask for detailed instructions.
2. Open Remix IDE and navigate the [Connect wallet](https://remix.ethereum.org/) button. Here, select **Injected Web3 Provider** and then **MetaMask**.
## Programming languages and libraries
### Communication protocols
WebSockets and HTTP are essential communication protocols in web applications. WebSockets enable two-way, persistent communication between a client and a server, useful for real-time price feeds, live transaction monitoring, and event notifications. In contrast, HTTP follows a one-way, request-response model, ideal for retrieving periodic price updates and transaction histories.
### ethers.js
Build DApps using [ethers.js](https://github.com/ethers-io/ethers.js) and Ethereum nodes deployed with Chainstack.
1. Install ethers.js
```bash Bash theme={"system"}
npm install ethers
```
2. Initialize HTTP or WebSocket provider
```javascript Javascript theme={"system"}
import { ethers } from 'ethers';
// Using HTTP provider
const httpProvider = new ethers.JsonRpcProvider("/*YOUR_HTTP_CHAINSTACK_ENDPOINT*/");
httpProvider.getBlockNumber().then(console.log);
// Using WebSocket provider
const wsProvider = new ethers.WebSocketProvider("/*YOUR_WS_CHAINSTACK_ENDPOINT*/");
wsProvider.getBlockNumber().then((blockNumber) => {
console.log(blockNumber);
wsProvider.destroy();
});
```
### web3.py
Build DApps using [web3.py](https://github.com/ethereum/web3.py) and Ethereum nodes deployed with Chainstack.
1. Install web3.py
```bash Bash theme={"system"}
pip install web3
```
2. Initialize HTTP or WebSocket provider
```python Python theme={"system"}
from web3 import Web3
# Using HTTP provider
http_web3 = Web3(Web3.HTTPProvider("/*YOUR_HTTP_CHAINSTACK_ENDPOINT*/"))
print(http_web3.eth.block_number)
# Using WebSocket provider
with Web3(Web3.WebsocketProvider("/*YOUR_WS_CHAINSTACK_ENDPOINT*/")) as ws_web3:
print(ws_web3.eth.block_number)
```
### Nethereum (.NET)
Build DApps using [Nethereum](https://github.com/Nethereum/Nethereum) and Ethereum nodes deployed with Chainstack.
1. Install Nethereum
2. Initialize HTTP or WebSocket provider
```csharp C# theme={"system"}
using Nethereum.JsonRpc.WebSocketClient;
using Nethereum.Web3;
namespace TutorialWeb3
{
internal class Program
{
static void Main(string[] args)
{
// Using HTTP provider
var httpClient = new Web3("/*YOUR_HTTP_CHAINSTACK_ENDPOINT*/");
var httpBlockNumber = httpClient.Eth.Blocks.GetBlockNumber.SendRequestAsync().GetAwaiter().GetResult();
Console.WriteLine($"HTTP Block Number: {httpBlockNumber}");
// Using WebSocket provider
using (var wsClient = new WebSocketClient("/*YOUR_WS_CHAINSTACK_ENDPOINT*/"))
{
var web3Ws = new Web3(wsClient);
var wsBlockNumber = web3Ws.Eth.Blocks.GetBlockNumber.SendRequestAsync().GetAwaiter().GetResult();
Console.WriteLine("WS Block Number: " + wsBlockNumber);
}
}
}
}
```
### viem
Build DApps using [viem](https://github.com/wevm/viem) and Ethereum nodes deployed with Chainstack.
1. Install viem
2. Initialize HTTP or WebSocket provider
```typescript Typescript theme={"system"}
import { createPublicClient, http, webSocket } from 'viem';
import { mainnet } from 'viem/chains';
// Using HTTP provider
const httpClient = createPublicClient({
chain: mainnet,
transport: http("/*YOUR_HTTP_CHAINSTACK_ENDPOINT*/"),
});
const blockNumber = await httpClient.getBlockNumber();
console.log(blockNumber);
// Using WebSocket provider
const wsClient = createPublicClient({
chain: mainnet,
transport: webSocket("/*YOUR_WS_CHAINSTACK_ENDPOINT*/"),
})
const wsBlockNumber = await wsClient.getBlockNumber();
console.log(wsBlockNumber);
await wsClient.transport.getRpcClient().then((rpcClient) => {
rpcClient.close();
});
```
## Development frameworks and toolkits
### Foundry
Configure [Foundry](https://github.com/foundry-rs/foundry) to deploy contracts using Chainstack Ethereum nodes.
1. Install Foundry
```bash Bash theme={"system"}
curl -L https://foundry.paradigm.xyz | bash
foundryup
```
2. Configure environment in Foundry
Create a new Foundry project:
```bash Bash theme={"system"}
forge init my_project
cd my_project
```
Create a `.env` file in your project root and add your Chainstack endpoint and private key:
```bash Bash theme={"system"}
CHAINSTACK_MAINNET_ENDPOINT=https://your-chainstack-mainnet-url
CHAINSTACK_DEVNET_ENDPOINT=https://your-chainstack-devnet-url
PRIVATE_KEY_MAINNET=your-mainnet-private-key
PRIVATE_KEY_DEVNET=your-devnet-private-key
```
You need to load the environment variables into your shell session:
```bash Bash theme={"system"}
source .env
echo $CHAINSTACK_DEVNET_ENDPOINT
echo $PRIVATE_KEY_DEVNET
```
Update your `foundry.toml` file to include the Chainstack network:
```toml TOML theme={"system"}
[profile.default]
src = 'src'
out = 'out'
libs = ['lib']
[rpc_endpoints]
mainnet = "${CHAINSTACK_MAINNET_ENDPOINT}"
devnet = "${CHAINSTACK_DEVNET_ENDPOINT}"
```
3. Before deploying, ensure that your contracts are compiled. This step is crucial to avoid deployment issues.
```bash Bash theme={"system"}
forge build
```
4. To use the Chainstack endpoint for deployment, you can use the following command:
```bash Bash theme={"system"}
forge create --rpc-url ${CHAINSTACK_DEVNET_ENDPOINT} --private-key ${PRIVATE_KEY_DEVNET} src/YourContract.sol:YourContract
```
Alternatively, you can create a deployment script in the `script` folder, for example `Deploy.s.sol`:
```solidity solidity theme={"system"}
// script/Deploy.s.sol
// Specify the Solidity version
pragma solidity ^0.8.20;
// Import the Forge script library
import "forge-std/Script.sol";
// Import your contract
import "../src/YourContract.sol";
contract DeployScript is Script {
function run() external {
// Retrieve the deployer's private key from the environment variables
uint256 deployerPrivateKey = vm.envUint("PRIVATE_KEY_DEVNET"); // Change to PRIVATE_KEY_MAINNET for mainnet
// Start broadcasting transactions using the deployer's private key
vm.startBroadcast(deployerPrivateKey);
// Deploy the contract
YourContract yourContract = new YourContract();
// Stop broadcasting transactions
vm.stopBroadcast();
// Log the deployed contract address
console2.log("Contract deployed at:", address(yourContract));
}
}
```
Then run the script with:
```bash Bash theme={"system"}
forge script script/Deploy.s.sol:DeployScript --rpc-url devnet--broadcast
```
5. Interact with the blockchain using Cast. Use the following command to query the balance of an Ethereum address:
```bash Bash theme={"system"}
cast balance --rpc-url $CHAINSTACK_DEVNET_ENDPOINT
```
Replace \ with the actual Ethereum address you want to query.
### Hardhat
Configure [Hardhat](https://github.com/NomicFoundation/hardhat) to deploy contracts using Chainstack Ethereum nodes.
1. Install Hardhat and other dependencies
```bash Bash theme={"system"}
npm init -y
npm install --save-dev hardhat @nomiclabs/hardhat-ethers ethers dotenv
```
2. Configure environment in Hardhat
Create a `.env` file in your project root and add your Chainstack endpoint and private key:
```bash Bash theme={"system"}
CHAINSTACK_MAINNET_ENDPOINT=https://your-chainstack-mainnet-url
CHAINSTACK_DEVNET_ENDPOINT=https://your-chainstack-devnet-url
PRIVATE_KEY_MAINNET=your-mainnet-private-key
PRIVATE_KEY_DEVNET=your-devnet-private-key
```
Initiate a project:
```bash Bash theme={"system"}
npx hardhat init
```
Update your `hardhat.config.js` file to use the Chainstack endpoint:
```javascript Javascript theme={"system"}
require('@nomiclabs/hardhat-ethers');
require('dotenv').config();
module.exports = {
solidity: "0.8.20", // Specify the required compiler version
networks: {
mainnet: {
url: process.env.CHAINSTACK_MAINNET_ENDPOINT,
accounts: [process.env.PRIVATE_KEY_MAINNET] // Mainnet private key
},
devnet: {
url: process.env.CHAINSTACK_DEVNET_ENDPOINT,
accounts: [process.env.PRIVATE_KEY_DEVNET] // Devnet private key
}
}
};
```
3. To deploy your contracts using the Chainstack endpoint, you can create a deployment script in the `scripts` folder, for example deploy.js:
```javascript Javascript theme={"system"}
const hre = require("hardhat");
async function main() {
// Retrieve the deployer account from the list of signers
const [deployer] = await hre.ethers.getSigners();
console.log("Deploying contracts with the account:", deployer.address);
// Load the contract factory from the contracts folder
const Token = await hre.ethers.getContractFactory("MyToken"); // Replace "MyToken" with your contract name
// Specify the initial supply for the token (adjust as necessary)
const initialSupply = hre.ethers.utils.parseUnits("1000", 18); // Adjust the supply and decimals as needed
// Deploy the contract and wait for it to be mined
const token = await Token.deploy(initialSupply);
await token.deployed();
// Output the contract address and transaction hash once deployed
console.log("Contract deployed at address:", token.address);
console.log("Transaction hash:", token.deployTransaction.hash);
}
// Execute the main function and handle potential errors
main()
.then(() => process.exit(0))
.catch((error) => {
console.error("Error during deployment:", error);
process.exit(1);
});
```
4. Compile the contracts
```tsx Bash theme={"system"}
npx hardhat compile
```
5. Use the appropriate network flag (mainnet or devnet) to deploy to the respective network
```bash Bash theme={"system"}
npx hardhat run scripts/deploy.js --network devnet
```
### Scaffold-ETH 2
Configure [Scaffold-ETH 2](https://github.com/scaffold-eth/scaffold-eth-2) to deploy contracts using Chainstack Ethereum nodes.
1. Clone the Scaffold-ETH 2 repository
```bash Bash theme={"system"}
git clone https://github.com/scaffold-eth/scaffold-eth-2.git
cd scaffold-eth-2
```
2. Install dependencies
```bash Bash theme={"system"}
yarn install
```
3. Create a .env.local file in the root directory of your project
```bash Bash theme={"system"}
touch .env.local
```
4. Add your Chainstack endpoint and private key to the .env.local file
```
CHAINSTACK_MAINNET_ENDPOINT=https://your-chainstack-mainnet-url
CHAINSTACK_DEVNET_ENDPOINT=https://your-chainstack-devnet-url
DEPLOYER_PRIVATE_KEY=your-private-key-here
```
Note: by default, Scaffold-ETH 2 uses Alchemy RPC nodes and it assumes the config contains an Alchemy API key. We can override this setting Chainstack RPC nodes and updating some other configs.
5. Modify the packages/hardhat/hardhat.config.ts file to configure the Chainstack endpoint. Locate the networks section and add or modify the configuration for the Chainstack networks
```javascript Bash theme={"system"}
const config: HardhatUserConfig = {
solidity: "0.8.20", // Ensure to specify the correct Solidity version
networks: {
mainnet: {
url: process.env.CHAINSTACK_MAINNET_ENDPOINT || `https://eth-mainnet.alchemyapi.io/v2/${providerApiKey}`, // Use the Chainstack mainnet endpoint
// accounts: [process.env.DEPLOYER_PRIVATE_KEY_MAINNET as string], // Mainnet private key
},
sepolia: {
url: process.env.CHAINSTACK_DEVNET_ENDPOINT || `https://eth-sepolia.g.alchemy.com/v2/${providerApiKey}`, // Use the Chainstack devnet endpoint
// accounts: [process.env.DEPLOYER_PRIVATE_KEY_DEVNET as string], // Devnet private key
},
// ... other network configurations
},
};
```
6. Compile contracts using Hardhat
```bash Bash theme={"system"}
cd packages/hardhat
yarn hardhat compile
```
7. To deploy your contracts using the Chainstack endpoint, run
```bash theme={"system"}
yarn deploy --network sepolia
```
8. To start the Next.js app with the Chainstack configuration
```bash theme={"system"}
yarn start
```
### Truffle (no longer maintained)
Configure [Truffle](https://github.com/trufflesuite/truffle) to deploy contracts using Chainstack Ethereum nodes.
1. Install Truffle and other dependencies
```bash theme={"system"}
# Initialize a new npm project
npm init -y
# Install Truffle as a local development dependency
npm install --save-dev truffle @truffle/hdwallet-provider dotenv
```
2. Configure environment in Truffle
Initialize a new Truffle project:
```bash Bash theme={"system"}
npx truffle init
```
Create a `.env` file in your project root and add your Chainstack endpoint and private key:
```bash Bash theme={"system"}
CHAINSTACK_MAINNET_ENDPOINT=https://your-chainstack-mainnet-url
CHAINSTACK_DEVNET_ENDPOINT=https://your-chainstack-devnet-url
PRIVATE_KEY_MAINNET=your-mainnet-private-key
PRIVATE_KEY_DEVNET=your-devnet-private-key
```
Update your `truffle-config.js` file to use the Chainstack endpoint:
```javascript Javascript theme={"system"}
require('dotenv').config();
const HDWalletProvider = require('@truffle/hdwallet-provider');
module.exports = {
networks: {
// Configuration for Mainnet
mainnet: {
provider: () => new HDWalletProvider(process.env.PRIVATE_KEY_MAINNET, process.env.CHAINSTACK_MAINNET_ENDPOINT),
network_id: 1, // Mainnet's network ID
},
// Configuration for Devnet
devnet: {
provider: () => new HDWalletProvider(process.env.PRIVATE_KEY_DEVNET, process.env.CHAINSTACK_DEVNET_ENDPOINT),
network_id: 11155111, // Sepolia
},
},
compilers: {
solc: {
version: "0.8.20", // Specify the Solidity compiler version
},
},
};
```
3. Create a migration script in the migrations folder to deploy your contract (migrations/1\_deploy\_contract\_name.js)
```javascript Javascript theme={"system"}
// Import your contract artifact
const YourContract = artifacts.require("CONTRACT_NAME");
module.exports = function (deployer) {
deployer.deploy(YourContract);
};
```
4. Compile the contracts
```jsx Bash theme={"system"}
npx truffle compile
```
5. To deploy your contract using the Chainstack endpoint, run
```bash Bash theme={"system"}
truffle migrate --network devnet
```
### Ape
Configure [Ape Framework](https://github.com/ApeWorX/ape) to deploy contracts using Chainstack Ethereum nodes. Before performing the following steps, you can set up and activate a virtual environment.
1. Install Ape and dependencies
```bash Bash theme={"system"}
pip install eth-ape
```
2. Configure environment in Ape
Initialize a project:
```bash Bash theme={"system"}
ape init
```
Create or update your `ape-config.yaml` file in your project root:
```yaml yaml theme={"system"}
name: ape-1
contracts_folder: contracts # Default is contracts
default_ecosystem: ethereum # Default is ethereum
node:
ethereum:
mainnet:
uri: CHAINSTACK_MAINNET_ENDPOINT
sepolia:
uri: CHAINSTACK_SEPOLIA_ENDPOINT
dependencies:
- name: OpenZeppelin
github: OpenZeppelin/openzeppelin-contracts/token/ERC20/ERC20.sol # Example
version: 4.4.2
```
3. Import an account. You'll be prompted to enter a private key and pass phrase to encrypt it.
```bash Bash theme={"system"}
ape accounts import devnet_deployer
```
4. To deploy your contracts using the Chainstack endpoint, you can create a deployment script, for example scripts/deploy.py
```python Python theme={"system"}
from ape import accounts, project
def main():
# Load the account for deployment
# Change 'devnet_deployer' to 'mainnet_deployer' when deploying to mainnet
account = accounts.load("devnet_deployer")
# Deploy the contract
contract = account.deploy(project.MyContract) # Replace 'MyContract' with your contract's name and add its arguments
# Output the contract address
print(f"Contract deployed at: {contract.address}")
# Output the transaction hash
print(f"Transaction hash: {contract.txn_hash.hex()}")
if __name__ == "__main__":
main()
```
5. Compile contracts. Before deploying, ensure your contracts are compiled. Ape automatically compiles contracts when deploying, but you can manually compile them if needed
```bash Bash theme={"system"}
ape compile
```
6. Run the deployment script using
```bash Bash theme={"system"}
ape run scripts/deploy.py --network ethereum:sepolia
```
### Brownie
Configure [Brownie](https://github.com/eth-brownie/brownie) to deploy contracts using Chainstack Ethereum nodes.
1. Create a Python virtual environment and install Brownie
```bash Bash theme={"system"}
python -m venv venv
source venv/bin/activate # On Windows, use venv\Scripts\activate
pip install eth-brownie
```
2. Configure environment in Brownie
Create a new Brownie project (add `--force` if a folder is not empty):
```bash Bash theme={"system"}
brownie init
```
In your project directory, create a `.env` file and add your Chainstack endpoint and private key:
```bash Bash theme={"system"}
CHAINSTACK_MAINNET_ENDPOINT=https://your-chainstack-mainnet-url
CHAINSTACK_DEVNET_ENDPOINT=https://your-chainstack-devnet-url
PRIVATE_KEY_MAINNET=your-mainnet-private-key
PRIVATE_KEY_DEVNET=your-devnet-private-key
```
Ensure that your terminal session loads these environment variables. You can manually source the .env file:
```bash Bash theme={"system"}
source .env
```
Update the `brownie-config.yaml` file in your project root:
```yaml yaml theme={"system"}
dotenv: .env
networks:
default: development
chainstack-mainnet:
host: ${CHAINSTACK_MAINNET_ENDPOINT}
chainid: 1
explorer: https://etherscan.io
chainstack-devnet:
host: ${CHAINSTACK_DEVNET_ENDPOINT}
chainid: 1337 # Example chain ID for devnet; adjust if different
```
Add a custom network to Brownie's network list:
```bash Bash theme={"system"}
brownie networks add Ethereum chainstack-mainnet host=${CHAINSTACK_MAINNET_ENDPOINT} chainid=1
brownie networks add Ethereum chainstack-devnet host=${CHAINSTACK_DEVNET_ENDPOINT} chainid=1337
```
To use your private key for deployments, you can create a `scripts/deploy.py` file:
```python Python theme={"system"}
import os
from brownie import accounts, Counter # Replace 'Counter' with your contract's class name
def main():
# Load the deployer's account using the private key from the environment variable
acct = accounts.add(os.getenv("PRIVATE_KEY_DEVNET")) # Use PRIVATE_KEY_MAINNET for mainnet
# Deploy the contract (Replace 'Counter' with the actual name of your contract)
contract = Counter.deploy({'from': acct})
# Output the contract address and transaction hash
print(f"Contract deployed at: {contract.address}")
print(f"Transaction hash: {contract.tx.txid}")
```
3. To deploy your contracts using the Chainstack endpoint, run
```bash Bash theme={"system"}
brownie run scripts/deploy.py --network chainstack-devnet
```
To add a custom RPC to Frame Desktop, open the wallet and navigate to the **Chains** section. Click on the chain details to add your Chainstack RPC endpoint.
## IDEs
Cloud-based IDEs provide the flexibility to use injected providers. MetaMask is the most commonly used one. By adding a Chainstack RPC node in MetaMask and connecting to the wallet in your IDE, you can seamlessly interact with the network through a Chainstack node.
### Remix IDE
To enable Remix IDE to interact with the network through a Chainstack node, you can follow these steps:
1. Install and set up MetaMask to use a Chainstack node for interaction. You can refer to the guide on Interacting through MetaMask for detailed instructions.
2. Open Remix IDE and navigate the [Connect wallet](https://remix.ethereum.org/) button. Here, select **Injected Web3 Provider** and then **MetaMask**.
## Programming languages and libraries
### Communication protocols
WebSockets and HTTP are essential communication protocols in web applications. WebSockets enable two-way, persistent communication between a client and a server, useful for real-time price feeds, live transaction monitoring, and event notifications. In contrast, HTTP follows a one-way, request-response model, ideal for retrieving periodic price updates and transaction histories.
### ethers.js
Build DApps using [ethers.js](https://github.com/ethers-io/ethers.js) and Ethereum nodes deployed with Chainstack.
1. Install ethers.js
```bash Bash theme={"system"}
npm install ethers
```
2. Initialize HTTP or WebSocket provider
```javascript Javascript theme={"system"}
import { ethers } from 'ethers';
// Using HTTP provider
const httpProvider = new ethers.JsonRpcProvider("/*YOUR_HTTP_CHAINSTACK_ENDPOINT*/");
httpProvider.getBlockNumber().then(console.log);
// Using WebSocket provider
const wsProvider = new ethers.WebSocketProvider("/*YOUR_WS_CHAINSTACK_ENDPOINT*/");
wsProvider.getBlockNumber().then((blockNumber) => {
console.log(blockNumber);
wsProvider.destroy();
});
```
### web3.py
Build DApps using [web3.py](https://github.com/ethereum/web3.py) and Ethereum nodes deployed with Chainstack.
1. Install web3.py
```bash Bash theme={"system"}
pip install web3
```
2. Initialize HTTP or WebSocket provider
```python Python theme={"system"}
from web3 import Web3
# Using HTTP provider
http_web3 = Web3(Web3.HTTPProvider("/*YOUR_HTTP_CHAINSTACK_ENDPOINT*/"))
print(http_web3.eth.block_number)
# Using WebSocket provider
with Web3(Web3.WebsocketProvider("/*YOUR_WS_CHAINSTACK_ENDPOINT*/")) as ws_web3:
print(ws_web3.eth.block_number)
```
### Nethereum (.NET)
Build DApps using [Nethereum](https://github.com/Nethereum/Nethereum) and Ethereum nodes deployed with Chainstack.
1. Install Nethereum
2. Initialize HTTP or WebSocket provider
```csharp C# theme={"system"}
using Nethereum.JsonRpc.WebSocketClient;
using Nethereum.Web3;
namespace TutorialWeb3
{
internal class Program
{
static void Main(string[] args)
{
// Using HTTP provider
var httpClient = new Web3("/*YOUR_HTTP_CHAINSTACK_ENDPOINT*/");
var httpBlockNumber = httpClient.Eth.Blocks.GetBlockNumber.SendRequestAsync().GetAwaiter().GetResult();
Console.WriteLine($"HTTP Block Number: {httpBlockNumber}");
// Using WebSocket provider
using (var wsClient = new WebSocketClient("/*YOUR_WS_CHAINSTACK_ENDPOINT*/"))
{
var web3Ws = new Web3(wsClient);
var wsBlockNumber = web3Ws.Eth.Blocks.GetBlockNumber.SendRequestAsync().GetAwaiter().GetResult();
Console.WriteLine("WS Block Number: " + wsBlockNumber);
}
}
}
}
```
### viem
Build DApps using [viem](https://github.com/wevm/viem) and Ethereum nodes deployed with Chainstack.
1. Install viem
2. Initialize HTTP or WebSocket provider
```typescript Typescript theme={"system"}
import { createPublicClient, http, webSocket } from 'viem';
import { mainnet } from 'viem/chains';
// Using HTTP provider
const httpClient = createPublicClient({
chain: mainnet,
transport: http("/*YOUR_HTTP_CHAINSTACK_ENDPOINT*/"),
});
const blockNumber = await httpClient.getBlockNumber();
console.log(blockNumber);
// Using WebSocket provider
const wsClient = createPublicClient({
chain: mainnet,
transport: webSocket("/*YOUR_WS_CHAINSTACK_ENDPOINT*/"),
})
const wsBlockNumber = await wsClient.getBlockNumber();
console.log(wsBlockNumber);
await wsClient.transport.getRpcClient().then((rpcClient) => {
rpcClient.close();
});
```
## Development frameworks and toolkits
### Foundry
Configure [Foundry](https://github.com/foundry-rs/foundry) to deploy contracts using Chainstack Ethereum nodes.
1. Install Foundry
```bash Bash theme={"system"}
curl -L https://foundry.paradigm.xyz | bash
foundryup
```
2. Configure environment in Foundry
Create a new Foundry project:
```bash Bash theme={"system"}
forge init my_project
cd my_project
```
Create a `.env` file in your project root and add your Chainstack endpoint and private key:
```bash Bash theme={"system"}
CHAINSTACK_MAINNET_ENDPOINT=https://your-chainstack-mainnet-url
CHAINSTACK_DEVNET_ENDPOINT=https://your-chainstack-devnet-url
PRIVATE_KEY_MAINNET=your-mainnet-private-key
PRIVATE_KEY_DEVNET=your-devnet-private-key
```
You need to load the environment variables into your shell session:
```bash Bash theme={"system"}
source .env
echo $CHAINSTACK_DEVNET_ENDPOINT
echo $PRIVATE_KEY_DEVNET
```
Update your `foundry.toml` file to include the Chainstack network:
```toml TOML theme={"system"}
[profile.default]
src = 'src'
out = 'out'
libs = ['lib']
[rpc_endpoints]
mainnet = "${CHAINSTACK_MAINNET_ENDPOINT}"
devnet = "${CHAINSTACK_DEVNET_ENDPOINT}"
```
3. Before deploying, ensure that your contracts are compiled. This step is crucial to avoid deployment issues.
```bash Bash theme={"system"}
forge build
```
4. To use the Chainstack endpoint for deployment, you can use the following command:
```bash Bash theme={"system"}
forge create --rpc-url ${CHAINSTACK_DEVNET_ENDPOINT} --private-key ${PRIVATE_KEY_DEVNET} src/YourContract.sol:YourContract
```
Alternatively, you can create a deployment script in the `script` folder, for example `Deploy.s.sol`:
```solidity solidity theme={"system"}
// script/Deploy.s.sol
// Specify the Solidity version
pragma solidity ^0.8.20;
// Import the Forge script library
import "forge-std/Script.sol";
// Import your contract
import "../src/YourContract.sol";
contract DeployScript is Script {
function run() external {
// Retrieve the deployer's private key from the environment variables
uint256 deployerPrivateKey = vm.envUint("PRIVATE_KEY_DEVNET"); // Change to PRIVATE_KEY_MAINNET for mainnet
// Start broadcasting transactions using the deployer's private key
vm.startBroadcast(deployerPrivateKey);
// Deploy the contract
YourContract yourContract = new YourContract();
// Stop broadcasting transactions
vm.stopBroadcast();
// Log the deployed contract address
console2.log("Contract deployed at:", address(yourContract));
}
}
```
Then run the script with:
```bash Bash theme={"system"}
forge script script/Deploy.s.sol:DeployScript --rpc-url devnet--broadcast
```
5. Interact with the blockchain using Cast. Use the following command to query the balance of an Ethereum address:
```bash Bash theme={"system"}
cast balance --rpc-url $CHAINSTACK_DEVNET_ENDPOINT
```
Replace \ with the actual Ethereum address you want to query.
### Hardhat
Configure [Hardhat](https://github.com/NomicFoundation/hardhat) to deploy contracts using Chainstack Ethereum nodes.
1. Install Hardhat and other dependencies
```bash Bash theme={"system"}
npm init -y
npm install --save-dev hardhat @nomiclabs/hardhat-ethers ethers dotenv
```
2. Configure environment in Hardhat
Create a `.env` file in your project root and add your Chainstack endpoint and private key:
```bash Bash theme={"system"}
CHAINSTACK_MAINNET_ENDPOINT=https://your-chainstack-mainnet-url
CHAINSTACK_DEVNET_ENDPOINT=https://your-chainstack-devnet-url
PRIVATE_KEY_MAINNET=your-mainnet-private-key
PRIVATE_KEY_DEVNET=your-devnet-private-key
```
Initiate a project:
```bash Bash theme={"system"}
npx hardhat init
```
Update your `hardhat.config.js` file to use the Chainstack endpoint:
```javascript Javascript theme={"system"}
require('@nomiclabs/hardhat-ethers');
require('dotenv').config();
module.exports = {
solidity: "0.8.20", // Specify the required compiler version
networks: {
mainnet: {
url: process.env.CHAINSTACK_MAINNET_ENDPOINT,
accounts: [process.env.PRIVATE_KEY_MAINNET] // Mainnet private key
},
devnet: {
url: process.env.CHAINSTACK_DEVNET_ENDPOINT,
accounts: [process.env.PRIVATE_KEY_DEVNET] // Devnet private key
}
}
};
```
3. To deploy your contracts using the Chainstack endpoint, you can create a deployment script in the `scripts` folder, for example deploy.js:
```javascript Javascript theme={"system"}
const hre = require("hardhat");
async function main() {
// Retrieve the deployer account from the list of signers
const [deployer] = await hre.ethers.getSigners();
console.log("Deploying contracts with the account:", deployer.address);
// Load the contract factory from the contracts folder
const Token = await hre.ethers.getContractFactory("MyToken"); // Replace "MyToken" with your contract name
// Specify the initial supply for the token (adjust as necessary)
const initialSupply = hre.ethers.utils.parseUnits("1000", 18); // Adjust the supply and decimals as needed
// Deploy the contract and wait for it to be mined
const token = await Token.deploy(initialSupply);
await token.deployed();
// Output the contract address and transaction hash once deployed
console.log("Contract deployed at address:", token.address);
console.log("Transaction hash:", token.deployTransaction.hash);
}
// Execute the main function and handle potential errors
main()
.then(() => process.exit(0))
.catch((error) => {
console.error("Error during deployment:", error);
process.exit(1);
});
```
4. Compile the contracts
```tsx Bash theme={"system"}
npx hardhat compile
```
5. Use the appropriate network flag (mainnet or devnet) to deploy to the respective network
```bash Bash theme={"system"}
npx hardhat run scripts/deploy.js --network devnet
```
### Scaffold-ETH 2
Configure [Scaffold-ETH 2](https://github.com/scaffold-eth/scaffold-eth-2) to deploy contracts using Chainstack Ethereum nodes.
1. Clone the Scaffold-ETH 2 repository
```bash Bash theme={"system"}
git clone https://github.com/scaffold-eth/scaffold-eth-2.git
cd scaffold-eth-2
```
2. Install dependencies
```bash Bash theme={"system"}
yarn install
```
3. Create a .env.local file in the root directory of your project
```bash Bash theme={"system"}
touch .env.local
```
4. Add your Chainstack endpoint and private key to the .env.local file
```
CHAINSTACK_MAINNET_ENDPOINT=https://your-chainstack-mainnet-url
CHAINSTACK_DEVNET_ENDPOINT=https://your-chainstack-devnet-url
DEPLOYER_PRIVATE_KEY=your-private-key-here
```
Note: by default, Scaffold-ETH 2 uses Alchemy RPC nodes and it assumes the config contains an Alchemy API key. We can override this setting Chainstack RPC nodes and updating some other configs.
5. Modify the packages/hardhat/hardhat.config.ts file to configure the Chainstack endpoint. Locate the networks section and add or modify the configuration for the Chainstack networks
```javascript Bash theme={"system"}
const config: HardhatUserConfig = {
solidity: "0.8.20", // Ensure to specify the correct Solidity version
networks: {
mainnet: {
url: process.env.CHAINSTACK_MAINNET_ENDPOINT || `https://eth-mainnet.alchemyapi.io/v2/${providerApiKey}`, // Use the Chainstack mainnet endpoint
// accounts: [process.env.DEPLOYER_PRIVATE_KEY_MAINNET as string], // Mainnet private key
},
sepolia: {
url: process.env.CHAINSTACK_DEVNET_ENDPOINT || `https://eth-sepolia.g.alchemy.com/v2/${providerApiKey}`, // Use the Chainstack devnet endpoint
// accounts: [process.env.DEPLOYER_PRIVATE_KEY_DEVNET as string], // Devnet private key
},
// ... other network configurations
},
};
```
6. Compile contracts using Hardhat
```bash Bash theme={"system"}
cd packages/hardhat
yarn hardhat compile
```
7. To deploy your contracts using the Chainstack endpoint, run
```bash theme={"system"}
yarn deploy --network sepolia
```
8. To start the Next.js app with the Chainstack configuration
```bash theme={"system"}
yarn start
```
### Truffle (no longer maintained)
Configure [Truffle](https://github.com/trufflesuite/truffle) to deploy contracts using Chainstack Ethereum nodes.
1. Install Truffle and other dependencies
```bash theme={"system"}
# Initialize a new npm project
npm init -y
# Install Truffle as a local development dependency
npm install --save-dev truffle @truffle/hdwallet-provider dotenv
```
2. Configure environment in Truffle
Initialize a new Truffle project:
```bash Bash theme={"system"}
npx truffle init
```
Create a `.env` file in your project root and add your Chainstack endpoint and private key:
```bash Bash theme={"system"}
CHAINSTACK_MAINNET_ENDPOINT=https://your-chainstack-mainnet-url
CHAINSTACK_DEVNET_ENDPOINT=https://your-chainstack-devnet-url
PRIVATE_KEY_MAINNET=your-mainnet-private-key
PRIVATE_KEY_DEVNET=your-devnet-private-key
```
Update your `truffle-config.js` file to use the Chainstack endpoint:
```javascript Javascript theme={"system"}
require('dotenv').config();
const HDWalletProvider = require('@truffle/hdwallet-provider');
module.exports = {
networks: {
// Configuration for Mainnet
mainnet: {
provider: () => new HDWalletProvider(process.env.PRIVATE_KEY_MAINNET, process.env.CHAINSTACK_MAINNET_ENDPOINT),
network_id: 1, // Mainnet's network ID
},
// Configuration for Devnet
devnet: {
provider: () => new HDWalletProvider(process.env.PRIVATE_KEY_DEVNET, process.env.CHAINSTACK_DEVNET_ENDPOINT),
network_id: 11155111, // Sepolia
},
},
compilers: {
solc: {
version: "0.8.20", // Specify the Solidity compiler version
},
},
};
```
3. Create a migration script in the migrations folder to deploy your contract (migrations/1\_deploy\_contract\_name.js)
```javascript Javascript theme={"system"}
// Import your contract artifact
const YourContract = artifacts.require("CONTRACT_NAME");
module.exports = function (deployer) {
deployer.deploy(YourContract);
};
```
4. Compile the contracts
```jsx Bash theme={"system"}
npx truffle compile
```
5. To deploy your contract using the Chainstack endpoint, run
```bash Bash theme={"system"}
truffle migrate --network devnet
```
### Ape
Configure [Ape Framework](https://github.com/ApeWorX/ape) to deploy contracts using Chainstack Ethereum nodes. Before performing the following steps, you can set up and activate a virtual environment.
1. Install Ape and dependencies
```bash Bash theme={"system"}
pip install eth-ape
```
2. Configure environment in Ape
Initialize a project:
```bash Bash theme={"system"}
ape init
```
Create or update your `ape-config.yaml` file in your project root:
```yaml yaml theme={"system"}
name: ape-1
contracts_folder: contracts # Default is contracts
default_ecosystem: ethereum # Default is ethereum
node:
ethereum:
mainnet:
uri: CHAINSTACK_MAINNET_ENDPOINT
sepolia:
uri: CHAINSTACK_SEPOLIA_ENDPOINT
dependencies:
- name: OpenZeppelin
github: OpenZeppelin/openzeppelin-contracts/token/ERC20/ERC20.sol # Example
version: 4.4.2
```
3. Import an account. You'll be prompted to enter a private key and pass phrase to encrypt it.
```bash Bash theme={"system"}
ape accounts import devnet_deployer
```
4. To deploy your contracts using the Chainstack endpoint, you can create a deployment script, for example scripts/deploy.py
```python Python theme={"system"}
from ape import accounts, project
def main():
# Load the account for deployment
# Change 'devnet_deployer' to 'mainnet_deployer' when deploying to mainnet
account = accounts.load("devnet_deployer")
# Deploy the contract
contract = account.deploy(project.MyContract) # Replace 'MyContract' with your contract's name and add its arguments
# Output the contract address
print(f"Contract deployed at: {contract.address}")
# Output the transaction hash
print(f"Transaction hash: {contract.txn_hash.hex()}")
if __name__ == "__main__":
main()
```
5. Compile contracts. Before deploying, ensure your contracts are compiled. Ape automatically compiles contracts when deploying, but you can manually compile them if needed
```bash Bash theme={"system"}
ape compile
```
6. Run the deployment script using
```bash Bash theme={"system"}
ape run scripts/deploy.py --network ethereum:sepolia
```
### Brownie
Configure [Brownie](https://github.com/eth-brownie/brownie) to deploy contracts using Chainstack Ethereum nodes.
1. Create a Python virtual environment and install Brownie
```bash Bash theme={"system"}
python -m venv venv
source venv/bin/activate # On Windows, use venv\Scripts\activate
pip install eth-brownie
```
2. Configure environment in Brownie
Create a new Brownie project (add `--force` if a folder is not empty):
```bash Bash theme={"system"}
brownie init
```
In your project directory, create a `.env` file and add your Chainstack endpoint and private key:
```bash Bash theme={"system"}
CHAINSTACK_MAINNET_ENDPOINT=https://your-chainstack-mainnet-url
CHAINSTACK_DEVNET_ENDPOINT=https://your-chainstack-devnet-url
PRIVATE_KEY_MAINNET=your-mainnet-private-key
PRIVATE_KEY_DEVNET=your-devnet-private-key
```
Ensure that your terminal session loads these environment variables. You can manually source the .env file:
```bash Bash theme={"system"}
source .env
```
Update the `brownie-config.yaml` file in your project root:
```yaml yaml theme={"system"}
dotenv: .env
networks:
default: development
chainstack-mainnet:
host: ${CHAINSTACK_MAINNET_ENDPOINT}
chainid: 1
explorer: https://etherscan.io
chainstack-devnet:
host: ${CHAINSTACK_DEVNET_ENDPOINT}
chainid: 1337 # Example chain ID for devnet; adjust if different
```
Add a custom network to Brownie's network list:
```bash Bash theme={"system"}
brownie networks add Ethereum chainstack-mainnet host=${CHAINSTACK_MAINNET_ENDPOINT} chainid=1
brownie networks add Ethereum chainstack-devnet host=${CHAINSTACK_DEVNET_ENDPOINT} chainid=1337
```
To use your private key for deployments, you can create a `scripts/deploy.py` file:
```python Python theme={"system"}
import os
from brownie import accounts, Counter # Replace 'Counter' with your contract's class name
def main():
# Load the deployer's account using the private key from the environment variable
acct = accounts.add(os.getenv("PRIVATE_KEY_DEVNET")) # Use PRIVATE_KEY_MAINNET for mainnet
# Deploy the contract (Replace 'Counter' with the actual name of your contract)
contract = Counter.deploy({'from': acct})
# Output the contract address and transaction hash
print(f"Contract deployed at: {contract.address}")
print(f"Transaction hash: {contract.tx.txid}")
```
3. To deploy your contracts using the Chainstack endpoint, run
```bash Bash theme={"system"}
brownie run scripts/deploy.py --network chainstack-devnet
```