> ## Documentation Index
> Fetch the complete documentation index at: https://docs.chainstack.com/llms.txt
> Use this file to discover all available pages before exploring further.
# Debugging Subgraphs with a local Graph node
> Debug subgraphs locally using Docker Compose and Graph Node. Fix indexing errors, inspect logs, and troubleshoot schema issues before production deployment.
**Chainstack Subgraphs is transitioning to Ormi**
Chainstack is sunsetting its Subgraphs service and partnering with [Ormi](https://ormilabs.com/), a next-generation subgraph indexer built for real-time production workloads, to support existing subgraphs. Your data and schemas remain unchanged—your only action is to swap the endpoint.
* No new subgraphs after January 5, 2026
* Service disabled on February 1, 2026
* Ormi provides one free month (Feb 1 – March 1, 2026)
For migration assistance, join the dedicated Telegram support group (check your email for the invitation).
See the [Ormi–Chainstack transition guide](https://docs.ormilabs.com/subgraphs/tutorials/migrate-chainstack-subgraphs) for full details.
**TLDR:**
* Learn how to run a local Graph Node using Docker Compose to debug subgraphs more thoroughly.
* Understand how to identify and fix errors by inspecting logs, adjusting schema requirements, and verifying entity data storage.
* Configure log levels in both local environments and Chainstack Subgraphs to pinpoint issues and streamline the debugging process.
* Finally, deploy your corrected subgraph to Chainstack Subgraphs for ongoing data indexing without disruptions.
## Introduction
So your subgraph is now ready, and you deployed it to Chainstack Subgraphs! You were careful in [writing your schemas and mappings](/docs/subgraphs-tutorial-working-with-schemas), so your subgraph should work, right? Well, maybe not.
Despite all the due diligence you might employ, it is possible that your subgraph encounters an error while indexing data. If this happens, the subgraph will not index any more data, and you might even be unable to query already indexed data.
This article will teach you how to spin up a local [Graph Node](https://github.com/graphprotocol/graph-node) using Docker Compose, and how to configure the logs of that local node to pinpoint the error that is plaguing your code.
## Before we begin
* This tutorial isn’t a beginner-friendly introduction to subgraph development. If you have never created a subgraph before, we have a [beginner’s guide to subgraph development](/docs/subgraphs-tutorial-a-beginners-guide-to-getting-started-with-the-graph) on our docs.
* In my experience, it is really difficult to manually spin up a Graph Node with Cargo, IPFS, and Postgres. You need to install a whole bunch of dependencies, and even then the source code may not compile due to OS-specific package dependency issues. If you want to try your hand at setting up a local Graph Node without Docker, you can refer to the repo’s [README file](https://github.com/graphprotocol/graph-node#prerequisites).
* The author of this post, however, recommends you save yourselves a whole lot of hair-scratching and head-banging by setting up Docker on your machine. [Docker](https://docs.docker.com/get-started/) is a tool that allows you to develop your applications in an isolated environment called a container. These containers can be replicated across different machines, ensuring a consistent and easy-to-set-up dev environment.
* Docker Compose, more specifically, can spin up a multi-container dev environment from a single YAML file that contains all the required configuration data.
* Before moving on with the tutorial, you need to install [Docker Engine](https://docs.docker.com/engine/), [Docker Desktop](https://docs.docker.com/desktop/), and [Docker Compose](https://docs.docker.com/compose/). This might seem tedious at first, but it will save you a lot of time and effort in the long run. With Docker set up, you don’t need to worry if a particular application isn’t well-suited to run on your OS.
## What will we be doing?
The Bored Apes Yacht Club (BAYC) subgraph that we [code along in the beginner’s guide](/docs/subgraphs-tutorial-a-beginners-guide-to-getting-started-with-the-graph) works perfectly. However, that wasn’t the initial case when I had a subgraph that failed soon after deployment. Not knowing where exactly I was making an error, I had to redeploy the subgraph many times after minor tweaks to nail down the bug.
I will take you through the debugging process I followed, hopefully teaching you the basics of debugging subgraphs along the way.
In this tutorial, we will:
1. Create a buggy subgraph.
2. Spin up a local Graph Node using Docker Compose.
3. Deploy a buggy subgraph on the said node and check for data availability.
4. Configure the environment variables in the YAML configuration file to tweak the exact data that is logged by our local node to check for errors.
5. Finally, deploy the debugged subgraph to Chainstack Subgraphs for long-term indexing.
## Creating our subgraph
This tutorial won’t dive deep into the details of this subgraph. I recommend you check out the beginner’s guide for that, linked above. I will, however, try to incorporate brief explanations.
1. Install [graph-cli](https://www.npmjs.com/package/@graphprotocol/graph-cli) on your machine.
2. Create a new directory and initialize a project in it by running:
```bash theme={"system"}
graph init
```
3. Set up a subgraph with the following parameters:
```yaml theme={"system"}
Protocol: Ethereum
Product for which to initialize: subgraph-studio
Subgraph Slug: BAYC
Directory to create the subgraph in: ChainstackSubgraph
Ethereum network: mainnet
Contract address: 0xBC4CA0EdA7647A8aB7C2061c2E118A18a936f13D
Contract Name: BAYC
Index contract events as entities: true
```
4. Paste the following code in `schema.graphql`:
```graphql theme={"system"}
type Transfer @entity(immutable: true) {
id: Bytes!
from: Bytes!
to: Bytes!
tokenId: BigInt!
blockNumber: BigInt!
transactionHash: Bytes!
}
type BoredApe @entity {
id: ID!
creator: Bytes!
newOwner: Bytes!
tokenURI: String!
blockNumber: BigInt!
}
type Property @entity {
id: ID!
image: String!
background: String!
clothes: String!
earring: String!
eyes: String!
fur: String!
hat: String!
mouth: String!
}
```
Explaining `schema.graphql`:
* The `Transfer` entity will index data every time a Bored Ape NFT is transferred. It will log the transaction data, as well as the recipient and receiver addresses.
* The `BoredApe` entity will index all the major information about an ape, including the original creator and the current owner.
* The `Property` entity will index the IPFS metadata for all the apes. Each instance of this entity can be identified using the `id` field, which is nothing but the `tokenID` of the ape.
5. Delete everything inside `subgraph.yaml`, and paste the following code:
```yaml theme={"system"}
specVersion: 0.0.5
description: A subgraph to index data on the Bored Apes contract
features:
- ipfsOnEthereumContracts
schema:
file: ./schema.graphql
dataSources:
- kind: ethereum
name: BAYC
network: mainnet
source:
address: "0xBC4CA0EdA7647A8aB7C2061c2E118A18a936f13D"
abi: BAYC
startBlock: 12287507
mapping:
kind: ethereum/events
apiVersion: 0.0.7
language: wasm/assemblyscript
entities:
- Transfer
- BoredApe
- Property
abis:
- name: BAYC
file: ./abis/BAYC.json
eventHandlers:
- event: Transfer(indexed address,indexed address,indexed uint256)
handler: handleTransfer
file: ./src/bayc.ts
```
Explaining `subgraph.yaml`:
* In here, we declared the data source (address of the BAYC smart contract), the entities we want to index, and the events we want to look out for. For our use case, tracking the `Transfer` event from the smart contract will suffice.
* For subgraphs that want to index IPFS data, `ipfsOnEthereumContracts` must be declared under features.
6. Run `graph codegen` in your terminal. You must run this command every time you edit the schema or YAML file.
7. Go to `src/bayc.ts` and delete everything inside it. Paste the following code:
```javascript theme={"system"}
import {
Transfer as TransferEvent,
BAYC,
} from "../generated/BAYC/BAYC"
import {
BoredApe,
Transfer,
Property
} from "../generated/schema"
import { ipfs, json, JSONValue, log } from '@graphprotocol/graph-ts'
export function handleTransfer(event: TransferEvent): void {
let transfer = new Transfer(event.transaction.hash.concatI32(event.logIndex.toI32()))
transfer.from = event.params.from
transfer.to = event.params.to
transfer.tokenId = event.params.tokenId
transfer.blockNumber = event.block.number
transfer.transactionHash = event.transaction.hash
transfer.save()
let contractAddress = BAYC.bind(event.address);
let boredApe = BoredApe.load(event.params.tokenId.toString());
if(boredApe==null){
boredApe = new BoredApe(event.params.tokenId.toString());
boredApe.creator=event.params.to;
boredApe.tokenURI=contractAddress.tokenURI(event.params.tokenId);
}
boredApe.newOwner=event.params.to;
boredApe.blockNumber=event.block.number;
boredApe.save();
const ipfshash = "QmeSjSinHpPnmXmspMjwiXyN6zS4E9zccariGR3jxcaWtq"
let tokenURI = "/" + event.params.tokenId.toString();
let property = Property.load(event.params.tokenId.toString());
if (property == null) {
property = new Property(event.params.tokenId.toString());
let fullURI = ipfshash + tokenURI;
let ipfsData = ipfs.cat(fullURI);
if (ipfsData) {
let ipfsValues = json.fromBytes(ipfsData);
let ipfsValuesObject = ipfsValues.toObject();
if (ipfsValuesObject) {
let image = ipfsValuesObject.get('image');
let attributes = ipfsValuesObject.get('attributes');
let attributeArray: JSONValue[];
if (image) {
property.image = image.toString();
}
if (attributes) {
attributeArray = attributes.toArray();
for (let i = 0; i < attributeArray.length; i++) {
let attributeObject = attributeArray[i].toObject();
let trait_type = attributeObject.get('trait_type');
let value_type = attributeObject.get('value');
let trait: string;
let value: string;
if (trait_type && value_type) {
trait = trait_type.toString();
value = value_type.toString();
if (trait && value) {
if (trait == "Background") {
property.background = value;
}
if (trait == "Clothes") {
property.clothes = value;
}
if (trait == "Earring") {
property.earring = value;
}
if (trait == "Eyes") {
property.eyes = value;
}
if (trait == "Fur") {
property.fur = value;
}
if (trait == "Hat") {
property.hat = value;
}
if (trait == "Mouth") {
property.mouth = value;
}
}
}
}
}
}
}
}
}
```
Explaining `src/bayc.ts`:
* We write the mapping logic for our entities under the `handleTransfer` function. This function will be automatically triggered every time the `Transfer` event is triggered in the BAYC smart contract. We configured this behavior inside the YAML file by creating the event-handler pair.
* We get the data points we need for the `Transfer` and `BoredApe` entities straight from the logs emitted by the smart contract.
* To index IPFS metadata, however, we use the `[ipfs.cat](http://ipfs.cat)` method from the [graph-ts library](https://github.com/graphprotocol/graph-ts) by passing it the IPFS hash and the token URI for a specific ape.
* We need to include a null check at every step while parsing the IPFS metadata, since an IPFS node may be unavailable at a given time, or the data we are querying may not exist at all.
And that’s it. Run `graph build` to compile your subgraph. Technically, you can even deploy this code to Chainstack, and it will index data without failing explicitly.
When I tried querying this subgraph, however, I realized I could only query data for the `Transfer` and `BoredApe` entities. The `Property` entity didn’t return any data at all.
But how do you know that the fault definitely lies with your subgraph? What if Chainstack is running a buggy indexer? Within your Chainstack Subgraphs console, you can query all 4 levels of logs that are defined in The Graph’s [logging API](https://thegraph.com/docs/en/developing/assemblyscript-api/#logging-api). You can always refer to these to try and debug your subgraphs. You can use these logs to debug your subgraph, and then there is no need to set up a local Graph Node at all.
Let us recreate this entire scenario on our machine.
## Running a local Graph Node
1. If you have Docker and Docker Compose installed on your machine, the easiest way to set up a Graph Node locally:
```bash theme={"system"}
git clone https://github.com/pranavdaa/Graph-Node-Local.git
```
This will clone a repo onto your machine that just contains the YAML configuration file we need. Make sure that Docker Desktop is running on your machine.
2. Open the cloned directory, and then the `docker-compose.yaml` file in a code editor. Even the old and rusty Notepad++ will do. Docker will download the required dependencies using official images uploaded to it. Go to the image under IPFS, and change the line to the following:
```yaml theme={"system"}
image: ipfs/go-ipfs:v0.17.0
```
This will result in Docker fetching a relatively recent version of IPFS. You can always check [Docker hub](https://hub.docker.com/) for the latest available versions of an image. You can also skip specifying a particular version if you wish to work with the latest available versions.
3. To index subgraphs that index IPFS data using the `.cat` method, we need to configure an extra environment variable. Inside the `environment` object, add an environment variable like this:
```yaml theme={"system"}
GRAPH_ALLOW_NON_DETERMINISTIC_IPFS: 1
```
4. Lastly, we need to pass an RPC URL for an Ethereum archive mainnet node to the YAML file. You can set up an archive node using [Chainstack](https://chainstack.com/). If you don’t know how to set up a node with Chainstack, refer to our [blog](https://chainstack.com/creating-a-public-chain-node-with-chainstack/). Edit the `ethereum` environment variable like this:
```yaml theme={"system"}
ethereum: 'mainnet:YOUR_CHAINSTACK_ENDPOINT'
```
5. Save the YAML file. Open a new terminal inside the cloned repo, and run:
```bash theme={"system"}
docker-compose up
```
This command is all you need. Open Docker Desktop and you should see a container named `graph-node-local` running. This step might take a while to execute the first time.
See how powerful this is? We didn’t have to download or set up a single dependency, and Docker automatically set up everything on our local endpoints. You can stop this container, and hence the Graph Node, by simply halting your terminal.
Finally, make sure the `latest_block_head` in your terminal corresponds to the latest block on [Etherscan](https://etherscan.io/). Otherwise, it means your node is lagging behind.
## Deploying to a local Graph Node
If you set up a subgraph project using `graph init`, the graph-cli creates a few commands inside the `package.json` file that can be executed using `npm run`.
1. Open a new terminal at the root of the subgraph project. To compile your subgraph, run:
```bash theme={"system"}
graph codegen && graph build
```
2. To deploy your subgraph to the local Graph Node, run the following command by passing any random version number to the terminal:
```bash theme={"system"}
npm run create-local && npm run deploy-local
```
Your subgraph is now deployed on a Graph Node running locally on your machine. Open the previous terminal where you ran the `docker-compose up` command. It should now be indexing data by requesting data from the Ethereum archive node we passed to it.
While the subgraph won’t be able to show us data from the recently added blocks, we can still query it. The `graph-cli` provides you with a UI interface URL and a GraphQL query endpoint in the terminal. Either one of those can be used to query the subgraph. In this tutorial, we will be using the UI interface. The Graph’s query API is discussed in detail in the [beginner’s guide](/docs/subgraphs-tutorial-a-beginners-guide-to-getting-started-with-the-graph). Feel free to refer to that if you feel lost here.
In the next section, we will start debugging our subgraph.
## First debugging iteration
1. Open the UI URL in your browser. For me, it is `http://localhost:8000/subgraphs/name/BAYC/graphql`. This URL may be different for you.
2. Run the following query in the interface:
```graphql theme={"system"}
{
transfers(first:3) {
id
tokenId
from
to
blockNumber
}
boredApes(first:3) {
id
creator
newOwner
tokenURI
blockNumber
}
properties(first:3) {
id
image
background
clothes
eyes
fur
mouth
earring
hat
}
}
```
This query will return the first three instances of each entity from our subgraph’s data store. This is what I get back:
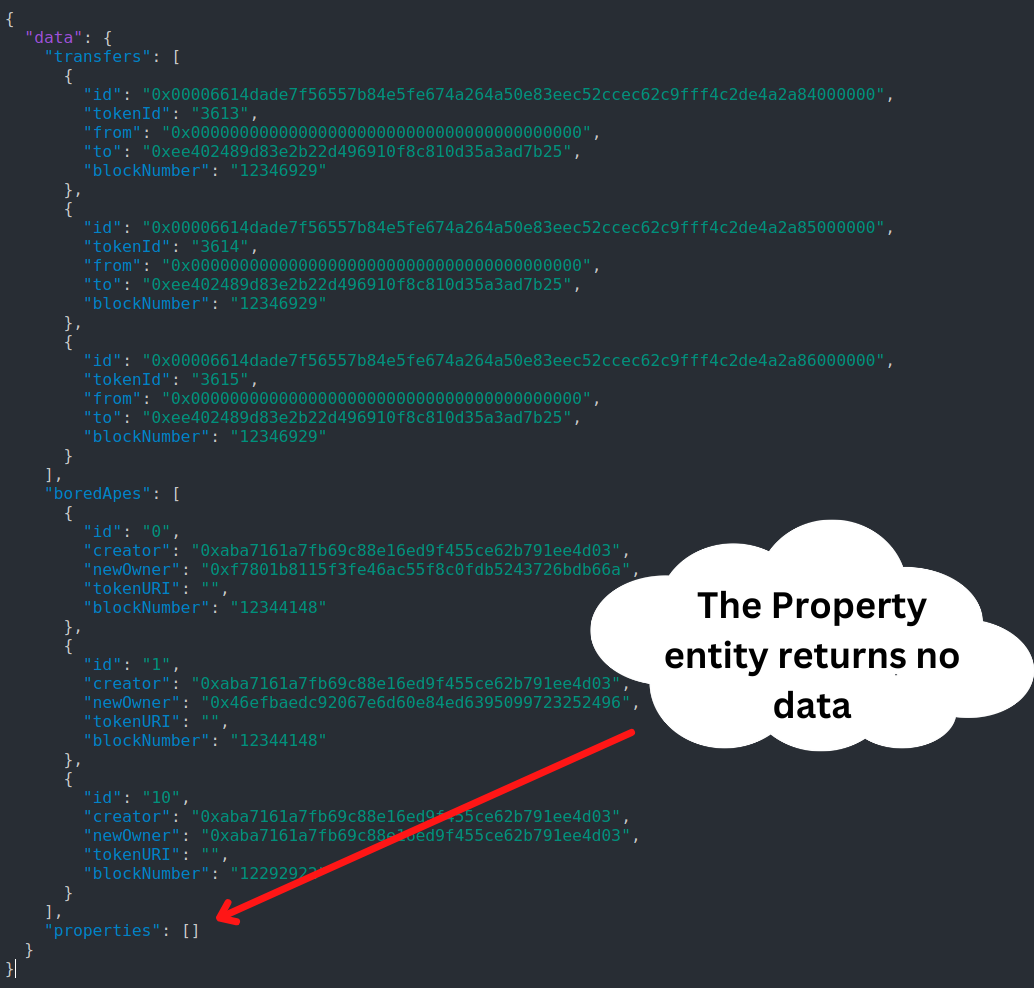 Clearly, there’s something wrong. When I saw that the `Property` entity had indexed no data, my first guess was that I passed the wrong IPFS path to the `ipfs.cat()` method. To double-check that, I used The Graph’s logging API.
This is where the fun starts. Let us do this!
1. Go to the terminal in your subgraph’s directory, and run:
```bash theme={"system"}
npm run remove-local
```
This command will remove the buggy subgraph from your node’s data store.
2. Go to the terminal running the local node, and stop the terminal (ctrl+c on my system, may be different on yours).
3. Go to `src/bayc.ts` in your subgraph code, and add this line to the file right before we invoke the `ipfs.cat()` method:
```typescript theme={"system"}
log.info('The fullURI is: {} ', [fullURI]);
```
4. Save the file.
5. Restart the Docker container using `docker-compose up` and re-deploy to the local node from the subgraph’s directory.
With this change, you will notice that the Graph Node logs out the `fullURI` every time the handler function runs. When I go to `ipfs://`, I can see all the metadata for the specific NFT. So this is not it. We’re missing something else.
Back to square 1.
### Alternative link
If `ipfs://` doesn’t work on your machine, try accessing IPFS with `https://ipfs.io/ipfs/`.
## Second debugging iteration
At this point, it finally hit me. The `Property` entity wasn’t returning `null` in the data fields. That would imply that the IPFS data is not being indexed correctly.
No. The `Property` entity isn’t returning anything at all. As in, the entity doesn’t have a single instance in our subgraph’s data store. This means we aren’t correctly storing the new instances generated every time the `handleTransfer` function is triggered.
I scan the code carefully once more, armed with this knowledge. And I finally catch it.
Check out the code for the `src/bayc.ts` file again. Specifically, notice the `save()` method. Every time we generate and fill out a new instance of an entity, we need to *SAVE* it to the subgraph’s data store. That is what the `save()` method does.
While writing the mapping function, I never *saved* any instance of the `Property` entity to the data store.
To solve this error, add the following expression to the `handlerTransfer` right before it ends:
```graphql src/bayc.ts theme={"system"}
property.save()
```
As before, build the subgraph again, and deploy it to the local node.
## Third debugging iteration
It is always a good moment when you have finally solved all the errors in your code. This was not one of those moments.
As soon as my subgraph started indexing, it failed with the following error:
```graphql GraphQL theme={"system"}
Entity Property[0]: missing value for non-nullable field `hat`
```
Clearly, there’s something wrong. When I saw that the `Property` entity had indexed no data, my first guess was that I passed the wrong IPFS path to the `ipfs.cat()` method. To double-check that, I used The Graph’s logging API.
This is where the fun starts. Let us do this!
1. Go to the terminal in your subgraph’s directory, and run:
```bash theme={"system"}
npm run remove-local
```
This command will remove the buggy subgraph from your node’s data store.
2. Go to the terminal running the local node, and stop the terminal (ctrl+c on my system, may be different on yours).
3. Go to `src/bayc.ts` in your subgraph code, and add this line to the file right before we invoke the `ipfs.cat()` method:
```typescript theme={"system"}
log.info('The fullURI is: {} ', [fullURI]);
```
4. Save the file.
5. Restart the Docker container using `docker-compose up` and re-deploy to the local node from the subgraph’s directory.
With this change, you will notice that the Graph Node logs out the `fullURI` every time the handler function runs. When I go to `ipfs://`, I can see all the metadata for the specific NFT. So this is not it. We’re missing something else.
Back to square 1.
### Alternative link
If `ipfs://` doesn’t work on your machine, try accessing IPFS with `https://ipfs.io/ipfs/`.
## Second debugging iteration
At this point, it finally hit me. The `Property` entity wasn’t returning `null` in the data fields. That would imply that the IPFS data is not being indexed correctly.
No. The `Property` entity isn’t returning anything at all. As in, the entity doesn’t have a single instance in our subgraph’s data store. This means we aren’t correctly storing the new instances generated every time the `handleTransfer` function is triggered.
I scan the code carefully once more, armed with this knowledge. And I finally catch it.
Check out the code for the `src/bayc.ts` file again. Specifically, notice the `save()` method. Every time we generate and fill out a new instance of an entity, we need to *SAVE* it to the subgraph’s data store. That is what the `save()` method does.
While writing the mapping function, I never *saved* any instance of the `Property` entity to the data store.
To solve this error, add the following expression to the `handlerTransfer` right before it ends:
```graphql src/bayc.ts theme={"system"}
property.save()
```
As before, build the subgraph again, and deploy it to the local node.
## Third debugging iteration
It is always a good moment when you have finally solved all the errors in your code. This was not one of those moments.
As soon as my subgraph started indexing, it failed with the following error:
```graphql GraphQL theme={"system"}
Entity Property[0]: missing value for non-nullable field `hat`
```
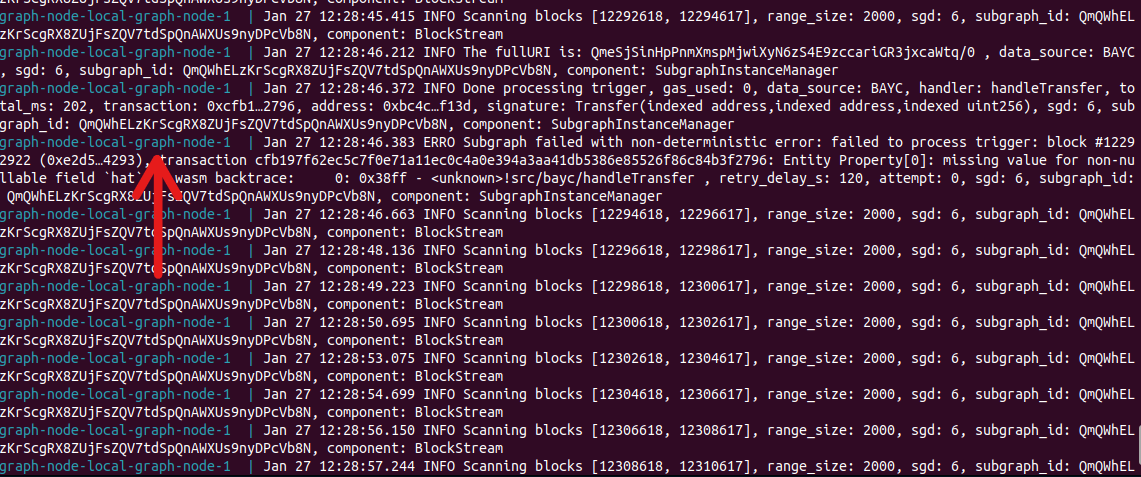 Notice `Property[0]` in the error log. This means that the very first instance of our entity failed to index. The field `hat` apparently can’t be `null`.
And again, it hit me.
Check out the code in the `schema.graphql` file. All of our entities are suffixed by the `!` symbol.
Each entity field marked by `!` has to contain a value, it can’t be `null`. Now, this makes sense for fields like `blockNumber` and `transactionHash`, since those values will never be `null`.
It is, however, possible, that a particular ape might not have all the 7 traits. In my experience, this is true more often than not. The very first Bored Ape, with `tokenID` 0, does not have a “hat”. Quite literally, it doesn’t have a hat. Hence, the metadata for this NFT returns `null`, when we try to query it for the value of the property `hat`. Check it out on [OpenSea](https://opensea.io/assets/ethereum/0xbc4ca0eda7647a8ab7c2061c2e118a18a936f13d/0).
Likewise, other apes will lack one or more of the properties that some other apes have. Thus, we need to edit the `Property` entity to look like this:
```graphql schema.graphql theme={"system"}
type Property @entity {
id: ID!
image: String
background: String
clothes: String
earring: String
eyes: String
fur: String
hat: String
mouth: String
}
```
Run the build and deploy commands again, hopefully for the last time.
Open the GraphQL URL again and query the `Property` entity like this:
```graphql GraphQL theme={"system"}
{
properties{
id
image
background
clothes
eyes
fur
mouth
earring
hat
}
}
```
This time around, I can successfully query my subgraph for the IPFS metadata. Hopefully, it works for you too.
At this point, I suggest you wait for a while before pushing it to production. Your subgraph may fail while indexing data from blocks further down the line.
If your subgraph fails way down the line, it might take a long while to re-index all the data after tweaking the code. In that case, note the block number where the subgraph fails, and set it as the `startBlock` in the YAML file. If you are confident that the changed code won’t cause the subgraph to fail on any of the blocks that were successfully indexed during the previous run, it makes sense to test out the subgraph on only the remaining blocks. This can save you time and resources.
Having successfully debugged the subgraph, we are now ready to deploy it to Chainstack Subgraphs.
This really is the simplest part. Run the `codegen` and `build` commands as before. Instead of deploying the subgraph to the local node, copy the deployment command from your Chainstack Subgraph’s console, and run it in a terminal at the root of your subgraph project.
## Conclusion
In this tutorial, you learned how to set up a local Graph Node on your machine and use it to debug your subgraph code. This is a good point to mention that The Graph node’s behavior can be tweaked in a variety of ways by configuring its environment variables. You can read about it in the [official documentation](https://github.com/graphprotocol/graph-node/blob/master/docs/environment-variables.md).
Chainstack Subgraphs also generates logs for you. You can always start by using those.
Practically speaking, it only makes sense to go through the whole debugging process if you need really detailed logs to pinpoint the error.
Again, you can configure the generated logs by adding or editing the environment variables in the `docker-compose.yaml` file.
Create an account on [Chainstack](https://chainstack.com/) today, to get access to super-fast, enterprise-grade blockchain indexers. Or maybe just hang around and check out our [Web3 \[De\]Coded section](/docs/web3-decoded-introduction) for cool Web3 tutorials and expert-level articles.
### See also
### About the author
Notice `Property[0]` in the error log. This means that the very first instance of our entity failed to index. The field `hat` apparently can’t be `null`.
And again, it hit me.
Check out the code in the `schema.graphql` file. All of our entities are suffixed by the `!` symbol.
Each entity field marked by `!` has to contain a value, it can’t be `null`. Now, this makes sense for fields like `blockNumber` and `transactionHash`, since those values will never be `null`.
It is, however, possible, that a particular ape might not have all the 7 traits. In my experience, this is true more often than not. The very first Bored Ape, with `tokenID` 0, does not have a “hat”. Quite literally, it doesn’t have a hat. Hence, the metadata for this NFT returns `null`, when we try to query it for the value of the property `hat`. Check it out on [OpenSea](https://opensea.io/assets/ethereum/0xbc4ca0eda7647a8ab7c2061c2e118a18a936f13d/0).
Likewise, other apes will lack one or more of the properties that some other apes have. Thus, we need to edit the `Property` entity to look like this:
```graphql schema.graphql theme={"system"}
type Property @entity {
id: ID!
image: String
background: String
clothes: String
earring: String
eyes: String
fur: String
hat: String
mouth: String
}
```
Run the build and deploy commands again, hopefully for the last time.
Open the GraphQL URL again and query the `Property` entity like this:
```graphql GraphQL theme={"system"}
{
properties{
id
image
background
clothes
eyes
fur
mouth
earring
hat
}
}
```
This time around, I can successfully query my subgraph for the IPFS metadata. Hopefully, it works for you too.
At this point, I suggest you wait for a while before pushing it to production. Your subgraph may fail while indexing data from blocks further down the line.
If your subgraph fails way down the line, it might take a long while to re-index all the data after tweaking the code. In that case, note the block number where the subgraph fails, and set it as the `startBlock` in the YAML file. If you are confident that the changed code won’t cause the subgraph to fail on any of the blocks that were successfully indexed during the previous run, it makes sense to test out the subgraph on only the remaining blocks. This can save you time and resources.
Having successfully debugged the subgraph, we are now ready to deploy it to Chainstack Subgraphs.
This really is the simplest part. Run the `codegen` and `build` commands as before. Instead of deploying the subgraph to the local node, copy the deployment command from your Chainstack Subgraph’s console, and run it in a terminal at the root of your subgraph project.
## Conclusion
In this tutorial, you learned how to set up a local Graph Node on your machine and use it to debug your subgraph code. This is a good point to mention that The Graph node’s behavior can be tweaked in a variety of ways by configuring its environment variables. You can read about it in the [official documentation](https://github.com/graphprotocol/graph-node/blob/master/docs/environment-variables.md).
Chainstack Subgraphs also generates logs for you. You can always start by using those.
Practically speaking, it only makes sense to go through the whole debugging process if you need really detailed logs to pinpoint the error.
Again, you can configure the generated logs by adding or editing the environment variables in the `docker-compose.yaml` file.
Create an account on [Chainstack](https://chainstack.com/) today, to get access to super-fast, enterprise-grade blockchain indexers. Or maybe just hang around and check out our [Web3 \[De\]Coded section](/docs/web3-decoded-introduction) for cool Web3 tutorials and expert-level articles.
### See also
### About the author
 Developer Advocate @ Chainstack
BUIDLs on Ethereum, zkEVMs, and The Graph protocol
Part-time Rust aficionado