> ## Documentation Index
> Fetch the complete documentation index at: https://docs.chainstack.com/llms.txt
> Use this file to discover all available pages before exploring further.
# Subgraph for friend.tech real-time trading data
> Index friend.tech trading data on Base L2 with subgraphs. Capture share trades, fees, and supply changes for social DApp analytics using Chainstack Subgraphs.
**Chainstack Subgraphs is transitioning to Ormi**
Chainstack is sunsetting its Subgraphs service and partnering with [Ormi](https://ormilabs.com/), a next-generation subgraph indexer built for real-time production workloads, to support existing subgraphs. Your data and schemas remain unchanged—your only action is to swap the endpoint.
* No new subgraphs after January 5, 2026
* Service disabled on February 1, 2026
* Ormi provides one free month (Feb 1 – March 1, 2026)
For migration assistance, join the dedicated Telegram support group (check your email for the invitation).
See the [Ormi–Chainstack transition guide](https://docs.ormilabs.com/subgraphs/tutorials/migrate-chainstack-subgraphs) for full details.
**TLDR:**
* Shows how to index the friend.tech trading activities on Coinbase’s L2 Base using Chainstack Subgraphs.
* Demonstrates how to capture key transaction data (e.g., trader, influencer, share price) from the protocol’s main contract and store it as queryable entities.
* Offers a practical example schema for analyzing fees, transaction details, and supply changes in a social DApp.
* Deploys on Chainstack for a robust and scalable subgraph solution powering analytics or trading automation.
## Introduction
The decentralized social network friend.tech has gathered substantial attention within the Web3 space lately. It enables the trading of users' tokenized stocks and is constructed on Coinbase's L2 network Base. With a surge in queries concerning the accessibility of this application's data, and considering the forthcoming release of the Base protocol in Chainstack Subgraphs hosting, we have prepared this tutorial. It aims to assist traders and analysts in launching their own subgraph, granting access to internal transactions, and if desired, facilitating the development of trading bots or financial analytics.
## Getting started
First, install the Graph CLI with either npm or yarn:
```shell npm theme={"system"}
npm install -g @graphprotocol/graph-cli
```
```shell yarn theme={"system"}
yarn global add @graphprotocol/graph-cli
```
After successful installation, initialize your subgraph project:
```shell Shell theme={"system"}
graph init --studio friendtech-by-chainstack
```
You will be prompted the questions that should be answered as follows:
```shell Shell theme={"system"}
✔ Protocol · ethereum
✔ Subgraph slug · friendtech-by-chainstack
✔ Directory to create the subgraph in · friendtech-by-chainstack
✔ Ethereum network · base
✔ Contract address · 0xCF205808Ed36593aa40a44F10c7f7C2F67d4A4d4
✔ Fetching ABI from Etherscan
```
Here we’ve chosen the protocol type, the subgraph name, the chain name, and the address of the related smart contract. The ABI has been automatically fetched from the [BaseScan](https://basescan.org/address/0xCF205808Ed36593aa40a44F10c7f7C2F67d4A4d4).
After you get a message that the start block couldn’t be found on the block explorer you can write the block number which is before the first transaction of this application. We can find this transaction block following the link in the section **More info** in the BaseScan called `ContractCreator: 0xdd9176ea3e7559d6b68b537ef555d3e89403f742 at txn [0xa7eba644182d78c4568364](https://basescan.org/tx/0xa7eba644182d78c4568364e00b0320a9fde9c1fe779cdbec6941fb7443d14c01)`:
```shell Shell theme={"system"}
✖ Failed to fetch Start Block: Failed to fetch contract creation transaction
✔ Start Block · 2430439
```
Then choose the name of a smart contract (you can use any) and approve automatic code generation for the events indexing.:
```shell Shell theme={"system"}
✔ Contract Name · FriendtechSharesV1
✔ Index contract events as entities (Y/n) · true
```
In the end you need to refuse adding more contracts:
```Json JSON theme={"system"}
Generate subgraph
Write subgraph to directory
✔ Create subgraph scaffold
✔ Initialize networks config
✔ Initialize subgraph repository
✔ Install dependencies with yarn
✔ Generate ABI and schema types with yarn codegen
Add another contract? (y/n):
```
## Launching the subgraph
Let’s check what we have generated in the `friendtech-by-chainstack` directory. Specifically, we're going to focus on the following files:
* `subgraph.yaml`
* `schema.graphql`
* `src/friendtech-shares-v-1.ts`
In the `subgraph.yaml` file, you can find the following code:
```yaml subgraph.yaml theme={"system"}
specVersion: 0.0.5
schema:
file: ./schema.graphql
dataSources:
- kind: ethereum
name: FriendtechSharesV1
network: base
source:
address: "0xCF205808Ed36593aa40a44F10c7f7C2F67d4A4d4"
abi: FriendtechSharesV1
startBlock: 2430439
mapping:
kind: ethereum/events
apiVersion: 0.0.7
language: wasm/assemblyscript
entities:
- OwnershipTransferred
- Trade
abis:
- name: FriendtechSharesV1
file: ./abis/FriendtechSharesV1.json
eventHandlers:
- event: OwnershipTransferred(indexed address,indexed address)
handler: handleOwnershipTransferred
- event: Trade(address,address,bool,uint256,uint256,uint256,uint256,uint256)
handler: handleTrade
file: ./src/friendtech-shares-v-1.ts
```
You can see that all the parameters that we put in the command line have been used here. But along with them, there are `entities` that will be created in the database to store the smart contract events data and `eventHandlers` that also can be used in the subgraph code and the paths to the other source code files.
If we open the file called `schema.graphql `, we see the actual structure of the tables with data:
```graphql schema.graphql theme={"system"}
type OwnershipTransferred @entity(immutable: true) {
id: Bytes!
previousOwner: Bytes! # address
newOwner: Bytes! # address
blockNumber: BigInt!
blockTimestamp: BigInt!
transactionHash: Bytes!
}
type Trade @entity(immutable: true) {
id: Bytes!
trader: Bytes! # address
subject: Bytes! # address
isBuy: Boolean! # bool
shareAmount: BigInt! # uint256
ethAmount: BigInt! # uint256
protocolEthAmount: BigInt! # uint256
subjectEthAmount: BigInt! # uint256
supply: BigInt! # uint256
blockNumber: BigInt!
blockTimestamp: BigInt!
transactionHash: Bytes!
}
```
And the `Trade` table is what we need. It contains the following entries:
* `trader` — the address of the trader
* `subject` — the address of the influencer
* `isBuy` — the direction of sale
* `shareAmount` — the number of shares in the trade
* `ethAmount` — the price of the share in the deal
* `subjectEthAmount` — the fee that is received by the influencer
* `protocolEthAmount` field is the fee that is received by the protocol
* `supply` — the current total number of issued tokens
* `blockNumber`, `blockTimestamp`, and `transactionHash` are the block data that is not related to the protocol but useful for data analysis
The last file with the source code is `src/friendtech-shares-v-1.ts` which contains the straightforward AssemblyScript code transferring the smart contract events data into the tables with the described structure.
```typescript friendtech-shares-v-1.ts theme={"system"}
import {
OwnershipTransferred as OwnershipTransferredEvent,
Trade as TradeEvent
} from "../generated/FriendtechSharesV1/FriendtechSharesV1"
import { OwnershipTransferred, Trade } from "../generated/schema"
export function handleOwnershipTransferred(
event: OwnershipTransferredEvent
): void {
let entity = new OwnershipTransferred(
event.transaction.hash.concatI32(event.logIndex.toI32())
)
entity.previousOwner = event.params.previousOwner
entity.newOwner = event.params.newOwner
entity.blockNumber = event.block.number
entity.blockTimestamp = event.block.timestamp
entity.transactionHash = event.transaction.hash
entity.save()
}
export function handleTrade(event: TradeEvent): void {
let entity = new Trade(
event.transaction.hash.concatI32(event.logIndex.toI32())
)
entity.trader = event.params.trader
entity.subject = event.params.subject
entity.isBuy = event.params.isBuy
entity.shareAmount = event.params.shareAmount
entity.ethAmount = event.params.ethAmount
entity.protocolEthAmount = event.params.protocolEthAmount
entity.subjectEthAmount = event.params.subjectEthAmount
entity.supply = event.params.supply
entity.blockNumber = event.block.number
entity.blockTimestamp = event.block.timestamp
entity.transactionHash = event.transaction.hash
entity.save()
}
```
Again, the `handleTrade` function is what we are interested in. We see that each event emitting leads to the new entity created with the fields that exactly correspond to the table structure without any changes. But if you need any additional operations you can add them in the function.
Finally, to start using the subgraph, run the command:
```shell Shell theme={"system"}
graph codegen && graph build
```
Then generate the binaries and deploy the subgraph into the hosting using the command from the UI (the detailed process is described [here](/docs/deploy-a-subgraph#deploy-a-subgraph)):
```shell Shell theme={"system"}
graph deploy --node https://api.graph-eu.p2pify.com/3c6e0b8a9c15214b8258b9a98ca1531d/deploy --ipfs https://api.graph-eu.p2pify.com/3c6e0b8a9c15524b8238b9a98ca1531d/ipfs friendtech-by-chainstack
```
After successful deployment, you can run queries via the UI interface (the link can be [found](/docs/#query-a-subgraph) in the platform UI) and get, for example, all deals with your account:
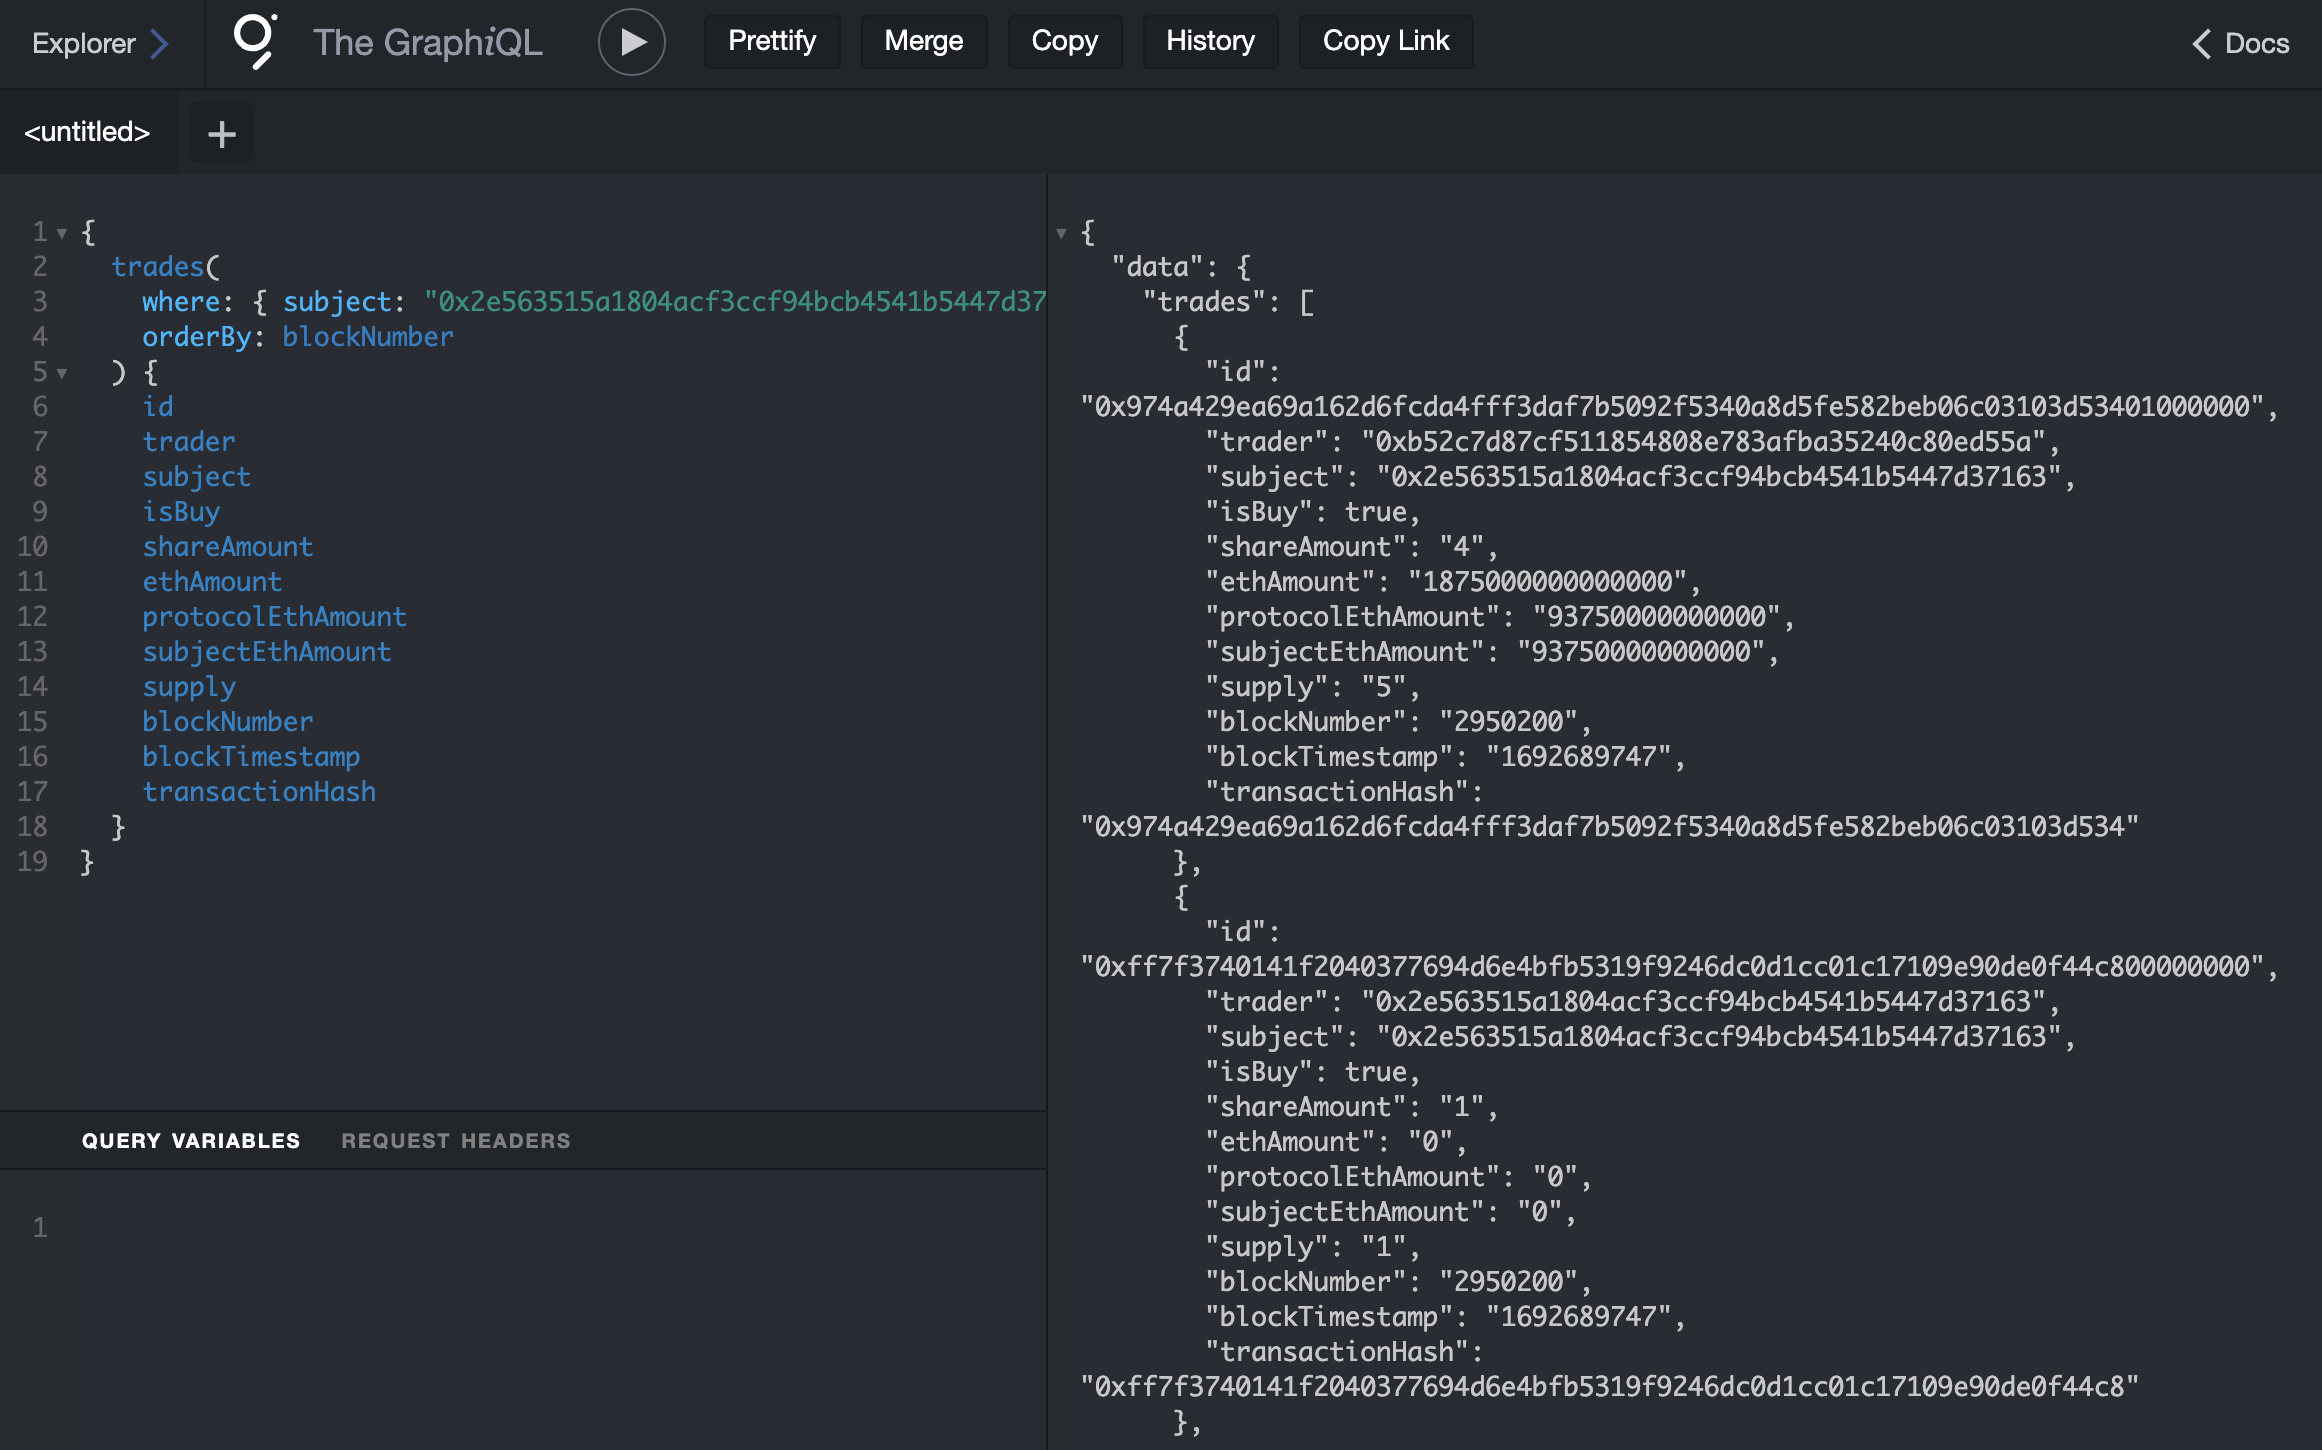 And that is how you use subgraphs to index all the share trades of friend.tech platform.
## Conclusion
Chainstack Subgraphs is a powerful tool that allows Web3 developers to index and query data from decentralized networks like Ethereum. They allow developers to easily access and use the data stored on these networks in their decentralized applications without building and maintaining their own infrastructure for data indexing and querying. This can save developers significant time and resources and make BUIDL-efficient DApps easier.
The aim of this article was to showcase the scale of these subgraphs by using them to easily fetch, process, and organize data that is as scattered as social DApp trades.
### See also
### About the author
And that is how you use subgraphs to index all the share trades of friend.tech platform.
## Conclusion
Chainstack Subgraphs is a powerful tool that allows Web3 developers to index and query data from decentralized networks like Ethereum. They allow developers to easily access and use the data stored on these networks in their decentralized applications without building and maintaining their own infrastructure for data indexing and querying. This can save developers significant time and resources and make BUIDL-efficient DApps easier.
The aim of this article was to showcase the scale of these subgraphs by using them to easily fetch, process, and organize data that is as scattered as social DApp trades.
### See also
### About the author
 Product Lead @ Chainstack
BUIDLs on Ethereum and Graph protocol
Majored in Data Science and Product Management