A beginner’s guide to getting started with The Graph
TLDR:
- The Graph is used to index and query blockchain data with a custom GraphQL API, making retrieval of on-chain data more efficient.
- In this tutorial, we create a subgraph for the Bored Ape NFT contract and fetch IPFS-based metadata alongside ownership data.
- We define schema entities (e.g.
Transfer,BoredApe,Property), map them via AssemblyScript to on-chain events, and handle mint or transfer events to store relevant NFT and metadata details. - Deploying the subgraph (e.g. on Chainstack Subgraphs) gives a powerful, real-time GraphQL endpoint for querying historical NFT data, including IPFS metadata.
Introduction
The Graph is an indexing protocol that allows developers to build GraphQL APIs to store and query data from the blockchain. In this tutorial, we will create a subgraph to index data from the popular Bored Apes NFT smart contract. We will also learn how to read IPFS metadata for a given smart contract, and index it alongside the rest of the data.
By the end of this guide, you will have become familiar with The Graph protocol and will have a working API you can use to query data from the blockchain without having to query all the blocks to find the relevant transactions.
What is The Graph
To understand the significance of The Graph protocol, you first need to understand why a blockchain indexing protocol is even needed.
Indexing blockchain data
Indexing refers to the process of reducing the time and resources required to look up data by preemptively iterating through the data and organizing it in a database.
The way blockchains store data makes it difficult to query it in ways that DApp developers need.
Tools like The Graph and Etherscan search through blockchain data and index it in their own database in such a way that querying it becomes less expensive moving on.
The Graph network
Blockchain developers clearly needed a way to index blockchain data so that it is readily available for use. A highly used DApp might require thousands of concurrent data lookups, which cannot be practically performed through a blockchain node.
As stated before, The Graph is an indexing tool that allows us to develop our own GraphQL APIs to store and index blockchain data according to our needs.
As of now, you have three options when it comes to deploying a subgraph:
- The Graph’s hosted service. The hosted service is The Graph protocol’s centralized solution for hosting subgraphs. Hosted service supports a multitude of different blockchains. However, The Graph will disable this service entirely in the future.
- Subgraph Studio. The Graph allows you to publish subgraphs on the decentralized graph network. This network however only supports the Ethereum Mainnet for now. Furthermore, to publish and maintain your subgraphs on the studio, you need to be well-versed in the tokenomics of the Graph network, which is split into many different roles like indexers, delegators, and curators. You can read about these roles in more detail on The Graph’s docs.
- Chainstack Subgraphs. Chainstack Subgraphs is a super-fast, production-level solution to deploy your subgraphs that you can use without having to go through the hassle of staking, delegating, and/or incentivizing the indexing of your subgraph. With Chainstack, you can be assured of fast indexing and consistent availability of data.
Setting up a subgraph project on your machine
Installing the Graph CLI
We first need to install the Graph CLI on our machine. We can do that using npm or yarn.
To install using npm:
Either one of these commands will install the Graph CLI globally into your system. This means you can access the CLI from a terminal in any directory.
To check if the CLI was installed correctly, run this command in your terminal:
This command will output the current version of the Graph CLI installed in your system.
This guide has been made using Linux and has also been tested on macOS. We use npm to install and manage dependencies in this guide, but Yarn should work just as well.
Creating a subgraph project
As discussed before, we will be creating a subgraph to index the Bored Ape NFT project.
Create a new directory and open it up in a new terminal. You can initialize a new subgraph project using:
This command will open up an interactive UI in your terminal. Create a new subgraph project with the following parameters:
After this, the Graph CLI will install all the dependencies of your project using either npm or yarn, depending on what is installed in your system.
A single subgraph can be used to index data from multiple smart contracts. After the Graph CLI is done installing all the dependencies for the BAYC smart contract, it will ask you if you want to add another smart contract within the same project.
Select No to exit the UI.
Let us go over what we do here:
- We initialize a new subgraph project using
graph init, but to do that we need to pass it a bunch of parameters. - The network and the contract address are the two main configurations to take note of. The Graph protocol supports a number of different chains, but the Bored Ape smart contract is deployed on the Ethereum Mainnet. Hence, we choose ‘mainnet’ as our network.
- We need to pass the correct address to the CLI, since that is what is used to fetch the latest ABI for the smart contract we want to index.
- When we choose to index the contract events as entities, The Graph automatically tries to generate some helper code for us. We will go into more detail on this below.
Understanding the project layout
If you followed the instructions above, you will see a new subgraph project inside a subdirectory. Run cd ChainstackSubgraph to move the terminal into the subdirectory.
Let us go over the main files in a subgraph project:
-
The manifest file. The
subgraph.yamlat the root defines all the major parameters of a subgraph project. It contains a list of all the smart contracts being indexed, as well as a list of entities and their corresponding handler functions. We will be adding more properties likestartBlockanddescriptionto the YAML file in the tutorial. You can read about all the specifications in detail in the Graph docs, though that is not necessary to go through this tutorial. -
The schema file. At its core, a subgraph is a GraphQL API that indexes data from the blockchain. It is important to understand the difference between a REST API and a GraphQL API. You can watch this video for a brief explanation.
The
schema.graphqlfile at the root of our project contains all our entities. These entities define what data our subgraph indexes.Here is what an entity could look like:
-
The mappings file. A mappings file contains functions that take the data from a blockchain, and convert it into manageable data along the lines of our GraphQL entities. It is written in AssemblyScript, which is a TypeScript-like language with a stricter syntax.
This file contains the logic that dictates how data should be retrieved and stored when someone interacts with the smart contracts we intend to index.
The Graph CLI creates a mapping file by default inside the
srcfolder. If you followed the instructions above, you should see a file namedbayc.tsinside thesrcfolder.
We will be working with these three files in this guide, so it is important to understand their significance.
Indexing data from events in subgraphs
Solidity allows us to “log” data to the blockchain with the help of events. Events log data in a transaction log is a special data structure within the EVM. These logs are not accessible to smart contracts on the blockchain themselves but can be accessed from the outside through an RPC client.
Many protocols like Chainlink and The Graph use this logging facility to power their services. Emitting events is much more efficient than saving data to state variables, with the tradeoff being that these logs are not accessible from within a smart contract.
Whenever a transaction triggers an event, the emitted data is stored in the transaction’s logs. You can read more about events in the Solidity docs.
The Graph protocol allows us to define three types of handler functions on the EVM chains: event handlers, call handlers, and block handlers.
- Event handlers run whenever a specific event is triggered.
- Call handlers run when a specific function is called by an account other than the contract itself.
- Block handlers run every time a new block is added to the chain, although it is possible to define filters such that the handler function runs only if the new block fulfills certain criteria.
Not all EVM chains support call or block handlers. Not only are event handlers supported on all EVM chains, but they are also much faster in retrieving data. Hence, subgraph developers should try to use event handlers as much as possible.
Configuring subgraph.yaml
When creating a subgraph, the first step should always be to define the data sources we want to read from, and the entities we want to index our data in. We do this in a YAML file at the root of our project, which is often referred to as the subgraph manifest.
The Graph CLI generates a boilerplate YAML file whenever we use it to initialize a subgraph project. Let us configure it to our requirements.
Entities and event handlers
Delete everything inside the subgraph.yaml file and paste the following:
Let us go over some important points here:
- We need to define event-handler pairs inside the
eventHandlersobject. In practice, what this means is that a function namedhandleTransferwill run every time an event namedTransferis triggered from the smart contract we are indexing. We are indexing the Bored Apes smart contract, and the transfer event is emitted every time a Bored Ape NFT is transferred from one address to another. You can check out the code on Etherscan. - Recent versions of The Graph API require us to declare some features under the
featuresobject. Since we will be using The Graph’s IPFS API, we need to declare it as such within the features object. - We will be defining three entities inside our schema file, and they too must be declared inside the subgraph manifest, within the entities object.
Start block
Ethereum is adding new blocks to the chain as we speak. While each individual block is negligible in size, taken together the total size of the chain is huge. We can configure an optional setting in the YAML file called startBlock, that will allow us to define the block number from which we want our subgraph to start indexing data. This could potentially save us from having to index millions of blocks, so it makes sense to configure this. We can define the start block as the block in which our smart contract was created since any block before that is irrelevant to us.
To find the start block for the BAYC smart contract:
- Go to the smart contract address on Etherscan.
- Above the table, click the filter icon > View Contract Creation.
Etherscan will show you the Txn hash of the contract creation alongside the block number. Copy the block number and add it to the YAML file. We have already done this.
Recently graph-cli added a feature where The Graph fetches the start block for smart contracts by default during project initialization. You can use the default value, but it is always better to know how to fetch the start block yourselves.
Defining schemas
As we discussed before, we define our subgraph’s schema in the schema.graphql file.
A subgraph schema is a collection of entities. An entity defines the kind of data we want to store and also the structure of the request query when we query data from our subgraph.
Check out Explaining subgraph schemasif you want to get some fundamentals to follow this section.
Think of an entity as an object that contains a bunch of data of different types, kind of like a JavaScript object. We should define our entities around the kind of queries we want to make in the future. This is what an entity in our subgraph will look like:
A few things to note here. Each entity must have the @entity directive. Also, each entity must have an ID field, which must have a unique value for all entities of the same type. We will look more into this while defining our mapping functions.
As you can see, each object in an entity has a scalar type (akin to data types) specified. The Graph protocol supports the following scalar types in its API:
| Type | Description |
|---|---|
Bytes | Byte array, represented as a hexadecimal string. Commonly used for Ethereum hashes and addresses. |
String | Scalar for string values. Null characters are not supported and are automatically removed. |
Boolean | Scalar for boolean values. |
Int | The GraphQL spec defines Int to have a size of 32 bytes. |
BigInt | Large integers. Used for Ethereum’s uint32, int64, uint64, …, uint256 types. Note: Everything below uint32, such as int32, uint24, or int8 is represented as i32. |
BigDecimal | BigDecimal High precision decimals represented as a significand and an exponent. The exponent range is from −6143 to +6144. Rounded to 34 significant digits. |
You can find the detailed reference to the GraphQL API here.
For now, go to the schema.graphql file in your subgraph project, and delete everything.
We will define three entities for our subgraph. Paste the following code into the schema file:
To understand the previous code snippet, let us look a little bit more into the Bored Apes smart contract. The Transfer event in the Bored Apes smart contract looks like this:
- This event is emitted whenever an NFT is transferred from one address to another. It logs the previous owner, the new owner, and the token ID of the NFT that was just transferred. We want the
Transferentity to store all of this data whenever theTransferevent is triggered so that we have a complete history of ownership for all the Bored Ape NFTs. - Note that all
Transferevents will have a unique transaction hash. Also, theidfield needs to be unique for all instances of theTransferentity. Thus, we can use the transaction hash of every transfer event to generate a unique ID every time. - Also, since all instances of the
Transferentity will have unique IDs, we will never need to overwrite an existing instance of theTransferentity. Thus, we should mark the entity as immutable. Entities marked immutable are faster to query, and should be marked as such unless we expect our entities to be overwritten with new values.
Let us define another entity inside our schema file. Paste the following code right below the previous entity:
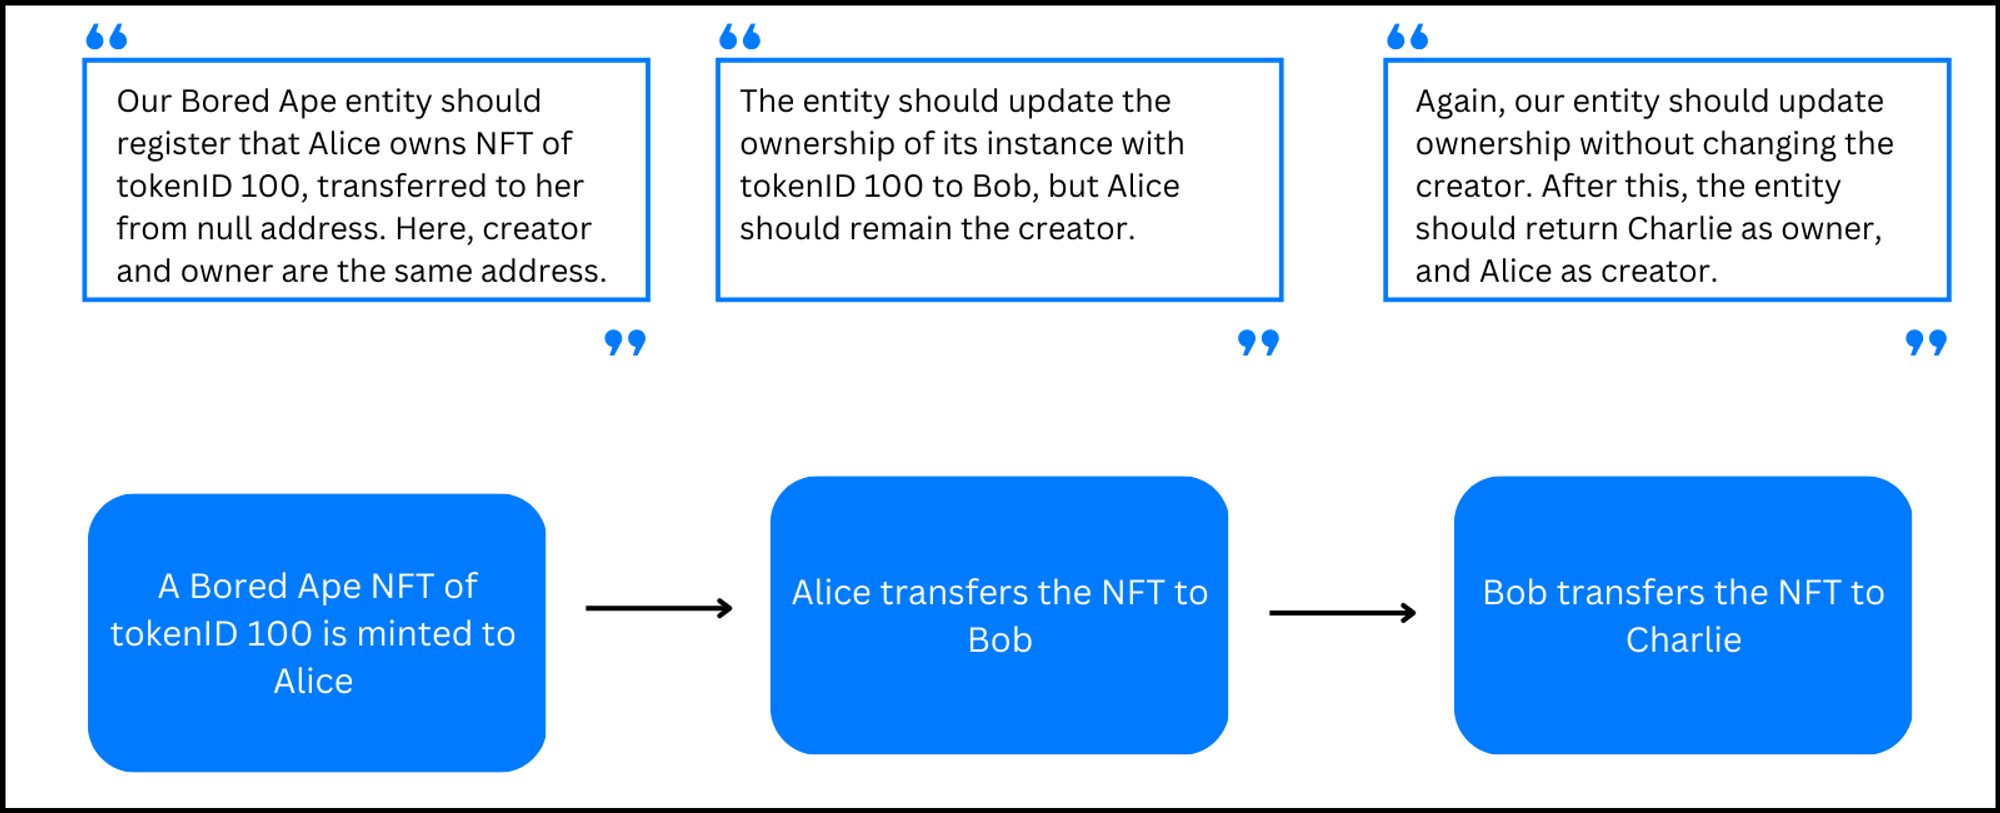
- We want this entity to store some data about all the Bored Ape NFTs. We want to be able to query the creator, current owner, and
tokenURIof an NFT from itstokenID, along with the block in which it last changed ownership. - Each instance of the
BoredApeentity will be distinguished by thetokenID, which we will use as the ID for the entity. Since an NFT can be transferred multiple times, the entity will have to be mutable to reflect this fact. - But the
Transferevent is emitted only when an ape is transferred from one address to another. How will we find out the creator of an NFT with its help?
Above mentioned is a good question, and this is a good point to mention that it is important to understand the structure of the smart contract you are creating a subgraph for. This is what the mint function in the BAYC smart contract looks like:
Note that the mint function emits the Transfer event such that minting an ape to Alice is like transferring an ape from the null address to Alice. How cool is that! This means that all the instances of our Transfer entity where the value of from is the null address are actually a recording of the minting of a new NFT:
Again, feel free to check out the BAYC smart contract code here. It is always helpful to understand the very data source you are trying to index.
Lastly, we want to define an entity to store all of the IPFS metadata that exists for a given ape. Add the Property entity right below the previous one:
- The image object is an IPFS address that leads directly to the bored ape image.
- The attributes array is a list of properties, up to 7 properties in length. Check what a random ape with token ID 1065 looks like on Opensea.
- We want our
Propertyentity to store valid values for all the attributes that actually have a value. We want it to storenullfor all the others. - You might notice that, unlike the first two entities, most fields of the
Propertyentity are not suffixed with an exclamation mark (!). This is because fields marked with an!must have a valid value. They cannot benull. We, however, expect many of our NFTs to have multiple attributes with the valuenull. Moreover, sometimes an IPFS node is not available, and we might thus not receive a response at all. Thus, we must ensure that all fields that store our metadata can storenullas a valid value.
And that’s it for the schema file. We are defining only these three entities. The final version of your schema file should look something like this:
It’s okay if you don’t entirely understand how the schemas work. It will become more clear when you go through the mappings section. Feel free to take a look at the GraphQL docs if you need a primer on the GraphQL type system.
Mapping functions to schemas
Make sure to save all your changes in the schema and YAML files.
Now run this command in your terminal:
- You must run this command every time after editing the schema or YAML file.
- The Graph will look into our entities and the events we want to index. Using the files and the ABI file, it will generate some classes for the entities and events in our subgraph in the
generateddirectory. You should not change any files inside thegenerateddirectory, unless you know exactly what you are doing.
Go to src/bayc.ts and delete everything inside it. Paste the following code at the top of the file to import all the AssemblyScript types we need from the generated folder:
Let us understand this in a little more detail:
- The
generateddirectory has two files,schema.tsandBAYC.ts schema.tscontains AssemblyScript types generated from our schema file. We import AssemblyScript classes for our entities directly from this file.BAYC.tscontains AssemblyScript types generated from our contract ABI. TheTransferEventclass allows us to work with theTransferevent from the smart contract, while theBAYCclass is an abstraction of the smart contract itself. We can use this latter class to read data and call functions from the smart contract.
Create a new function named handleTransfer as follows:
- For each event handler that is defined in
subgraph.yaml, we need to create an exported function of the same name in our mapping file. Each event handler should accept a parameter calledeventwith a type corresponding to the name of the event which is being handled. In our case, we are handling theTransferevent. - This function will trigger every time the
Transferevent is emitted. - The mapping function contains the logic that powers our API. This is where we manipulate blockchain data to index it according to our requirements.
Let us define the logic to handle our Transfer entity every time this function runs. Paste the following code inside the function:
- First, we create a new instance of the
Transferentity. We ensure that each instance of theTransferentity has a unique ID by concatenating the transaction hash with the log index of the event. This is what will be returned as theidwhen we query theTransferentity. - The next three fields are available directly from the parameters of the
Transferevent. event.blockandevent.transactionare part of the Ethereum API of the graph-ts library. You can refer to this page for a complete reference. We can leverage this library to get back all sorts of data.- The store API, again part of the graph-ts library, gives us access to the
save()method. Using this method, we can save new instances of theTransferentity to our database.
Next, paste this code right below the previous snippet:
- The
bindmethod allows us to access the address of the smart contract that emitted the event, which in our case is the address of the BAYC smart contract. This will come in handy later on. - Recall that we use the token ID of an NFT as a unique identifier for every instance of the
BoredApeentity. Let us say our subgraph comes across aTransferevent for a particular token ID. We can then use the load method to check if any instance of theBoredApeentity exists with that particular ID. - If no instance with that ID exists, we create a new one. If we are encountering that token ID for the first time, then it means it has just been minted. We populate the creator field, and we get the token URI of the particular NFT by using the
contractAddressobject. - Now every time that NFT is transferred, we will simply update the
ownerfield and theblockNumberfield. We don’t have to change the other fields because they will remain constant. After that, we save the entity to our database.
Lastly, paste the following code into the mappings file:
Ok, this is a lot. Let me take you through this step-by-step:
- You can get the main IPFS hash that stores all the metadata by calling the
baseURIfunction on the bored apes smart contract. - We only need to index all the IPFS metadata for a particular entity once. The
handleTransferfunction however will run every time the transfer event is emitted. Thus, we run the entire metadata indexing procedure only if that particular instance of thePropertyentity doesn’t exist. - The
.cat()method can be used to retrieve the entire metadata of an NFT by passing the complete IPFS hash path to it. Please note that you need to perform a null check at every step while querying IPFS data. - We use The Graph’s JSON API to convert the retrieved data to a parable JSON object. We retrieve the image link and store it to the
Propertyentity directly after converting it to a string. - Lastly, we iterate through the entire
attributesarray to store those values to the respective fields. The attributes that don’t return a value will be markednull, since that is the default value. - After everything is queried and indexed, we update our subgraph’s store again by calling the
.save()method.
And that’s it. We are done with our mappings file. This is how the file should look right now:
Now save the file and run the following command in your terminal:
This command will compile your subgraph code to WebAssembly, thus making it ready to be deployed.
Deploying the subgraph
Make sure you have run graph codegen and graph build before deploying your subgraph.
To deploy a subgraph to Chainstack:
- Go to Chainstack and create a subgraph under your project.
- Open your subgraph details in the console and scroll down till you see the subgraph deployment command.
- Copy the command and run it in your terminal.
Your subgraph has now been deployed to Chainstack Subgraphs. Give your subgraph a few minutes to sync. You can then use the Query URL or the GraphQL UI URL to interact with your subgraph. Your Chainstack Subgraphs console will have all the relevant usage data for your subgraph. You can also use the Logs functionality to debug your subgraph.
Take a look at Debugging subgraphs with a local Graph Node if you want to learn how to debug subgraphs.
Querying subgraphs
You can query a subgraph deployed on Chainstack in one of two ways. Use the Query URL to interact with your subgraph from within your terminal, or use the GraphQL UI URL to interact with the subgraph from within your browser.
Using the GraphQL UI URL
Go to your Chainstack console and open the GraphQL UI URL in a new tab. Run the following query to get back all the data fields from the Transfer entity:
Just like everything else, The Graph provides us with a detailed Query API. We will go through some of the features of the Query API.
We can sort our queries using the orderBy attribute to sort the returned data with respect to a particular data field. If we modify the previous query like this:
We get the requested data fields from all instances of the Transfer entity sorted according to the token ID.
What if we want to get the transaction hashes of all transactions when a Bored Ape NFT was minted? How do we do that?
Recall that any instance of the Transfer entity that has the null address as its from value represents an NFT being minted. Modify the previous query to look like this:
With what we have learned about querying, let us write a query that does the following:
- Fetches the complete transfer history of the NFT with token ID 1065.
- Fetches the data and metadata for that NFT.
This is what the query will look like:
A complete reference to the Query API is available here.
Fetching subgraph data using JS will show you how you can use JavaScript to fetch data coming from subgraphs.
Using the query URL
You need the curl CLI installed in your system to use the Query URL from within your terminal. Run the following command in your terminal:
This should return the current version of the curl CLI installed in your system. Check out this link if you need to install curl.
To use the Query URL, open your terminal and run this curl command:
You can run any query through the terminal using this format.
Conclusion
Congratulations on making it this far!
You just learned a ton about The Graph protocol, and you also deployed your very own subgraph with the Chainstack Subgraphs service.
This is already incredibly powerful. We can use this subgraph to query all sorts of historical data for the Bored Apes smart contract, including all the IPFS metadata.
