Sending Trader node transaction with web3.js, ethers.js, web3.py, and ethClient.go
EVM transactions
This guide focuses on the EVM Trader nodes: Ethereum, BNB Smart Chain, Polygon.
Introduction
A Trader node (ex Warp) transaction is an integration of Chainstack and the high-speed bloXroute network. Trader node transactions are designed to reduce transaction times and ensure efficient delivery to their destination.
Simply put, when a transaction is sent through a Trader node endpoint, it is placed on an "expressway" for blockchain transaction propagation. This means that compared to sending transactions through a standard EVM node, a Warp transaction can reach validators much more quickly, significantly reducing transaction finalization time.
This article describes how to implement Trader node transactions with Chainstack and popular Web3 libraries.
What is a Trader node transaction, and what is bloXroute?
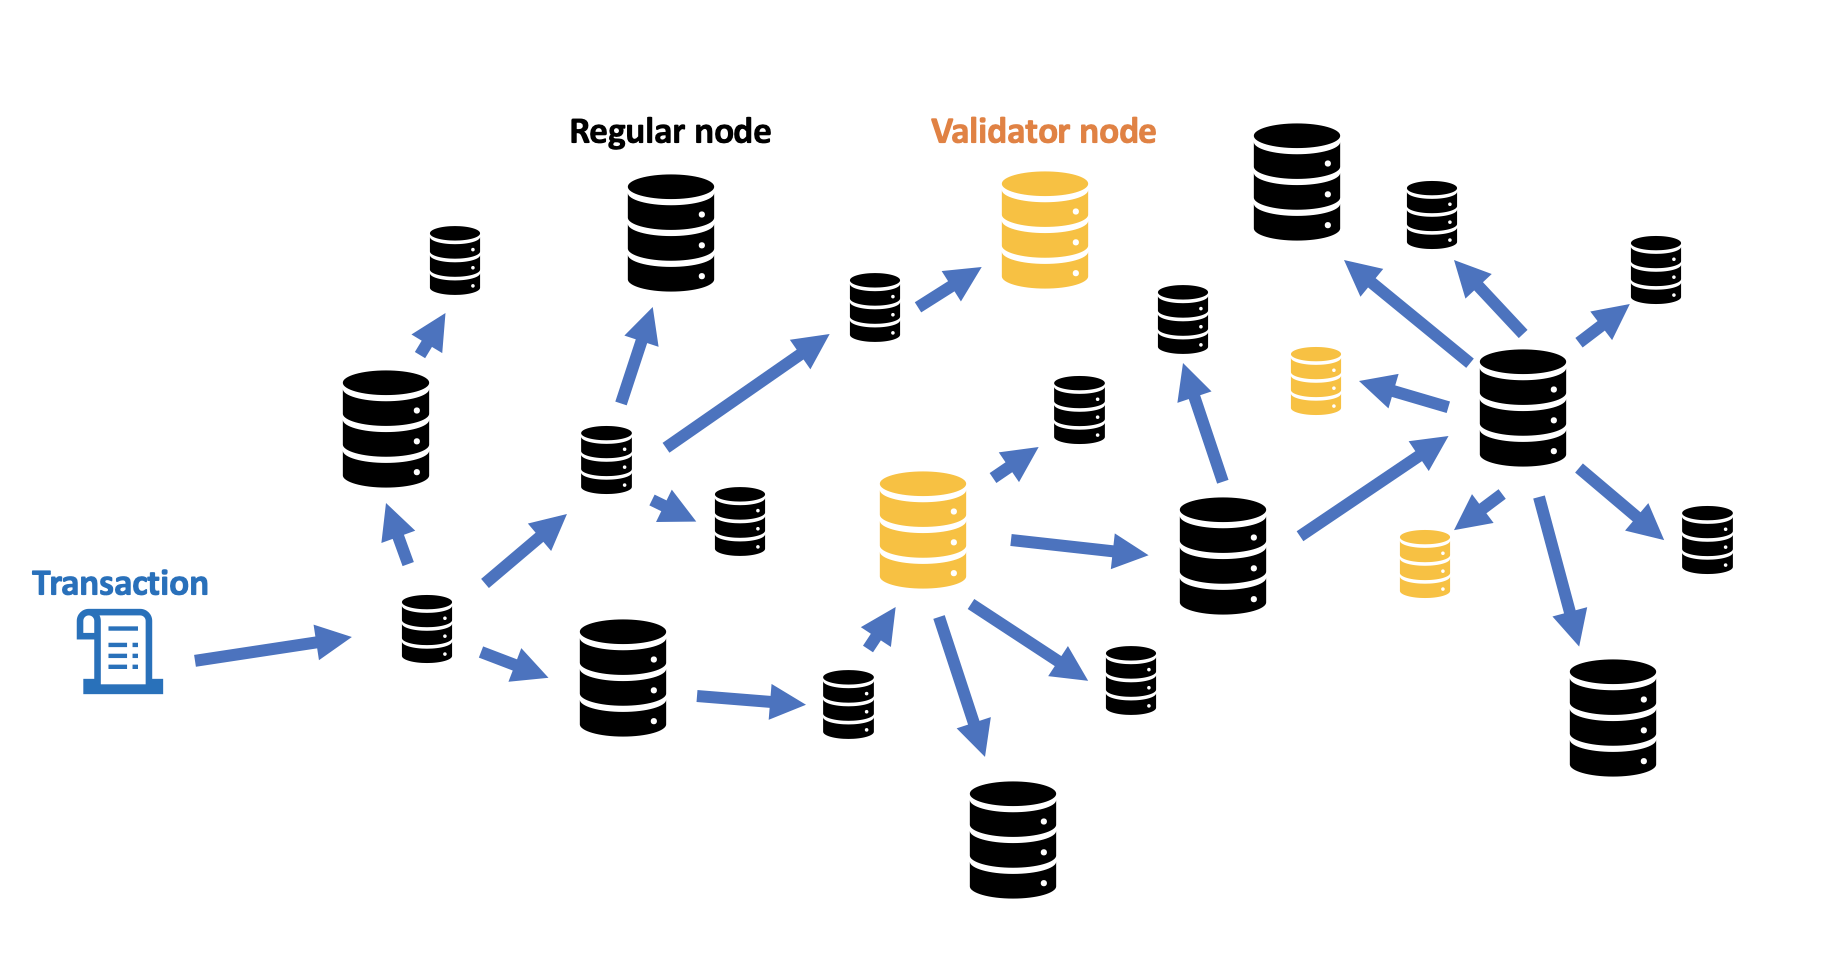
When a transaction is sent to a normal EVM node, it is propagated to all nodes within the blockchain network. It moves from node to node until a validator validates it or eventually reaches all nodes. Depending on network conditions, this process usually takes a few hundred milliseconds to a few seconds.
Check out how to test transaction propagation by reading Monitoring transaction propagation from node to mempool in EVM networks with Python.
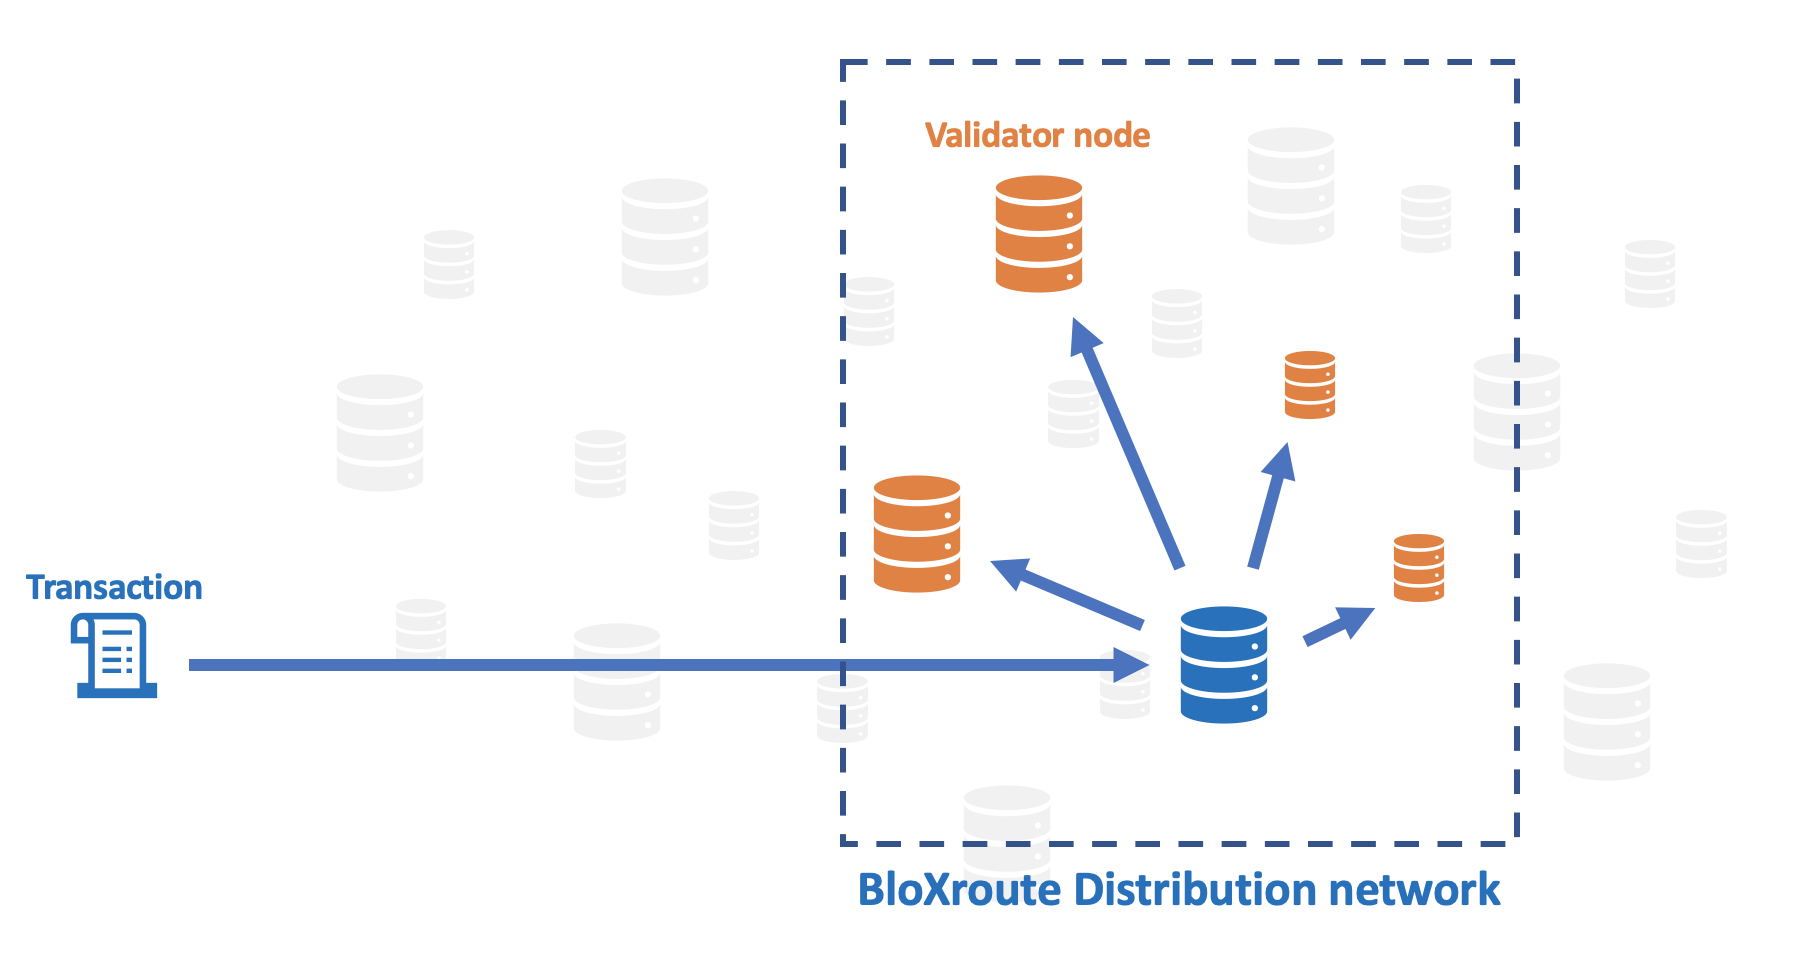
A bloXroute distribution network (BDN), which can be found in more detail in the BDN Architecture, is a special network with a direct connection to a set of validators. The core of the BDN is a high-capacity, low-latency global network of servers optimized to propagate transactions and blocks quickly. In general, a transaction sent to the BDN will be delivered to a validator in an expedited manner.
According to their website, bloXroute's BDN provides several benefits, including:
- Faster transaction propagation: bloXroute's BDN can propagate transactions up to 400-1,000 ms faster than the traditional peer-to-peer (P2P) network. This can be a significant advantage for applications that require real-time transaction processing, such as trading and DeFi.
- Improved network stability: bloXroute's BDN is more stable than the P2P network. This is because the servers are connected using a dedicated network, reducing the risk of congestion and packet loss.
- Increased scalability: bloXroute's BDN is designed to scale to meet the needs of future blockchain applications. The network is dynamic and can be easily scaled up or down as needed.
What about Trader nodes?
A Trader node is a hybrid of a normal EVM node and a BDN, combining the best of both worlds. In most circumstances, it behaves just like a normal EVM node. However, when it receives a transaction from the user, it immediately forwards the transaction to the closest bloXroute cloud API, which serves as the gateway to the BDN. The transaction does not follow the normal propagation process.
There are a few benefits of using Trader nodes:
- Users can use a Trader node to avoid the need for separate signup for the bloXroute service. This is particularly convenient for users who send a low number of transactions each month.
- bloXroute uses a special set of APIs for authentication and sending transactions, which may not be compatible with the customer's existing implementation. In contrast, a Chainstack Trader node leverages the standard Ethereum JSON-RPC API, making it compatible with most mainstream tools and libraries, such as Metamask, web3.py, and web3.js.
- When monitoring transactions within a network, using a Trader node may be a better option since it is directly connected to other peers in the network.
Chainstack users on a paid plan are allocated a certain number of Trader transactions per month. The number depends on the plan:
Plan | Monthly allocated Trader node transactions |
---|---|
Growth | 25 |
Business | 250 |
Enterprise | 500 |
Each additional Trader node transaction is billed separately if you exceed your monthly allocation. At the time of writing, the cost is $0.15 per transaction.
How to access a Trader node on Chainstack
The Trader node transactions feature is available starting from the Growth plan for the following protocols:
- Ethereum
- Solana
- BNB Smart Chain
- Polygon
To deploy a Trader node, in the wizard, do the following:
- Select one of the protocols mentioned above.
- Under Configuration, select Advanced.
- Select Trader node.
The Trader node will be deployed.
This is the gateway to your application.
How to execute a Trader node transaction
A Trader transaction is a type of transaction that is dispatched to your node using the eth_sendRawTransaction RPC method. This method is a standard Ethereum procedure for transmitting transactions.
In this section, we will dive deeper into the process of sending Trader node transactions using some of the most widely used Web3 libraries. We will provide examples for web3.js, ethers.js, web3.py, and ethClient.go.
Executing a Trader node transaction with web3.js
web3.js is a library that allows you to interact with a local or remote Ethereum node using HTTP, IPC, or WebSocket. Here's how you can send a Trader node transaction using web3.js:
const Web3 = require("web3");
var url = "YOUR_CHAINSTACK_TRADER_NODE_ENDPOINT"
var publicKey = "YOUR_ADDRESS"
var privateKey = "YOUR_PRIVATE_KEY"
const web3 = new Web3(url);
const transaction = {
from: publicKey,
to: publicKey,
value: 100,
gas: 30000,
gasPrice: 1000000000,
};
const signedTransaction = await web3.eth.accounts.signTransaction(transaction, privateKey);
const transactionHash = await web3.eth.sendSignedTransaction(signedTransaction.rawTransaction);
const transactionReceipt = await web3.eth.getTransactionReceipt(transactionHash);
console.log(transactionReceipt);
Executing a Trader node transaction with ethers.js
ethers.js is a complete Ethereum library and wallet implementation prioritizing compactness and simplicity. Here's how you can send a Trader node transaction using ethers.js:
const { ethers } = require("ethers");
var url = "YOUR_CHAINSTACK_TRADER_NODE_ENDPOINT"
var publicKey = "YOUR_ADDRESS"
var privateKey = "YOUR_PRIVATE_KEY"
async function main() {
const provider = new ethers.JsonRpcProvider(url);
balance = await provider.getBalance(publicKey)
console.log("balance is " + balance)
var nonce = await provider.getTransactionCount(publicKey);
console.log("nonce is " + nonce)
var wallet = new ethers.Wallet(privateKey, provider)
var transaction = {
'to': publicKey,
'value': 100,
'maxGasFee': 6000000000000000
};
console.log("sending tx")
wallet.sendTransaction(transaction)
.then((txObj) => {
console.log('txHash', txObj.hash)
})
}
main();
Executing a Trader node transaction with web3.py
web3.py is a Python library for interacting with Ethereum. It's commonly used for scripting, back-end development, and server-side tasks. Here's how you can send a Trader node transaction using web3.py:
import web3
url = "YOUR_CHAINSTACK_TRADER_NODE_ENDPOINT"
publicKey = "YOUR_ADDRESS"
privateKey = "YOUR_PRIVATE_KEY"
w3 = web3.Web3(Web3.HTTPProvider(url))
transaction = {
"from": publicKey,
"to": publicKey,
"value": 100,
"gas": 300000,
"gasPrice": 1000000000,
}
signed_transaction = w3.eth.account.sign_transaction(transaction, privateKey)
transaction_hash = w3.eth.send_raw_transaction(signed_transaction.rawTransaction)
transaction_receipt = w3.eth.wait_for_transaction_receipt(transaction_hash)
print(transaction_receipt)
Executing a Trader node transaction with ethClient.go
ethClient.go is a Go-based Ethereum client that allows you to interact with the Ethereum blockchain. Here's how you can send a Trader node transaction using ethClient.go:
package main
import (
"fmt"
"math/big"
"github.com/ethereum/go-ethereum/ethclient"
)
func main() {
client, err := ethclient.Dial("YOUR_CHAINSTACK_TRADER_NODE_ENDPOINT")
if err != nil {
panic(err)
}
publicKey := ""
privateKey := ""
// Create the transaction
transaction := types.Transaction{
From: publicKey,
To: publicKey,
Value: big.NewInt(1000000000000), // in wei
Gas: 3000,
GasPrice: big.NewInt(1000000000), // in wei
}
signedTransaction, err := transaction.Sign(types.Secp256k1PrivateKey(crypto.FromECDSA(common.HexToECDSA(privateKey))))
if err != nil {
panic(err)
}
txHash, err := client.SendTransaction(signedTransaction)
if err != nil {
panic(err)
}
fmt.Println(txHash)
}
Conclusion
This article has provided an in-depth look at the integration between Chainstack and bloXroute, the mechanics of Trader node transactions, and how to execute Trader node transactions using the most popular Web3 libraries.
Feel free to ping me on Twitter or Telegram if you have any questions.
About the author
Updated 2 days ago